|
|
Post by metroland on Dec 17, 2010 15:43:09 GMT
…or hopefully not too many tears. You shouldn’t need much skill at all (I have very little) but you will need some patience as this method means you can only do a few inches at a time – but if you work on 2 or 3 different bits of track you can do 18-24” at a time. I anguished for a long time over how to get 4 rail track right, which is probably a common issue with 99.9pct of you reading this. The down sides: a/ 00-16.5 gauge is ‘wrong’ so it’s all compromise to some extent. b/ I was never happy with the Peco bit ands bobs. c/ I couldn’t get hold of the conductor rail ‘ramps’ by Scalefour Society(?) though these may now be available. d/ I was quite disappointed with some Southern electric layouts which were generally first rate, but spoilt by conductor rail ends which were simply bent at the ends to represent ramps. The up sides to my method: 1/ No special tools need. 2/ No previous skill needed – just patience. 3/I feel it looks right (well it satisfies me anyway). ‘If it looks right it is right’ given that I’m working with OO-16.5mm which is ‘wrong’ to start with. 4/ It’s technically very simple! Just take your time. My track is Peco Code 100 and had been laid and ballasted for some time, but not weathered. Like many of us, I kept putting off having a go at 4 rail, and when I did try on some sidings, it was frustrating, and didn’t look right. In theory, turning Code 100 rail upside down and using it for 3rd and 4th rails would be ‘scale’ (LT conductor rails are heavier than running rails) but it didn’t look right. When I look at real track, it always looks to me that the outside conductor rail is thinner than running rail due to the action of conductor shoes. Likewise the centre rail looks to be the same width as the running rails due to the ‘cleaning’. Obviously if you stare at one bit you can soon see the conductor rails are thicker. OK, so we’re back to trying to get OO to look right and I felt that by using Code 100 rail for the middle, and Code 60 (N gauge rail) for the outer conductor rail was reasonably convincing. I worked out a way of doing ‘ramps’ which was not perfect but gave me an easy way of doing them with very little grief. Basically you need to cut a notch out of the end of the rail (the rusty brown area in pic). Note that the lower cut needs to go from 2 o’clock to 8 o’clock if you’re right handed. 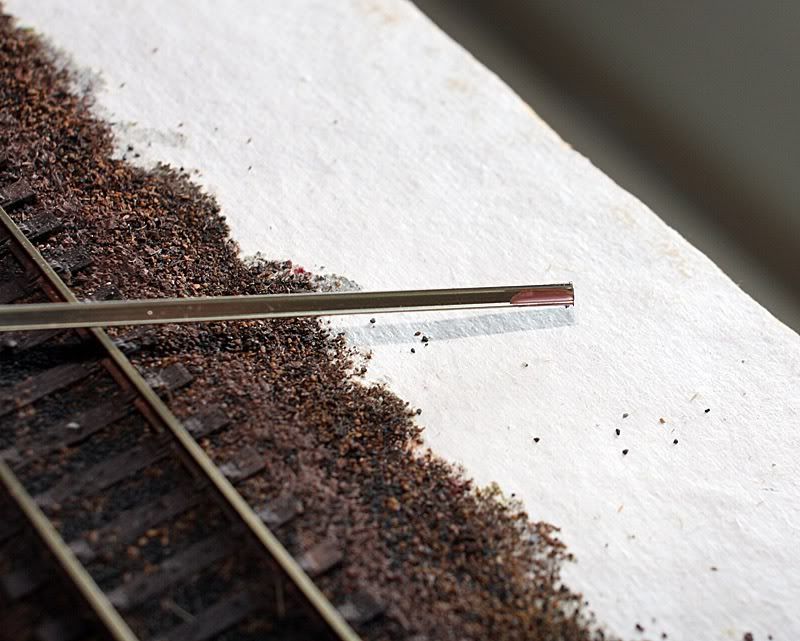 I haven’t included any dimensions for the cut as I vary these a little to suit the location. Once cut, the laws of physics mean the end will turn upwards. 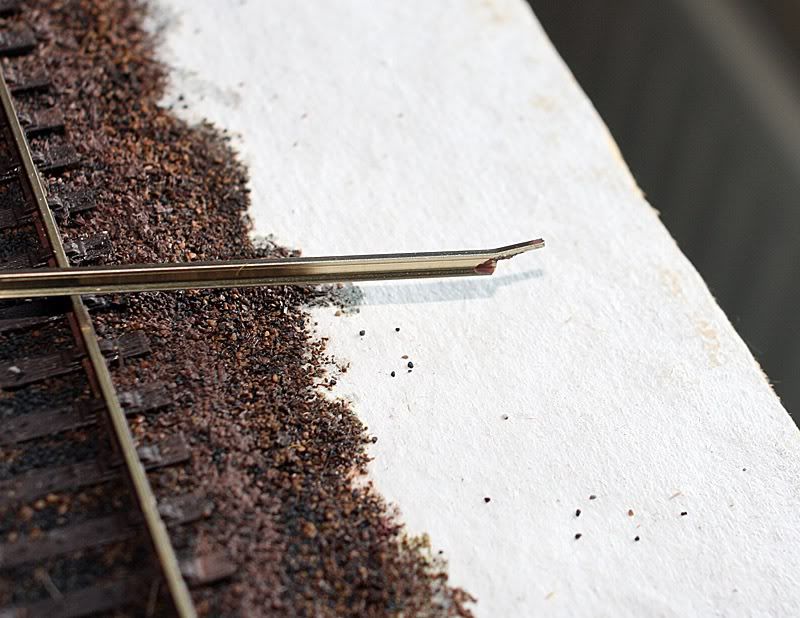 Simply use some pliers to turn it downwards. Note that I didn’t angle the cut properly in this case but you can always do it again or file it down. 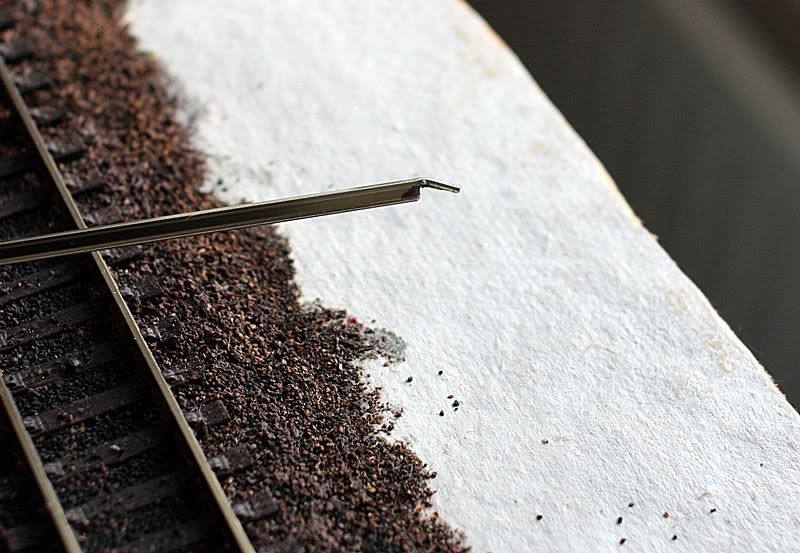 It seems to me that Southern modellers go to a lot of effort over the insulating pots, but with all the static electricity and general track gunge most of the white pots disappear quite quickly, so all you need is a representation of them. With all the kind comments about Aylesbury Junction, so far no-one has mentioned insulator pots – then again there aren’t any! The centre rail is simply glued to the middle of the track. With weathering it’s given me an acceptable looking effect. For the outside rail, I simply use a track pin, and the little white circular collar in the Peco pack for insulating chairs etc and ignore the pots. The pins are inserted every 5 sleepers or so. And the Code 60 rail superglued on top. This is where I say patience is needed. With the centre you may be able to do longer stretches at a time, but for the outer rail (especially on a curve) you may only be able to balance (and weigh down) 6” at a time. In order to align the rails I just stick several track pins either side of the bit that’s setting and leave for at least 24hours. Once I’d got on top of the method I was able to work on 3 or 4 little bits at a time, and soon the work sites converged. 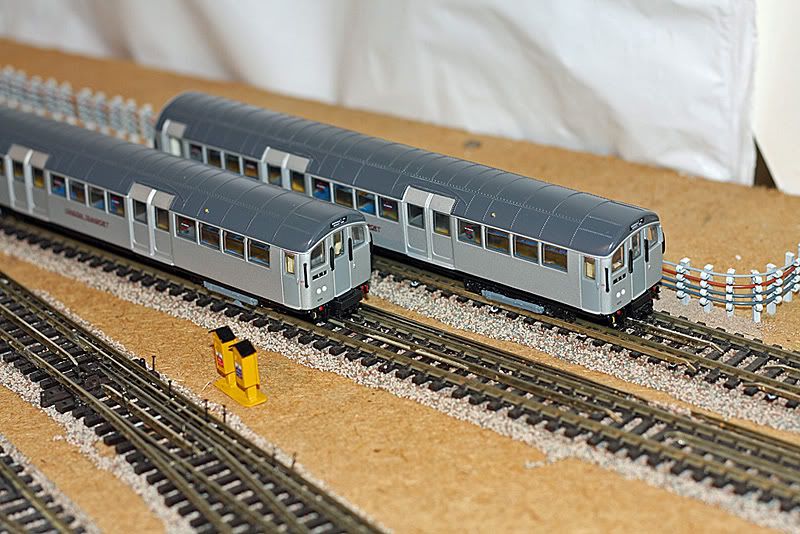 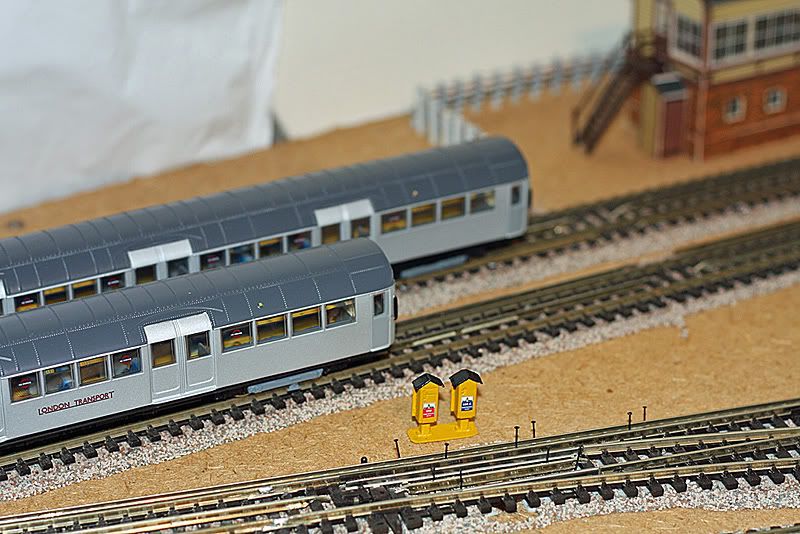 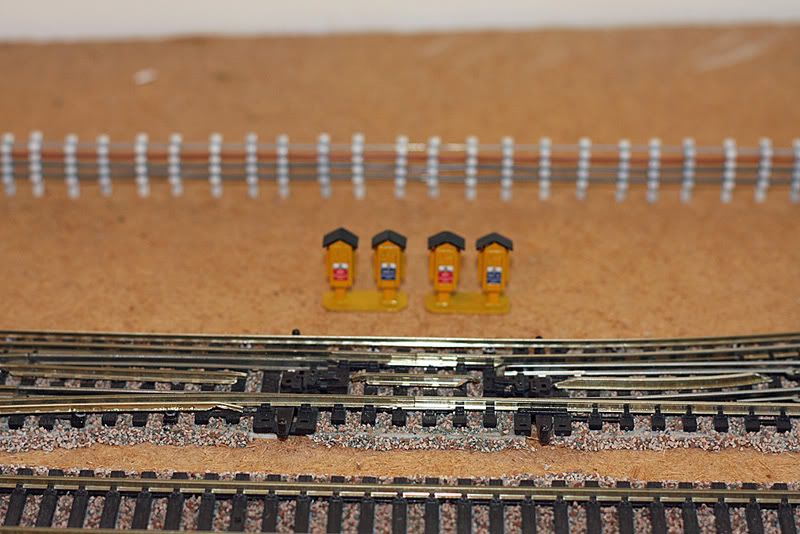 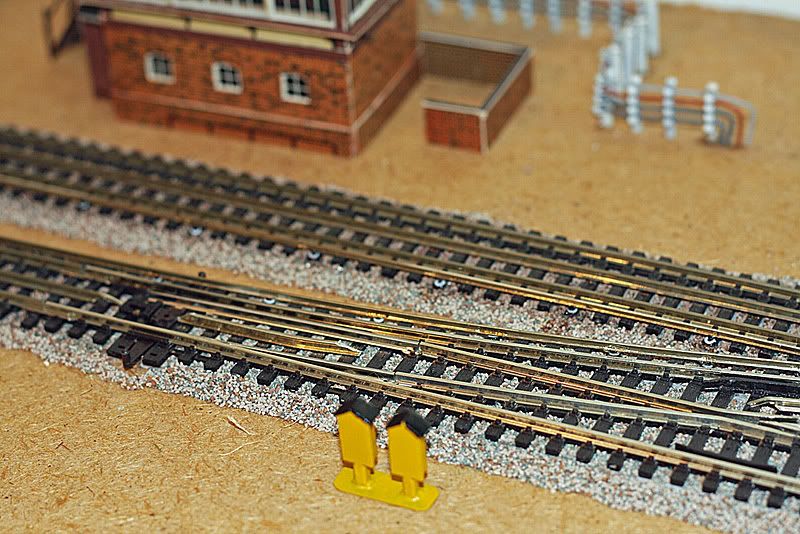 I have done a few other little tweaks in places but these are the main ways I’ve done it all. The one thing I can’t seem to do is the Vee in points. In life this is a piece of straight rail with another piece of straight rail cut at 45deg. I can’t seem to replicate this nicely so just do straights or curves as I think best fits the particular turnout. All that’s left is to weather the track if you haven’t done so already. If I were to start again…… (don’t you hear that a lot?) I’d weather track and rails before laying. For weathering I use Joes Model Trains Custom Flat Acrylic - brown rust first. Then I use dark brown on top. The dark brown won’t stick to nickel silver without some kind of undercoat. The further lines here have just the rust undercoat, and the non-electrified lines have the dark brown topcoat as well. 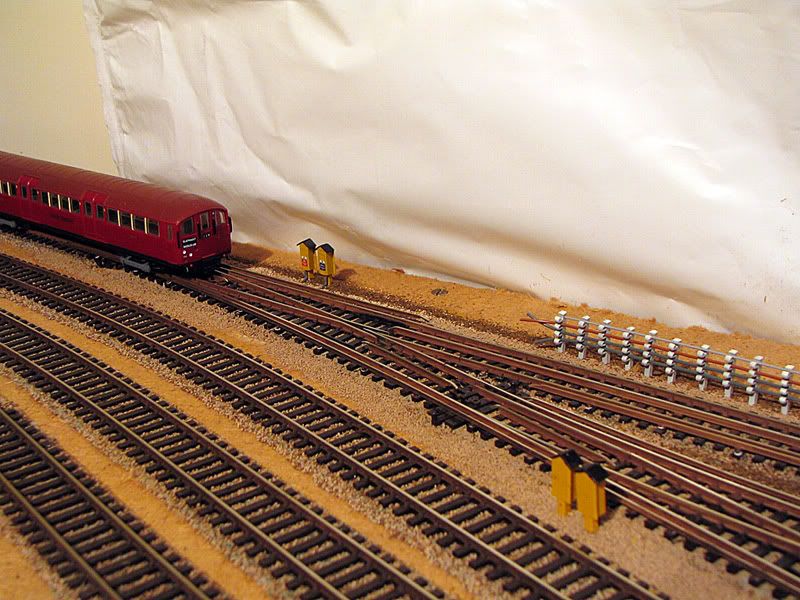 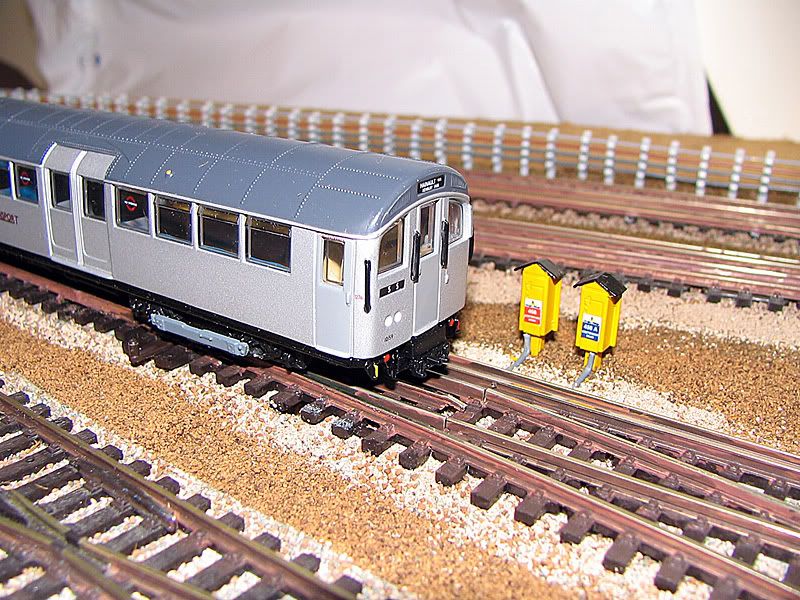 It may take some time, but very little skill is needed, and when you have a decent length of complex track it’s a great thrill (not to mention relief….) 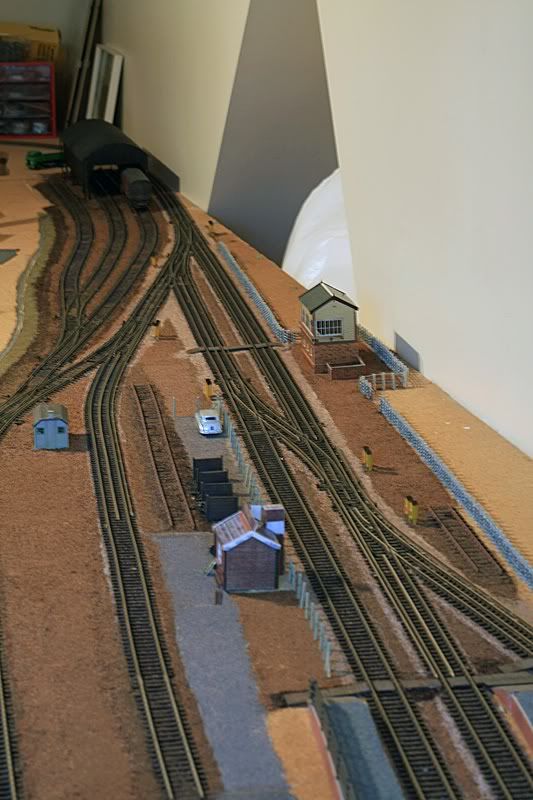 The 4 rail headshunt near bottom RH corner may not be prototypical but I need it for operations on my layout! |
|
Deleted
Deleted Member
Posts: 0
|
Post by Deleted on Dec 17, 2010 16:18:11 GMT
On the big railway, the conductor rails are generally bent down at the end for ramps, rather than a seperate piece.
On LU, they use a mix of welded and bolted ramps.
|
|
metman
Global Moderator
5056 05/12/1961-23/04/2012 RIP
Posts: 7,421
|
Post by metman on Dec 17, 2010 16:36:59 GMT
|
|
Deleted
Deleted Member
Posts: 0
|
Post by Deleted on Dec 17, 2010 18:25:44 GMT
Good site if only if only I had known about it a couple of years ago! I cheated with the ramps on the ends of the 3rd/4th rail and painted then white as they were around the real depot. Most people don't notice.
Xerces Fobe
|
|
|
|
Post by metroland on Dec 17, 2010 18:36:24 GMT
On the big railway, the conductor rails are generally bent down at the end for ramps, rather than a seperate piece. On LU, they use a mix of welded and bolted ramps. OK I probably need to spell it out word by word. On the 'Southern' the 3rd rails are bent rather than being moulded ramps like LU, but from normal-ish viewing distances they seem (to me at least) to be almost chamfered. See pics from Wye, Clapham Junction and Worting Junction. 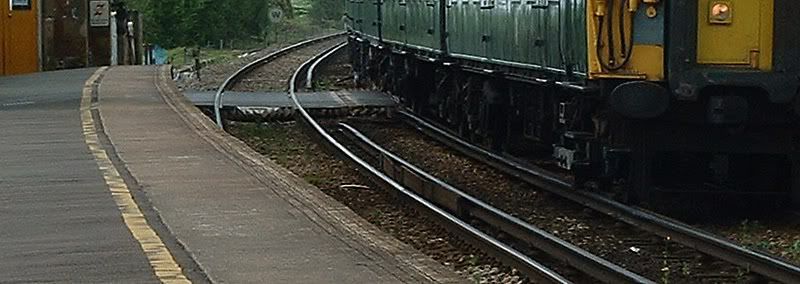  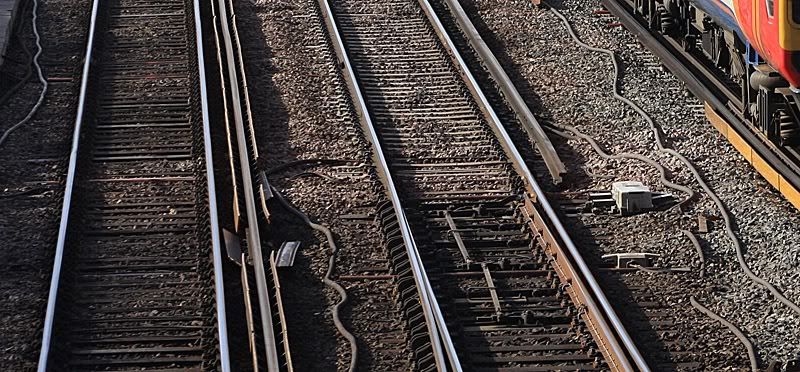 More recently (though it is London Overground not 'Southern') we seem to have some 'national rail' trains with 3rd rail ends which are more like LU ones? See pic of Hoxton: 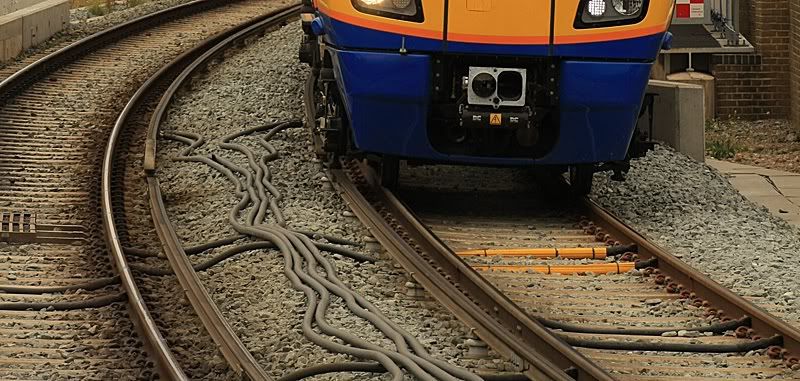 My point is that when I look at some Southern layouts they seem to look overly crude at the end of conductor rails. It's always struck me as odd when you think the clubs with good 'southern electric' layouts clearly have a number of good modellers. |
|
Deleted
Deleted Member
Posts: 0
|
Post by Deleted on Dec 17, 2010 19:06:46 GMT
Do remember that the latter is very new ally conductor rail.
The rest will have picked up the smoothness from all the shoes running up them - you can see how they lose their profile, most of the juice rails round here have gained a flat profile to the top, not the original railhead shape.
|
|
|
|
Post by metroland on Dec 17, 2010 20:13:41 GMT
Do remember that the latter is very new ally conductor rail. The rest will have picked up the smoothness from all the shoes running up them - you can see how they lose their profile, most of the juice rails round here have gained a flat profile to the top, not the original railhead shape. OK so how do you get a convincing look to your model rails? |
|
Deleted
Deleted Member
Posts: 0
|
Post by Deleted on Dec 17, 2010 20:22:23 GMT
OK so how do you get a convincing look to your model rails? I don't have a true fixed layout. For ideas though, if it was SR you could bend down the end of the rail, then file it a little to give a smooth finish. For LU, you could cut a small length, make a ramp shape from it, solder it on, remove any excess then paint black for appropriate weathering. Looking at what I have here, modern ramps keep the bottom level the same with a very odd insulator, but are very wide across the top and go down to a point at the end. To make something like that, you'd have to cast it yourself, or be incredibly skilled with a hammer and superpowers. |
|
|
|
Post by metroland on Dec 17, 2010 20:48:36 GMT
OK so how do you get a convincing look to your model rails? I don't have a true fixed layout. For ideas though, if it was SR you could bend down the end of the rail, then file it a little to give a smooth finish. For LU, you could cut a small length, make a ramp shape from it, solder it on, remove any excess then paint black for appropriate weathering. Looking at what I have here, modern ramps keep the bottom level the same with a very odd insulator, but are very wide across the top and go down to a point at the end. To make something like that, you'd have to cast it yourself, or be incredibly skilled with a hammer and superpowers. I spent a blithering amount of time writing up (and getting photos and links) a way for people with limited skills to do convincing track without the need to go to great lengths, and in order to try and give them the confidence to have a go. If you're wanting a thread to discuss skilled options may I respectfully suggest you start one of your own? (Nothing wrong with Finescale etc - I have been known to read and occasionally buy, MRJ. However I was looking to either give advice and leave it at that, or discuss easy and convincing ways of doing 4 rail - ie without tears). |
|
Deleted
Deleted Member
Posts: 0
|
Post by Deleted on Dec 17, 2010 21:04:15 GMT
I spent a blithering amount of time writing up (and getting photos and links) a way for people with limited skills to do convincing track without the need to go to great lengths, and in order to try and give them the confidence to have a go. If you're wanting a thread to discuss skilled options may I respectfully suggest you start one of your own? (Nothing wrong with Finescale etc - I have been known to read and occasionally buy, MRJ. However I was looking to either give advice and leave it at that, or discuss easy and convincing ways of doing 4 rail - ie without tears). Keep yer 'at on! I was merely suggesting ideas. If you lengthened the length of the ramp a little, and made the bend smoother, IMO it'd be more realistic, but it's a good solution. I like what you've done with the layout and it looks great. And I was just chipping in my two pence, with regards to the SR region rails. I've used the trains round here more times than I could count, and the conductor rails, let alone the chairs/pots, seem to have not changed within the last god knows how long. |
|
Deleted
Deleted Member
Posts: 0
|
Post by Deleted on Dec 17, 2010 23:47:52 GMT
I used Finescale and initially regretted it as the Peco chairs and conductor rail are designed for Code 100 track. After a disaster with 4th rail it was relayed it basically on the sleepers. It looks OK for normal viewing and has been well fitted in by me with plenty of superglue to ensure it does not fall out in transit. I am happy with it below is a photo notice the end of the conductor rails painted white - check out real photos of Croxley Depot and you will see lots of white paint on the conductor rail ends it fools most people 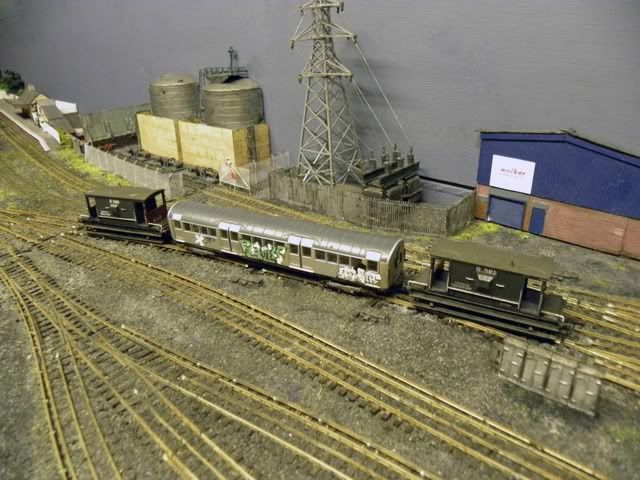 Xerces Fobe |
|
|
|
Post by metroland on Dec 18, 2010 8:38:59 GMT
I think the white ends are great and a good way of doing rails in depot areas, and areas where there's plenty of foot traffic (eg to the canteen beside the station). I avoided them on 'normal passenger running lines' (for want of a better description) as I wasn't so sure it would look as appropriate.
BTW seeing your lineside cabinets reminded me of something that's been niggling me.
When I look at the real thing today, or pics of the past, I can't seem to see any rhyme or reason as to how many cabinets to put in or where. There are obviously more of them by signals, or signal cabins, but I can fathom just what is going to look 'right' for the lines I'm building. Any clues? Anyone?
|
|
Deleted
Deleted Member
Posts: 0
|
Post by Deleted on Dec 18, 2010 10:03:01 GMT
BTW seeing your lineside cabinets reminded me of something that's been niggling me. When I look at the real thing today, or pics of the past, I can't seem to see any rhyme or reason as to how many cabinets to put in or where. There are obviously more of them by signals, or signal cabins, but I can fathom just what is going to look 'right' for the lines I'm building. Any clues? Anyone? There were a lot of points at the entrance to the depot together with points for the 2 branches to Croxley Green and Rickmansworth (Church Street)/Croxley Mills) as well as the headshunt to the depot. I assume these boxes appeared after Croxley Junction box was closed which I would guess was around 1963/64. Xerces Fobe |
|
|
|
Post by metroland on Dec 18, 2010 13:47:20 GMT
Thanks for the link. Unfortunately they don't seem have have pics of what you get for your money. Given that I have Code 100 for centre rail and Code 60 for outer I'm not sure I can get a consistent 'look' to 3rd and 4th rails. Without a pic or a sample it's really tricky to tell. Presumably their ramps will look ok with one gauge and need some mods with t'other, |
|
Deleted
Deleted Member
Posts: 0
|
Post by Deleted on Dec 18, 2010 14:09:57 GMT
|
|
neilw
now that's what I call a garden railway
Posts: 284
|
Post by neilw on Dec 18, 2010 14:13:44 GMT
The correct 150lb/yard conductor rail is available from the scalefour society, as are the correct insulating pots which allow for the difference in height of the pos and neg rails. They are very fiddly but spot-on accurate. The three types of ramps are also available. I suspect they are from the same supplier as the ones from C and L, who also do the pots but not quite as good (but less fiddly) There is some great info about 3rd and 4th rail, including the pictures of the ramps you need at homepage.ntlworld.com/russelliott/3rd-4th.htmlWhilst a bit fiddly, they really do make a difference...... |
|
neilw
now that's what I call a garden railway
Posts: 284
|
Post by neilw on Dec 18, 2010 14:20:06 GMT
sorry Charlie J, I think you posted whilst I was typing away!
|
|
|
|
Post by metroland on Dec 18, 2010 14:45:04 GMT
Neilw/CharlieJ: Yes I've seen that site but it's only helpful insofar as it tells you what happens in 1:1 scale.
OO is 'wrong' and I simply don't have the skills to work in EM/P4/S4 etc. The 150lb rail and chairs etc may be accurate but surely that's only the case if you work in EM/P4/S4?
If you use these parts in OO-16.5 then surely they are no longer accurate in terms of getting it to look right?
Do you have any reference pics of people who've used these in OO as opposed to finer scales?
I suspect most people want the holy grail of easy LT track in OO, and baulk at the difficulty of finer scales (as I did) especially if importing finescale components into OO is just as 'wrong' as OO is? Or am I missing something here?
(BTW I'd forgotten that site has reference pic of tube train alongside LMS searchlight signal - which is something I have in mind for a later part of layout detailing, which will get me out of a signalling problem!)
|
|
Deleted
Deleted Member
Posts: 0
|
Post by Deleted on Dec 18, 2010 15:27:20 GMT
It has the dimensions on there for 4mm scale, in mm!
That is, 4mm to 1ft, or OO gauge!
The Peco rails and chairs are used on the Abbey Road layout and look good, as well as coming with a little plate to put under the chair if you want the differing height. However I'm not sure how well this all fits up to scale.
|
|
|
|
Post by metroland on Dec 18, 2010 16:51:50 GMT
It has the dimensions on there for 4mm scale, in mm! That is, 4mm to 1ft, or OO gauge! Charlie, OO is only 4mm scale SOME OF THE TIME. I am not a finescale modeller. His dimensions will translate into P4/S4/EM but OO has a track width of 16.5mm which is NOT repeat NOT 4' 8.5" ie if you take his dimensions and plonk scale 3rd and 4th rails in OO track it won't look the part. Can you not understand that I have already tried this? Why do you persist in trying to take a thread about easy OO 4-rail which 'looks the part back' into finescale dimensions that most of us cannot work with? If you think that's the way to do it I would love to see your results - either fully 4mm scale, or OO track with scale 3rd and 4th rails. I have only a passing interest in finescale. If anyone can put up some good looking OO track I would LOVE to see it. OO-16.5mm has to involve compromises. Please don't keep reminding what full size track dimensions are. I cannot do a P4 version of LT track - I have to work with OO and try and make it look good. |
|
neilw
now that's what I call a garden railway
Posts: 284
|
Post by neilw on Dec 18, 2010 17:00:09 GMT
Have a look on P34 of January's Railway Modeller, there is a layout using the Peco conductor rail and pots and it looks very good. As you say the problem of 00 being too narrow to scale could be exagerated by the extra two rails, but I think this looks pretty good (only marred by the pots not being on adjacent sleepers as they generally should). He says the layout is a HO/00 comprimise, but that would still make the track 16.5mm presumably?
|
|
Deleted
Deleted Member
Posts: 0
|
Post by Deleted on Dec 18, 2010 17:04:18 GMT
It has the dimensions on there for 4mm scale, in mm! That is, 4mm to 1ft, or OO gauge! Charlie, OO is only 4mm scale SOME OF THE TIME. I am not a finescale modeller. His dimensions will translate into P4/S4/EM but OO has a track width of 16.5mm which is NOT repeat NOT 4' 8.5" ie if you take his dimensions and plonk scale 3rd and 4th rails in OO track it won't look the part. Can you not understand that I have already tried this? Why do you persist in trying to take a thread about easy OO 4-rail which 'looks the part back' into finescale dimensions that most of us cannot work with? If you think that's the way to do it I would love to see your results - either fully 4mm scale, or OO track with scale 3rd and 4th rails. I have only a passing interest in finescale. If anyone can put up some good looking OO track I would LOVE to see it. OO-16.5mm has to involve compromises. Please don't keep reminding what full size track dimensions are. I cannot do a P4 version of LT track - I have to work with OO and try and make it look good. Stupid, stupid moment there. Of course, the track is 3.5mm to the foot...  neilw neilw, the track for HO is too 16.5mm. |
|
Deleted
Deleted Member
Posts: 0
|
Post by Deleted on Dec 18, 2010 17:24:51 GMT
In the end we are all modeling our own interpretation of the real railway and without exception all layouts are full of compromises.
I was not initially going to use Code 75 track for my Croxley layout however my mate who helps with the layout suggested we did and I could see his point.
It up to the individual what they want to do and are comfortable with. At a model railway show I can appreciate a model of a tube train made out of Lego as much as one built from scratch. The key components are imagination and the drive to have a go making something.
I am a member of another national Model Railway Club where elitism has rears it's head regularly and this can lead to misunderstandings etc. For me railway modeling is a hobby I enjoy I am welcome constructive criticism of my efforts and if you really don't like what a modeler has done so what!
Happy modeling all and remember it a relaxing hobby for us all to enjoy. ;D
Xerces Fobe
|
|
|
|
Post by phillw48 on Dec 18, 2010 17:30:00 GMT
In the end we are all modelling our own interpretation of the real railway and without exception all layouts are fulll of compromises. I was not intially going to use Code 75 track for my Croxley layout however my [glow=red,2,300]mare[/glow] who helps with the later suggested we did. Clever horse! ;D |
|
Deleted
Deleted Member
Posts: 0
|
Post by Deleted on Dec 18, 2010 17:31:50 GMT
I would have thought code 75 rail would be more prototypically correct, based on the assumption that LU uses lighter flat-bottomed rail than UIC60.
Then again it has to be said that bullhead rail would be even more correct - shame it's not exactly readily available.
|
|
Deleted
Deleted Member
Posts: 0
|
Post by Deleted on Dec 18, 2010 17:40:38 GMT
In the end we are all modelling our own interpretation of the real railway and without exception all layouts are fulll of compromises. I was not intially going to use Code 75 track for my Croxley layout however my [glow=red,2,300]mare[/glow] who helps with the later suggested we did. Clever horse! ;D Hit the wrong button - more of a donkey I think  -The full corrected post is now displayed Xerces Fobe |
|
|
|
Post by metroland on Dec 18, 2010 17:55:01 GMT
In the end we are all modeling our own interpretation of the real railway and without exception all layouts are full of compromises. I was not initially going to use Code 75 track for my Croxley layout however my mate who helps with the layout suggested we did and I could see his point. Happy modeling all and remember it a relaxing hobby for us all to enjoy. ;D Xerces Fobe Tell me about it!!!!! I decided long ago to stick with Code 100 as I had various bits of stock. Then I had to decide between Electrofrogs and Insulfrogs. Also I wanted medium and/or large radius points where I could for the BR lines. Initially I laid Insulfrog points and have since ripped most out them out when I recognised the virtue of electrofrog, and how to wire the layout. I only have 1 insulfrog in a key position where I simply can't work out how to wire DC around this particular problem. (Much too much stock to chip all locos with DCC.....) The medium and large radius points were great with BR stock. Much better looking than having small radius everywhere. Then I had some tube stock motorised and the small wheels started to fall into the big holes in the Vee. Happy days........... |
|
|
|
Post by metroland on Dec 18, 2010 18:02:47 GMT
Have a look on P34 of January's Railway Modeller, there is a layout using the Peco conductor rail and pots and it looks very good. As you say the problem of 00 being too narrow to scale could be exagerated by the extra two rails, but I think this looks pretty good (only marred by the pots not being on adjacent sleepers as they generally should). I'll take a look. Good job my layout only has pots (of sorts) on the outer rail ;D That reminds me of City Road. Anyone remember that? It was inspirational and for a short while on the circuit at same time as John Polley's then new Abbey Road. It's funny what you notice on other peoples' layouts though. IIRC on City Road the insulator pots on both 3rd and 4th rails were on the same sleeper which wouldn't happen. (Not claiming my layout is perfect it's just how easy it is to look over someone else's and spot things straight away). |
|
|
|
Post by metroland on Dec 18, 2010 18:06:40 GMT
I would have thought code 75 rail would be more prototypically correct, based on the assumption that LU uses lighter flat-bottomed rail than UIC60. Then again it has to be said that bullhead rail would be even more correct - shame it's not exactly readily available. Another reason for doing BR/LT  With the Kings X Widened Lines, Gunnersbury-Richmond, Outer Met areas, Watford DC Lines, Bromley-by-Bow to Upminster, and others, there's almost always a prototype for something you want to do. |
|
Deleted
Deleted Member
Posts: 0
|
Post by Deleted on Dec 18, 2010 18:11:41 GMT
Here is a picture of my Croxley WRD layout taken from a different view by Daniel Floyd at a show earlier this year. Plenty of compromises on to see especially the 2 double slips and the associated conductor rails. 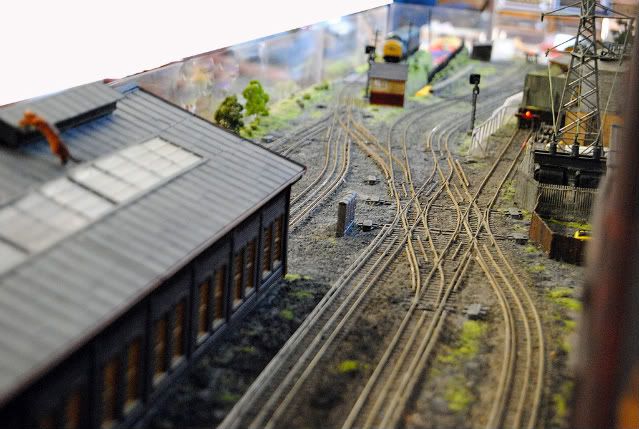 Xerces Fobe |
|


 -The full corrected post is now displayed


