|
|
Post by metroland on Nov 4, 2015 15:54:31 GMT
Welcome to Mantles Wood. Followers of my old layout will know that sadly I had to tear it up, in preparation for a house move to west Wales May 2014. The Head of Household gave approval for me to use the new garage as my layout room, a very commendable 17’ x 13’ area. However, it wasn’t until nearly Christmas that we were able to have local chippies convert it into a proper room, as we were endlessly moving furniture from room to room whilst the bungalow was re-decorated etc, and the garage was needed as decanting space. Why Mantles Wood? Well I’d always been fascinated by Rickmansworth ever since I discovered it as a lad, and as you know my old layout had elements of BR and LT. Even with my larger facility there’s no way I could attempt Ricky so was pondering a poor man’s Rickmansworth. Many of you will know that Mantles Wood marks the boundary these days between Network Rail and TfL, and in the past BR/LT etc. Needless to say Mantles Wood isn’t actually at Mantles Wood but then Clapham Junction isn’t at Clapham so nothing new there then. Further reading here: www.metadyne.co.uk/Mantleswood.htmlThis gave me the opportunity to have a name from the right area, but use my old stock and the old pretext that the line here was originally LNWR/Metropolitan Joint before eventually becoming BR/LT. The rest of this first post concerns the conversion of the garage into a proper room as I hope some viewers will be interested.
The garage was built in about 1999, with a typical concrete floor and breeze block construction, and a window that was little better than green-house glass. Fortunately we had a sum of money left over from the house move that meant paying for the job to be done properly wasn’t too onerous, although we avoided super-dooper professional firms who would have charged well who knows….? Although the bungalow wasn’t a wreck, we had a lot to do with thorough redecoration, and then (mostly through choice) rebuilding the kitchen, major re-wiring and replacing the fireplace. This gave us the chance to check out the price/quality of local tradesmen who generally did a good day’s work for a good day’s pay and by and large were semi-retired/almost retired. We decided to offer the work to a local carpenter who’d done good work for us, a shopfitter/chippie who he also used on bigger jobs, and an electrician who’d done a lot of wiring for us. Generally speaking their work was £12-£15 per hour (amazing considering where we’d come from in South Bucks). As the garage was all concrete/stone I decided to go for hi-spec within reason and I’m really glad I did. Note: I was quite ill when most of the work was done so quality of pics varies. I had the window replaced with a double-glazed one just before the major work was done. The walls and floors were covered with waterproof membranes. The flooring timbers were either 4” x 3” or 4” x 2” and the wall timbers were 3” x 2”. In both cases the spaces were filled with 40mm insulating foamy stuff which had waterproof facings. The walls were then covered with plasterboard and then plastered. The floor then had a covering of flooring quality chipboard. Also the living room carpet from the previous owner didn’t suit us indoors but it was fairly new and did a treat in the garage. The work was complete just before Christmas. It took a while for the top plaster to dry as it was damp weather at the time, however it was worth the wait. Touch wood there’s been no shrinkage to date since it dried so slowly. As the garage was a bare shell, the cost of additional wiring and sockets was minimal (as compared doing half the amount I eventually chose) so I had 16 electric sockets and eight 4’ fluorescent lights in 2 banks of 4. With the wiring that we’d had done in the main house, we’d had to have a new consumer unit (fuse box in old money). There was spare capacity on this to run a 40A cable to the garage so the electrician gave me another ring main in the garage with its own fuse box. I could actually have a cooker in there but that’s probably overkill unless I’m really in the doghouse. The ‘loft’ space was filled with something like 12” of rock-wool to give further insulation. Total cost of the work was in the region of £4k, roughly 50/50 parts/labour. Clearly that’s not the sort of sum most people have on tap, and neither did I before the house move. However that was by no means bad when you consider that people who advertise heavily about converting lofts/garages into meaningful space would like have wanted double. Even if you’re doing it yourself I’d strongly recommend doing it to a decent spec if funds allow. A couple of pics of the garage just prior to the work: 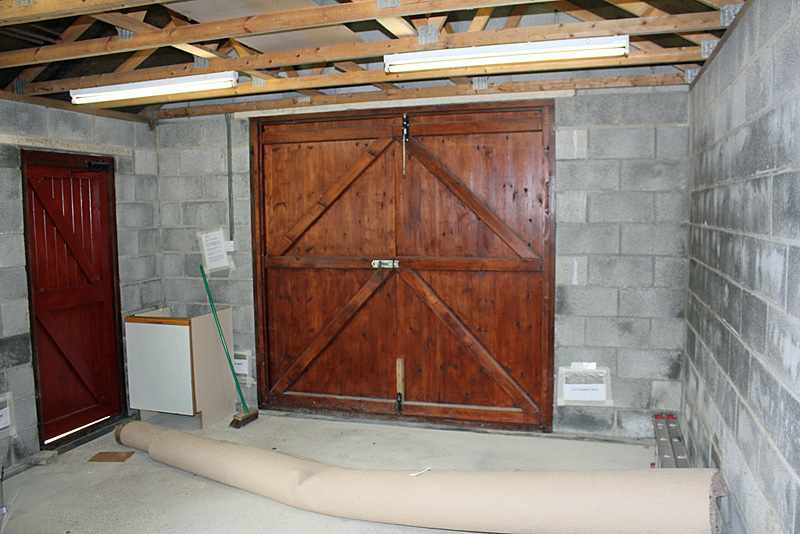 rev a unconverted garage 800px rev a unconverted garage 800px by Sarah S1ddons, on Flickr 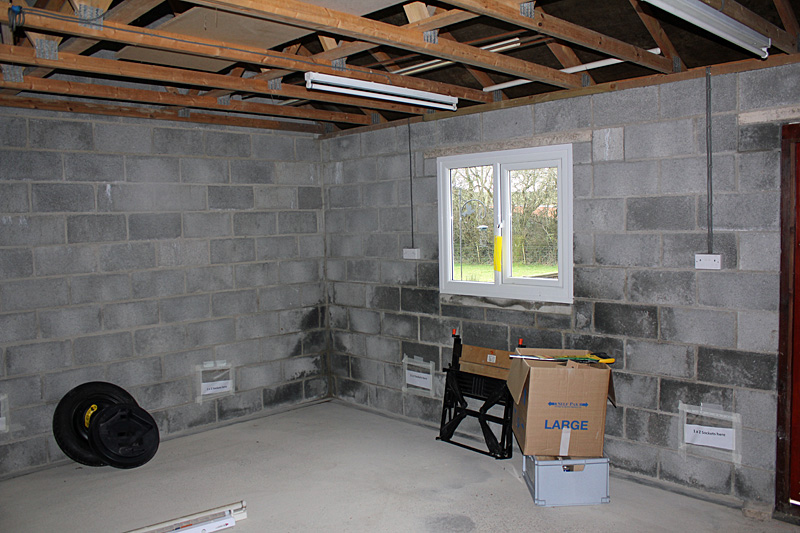 rev b unconverted garage 800px rev b unconverted garage 800px by Sarah S1ddons, on Flickr Early wiring work before the build proper can start: 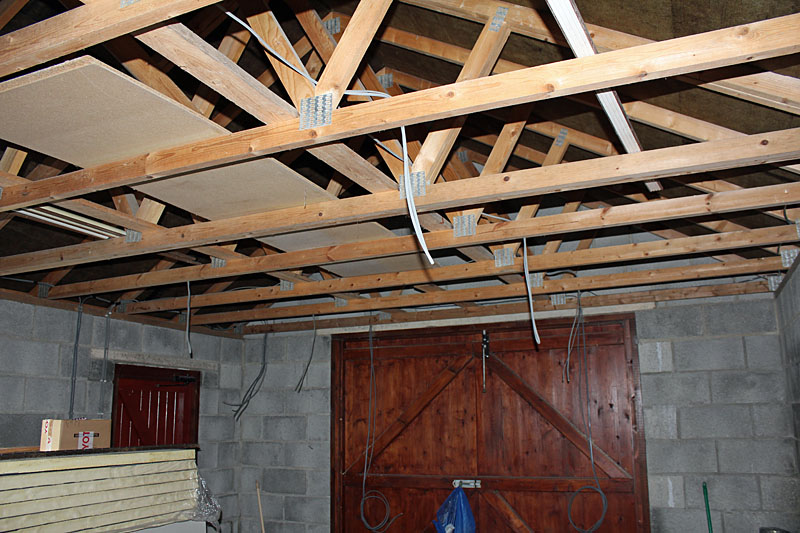 rev c start of wiring 800px rev c start of wiring 800px by Sarah S1ddons, on Flickr Roof and floor work. Note the garage door hasn’t yet been covered:  rev d roof 800px rev d roof 800px by Sarah S1ddons, on Flickr 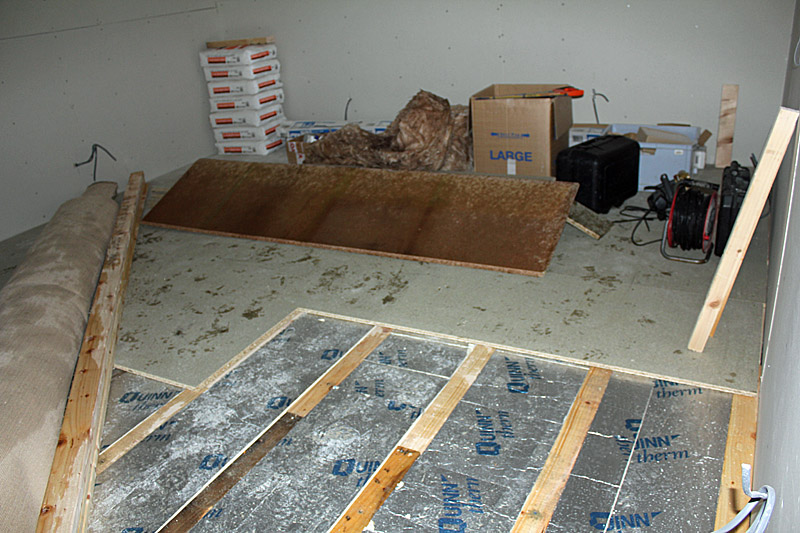 rev e floor 800px rev e floor 800px by Sarah S1ddons, on Flickr The garage door has now disappeared behind a wall 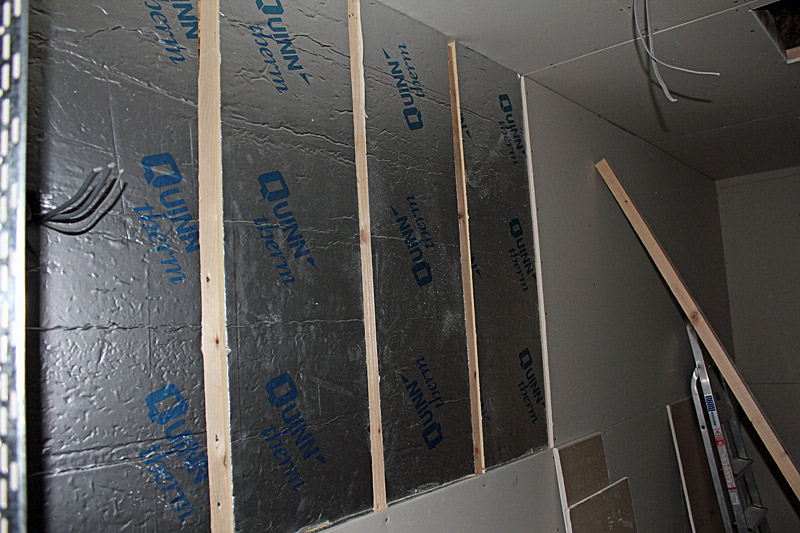 rev f wall_garage door 800px rev f wall_garage door 800px by Sarah S1ddons, on Flickr Top-coat plastering under way on the end wall opposite the garage doors  rev g plastering in progress 800px rev g plastering in progress 800px by Sarah S1ddons, on Flickr The finished room but still bare 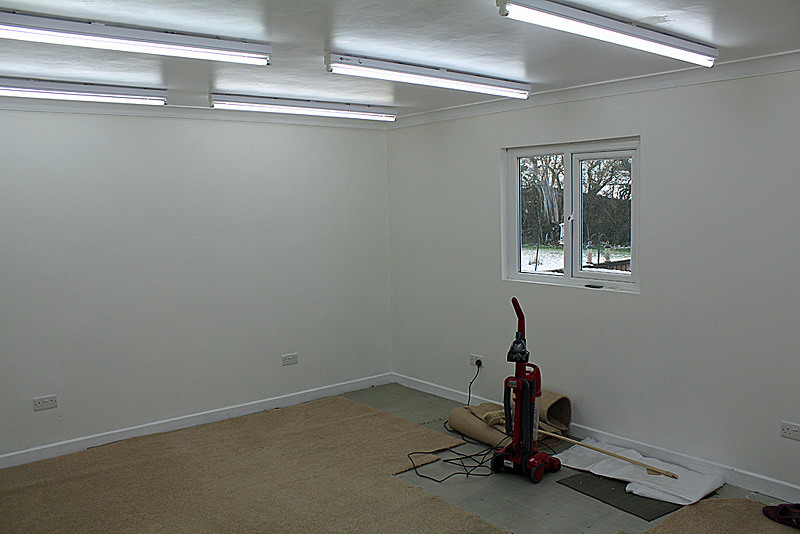 rev h complete_bare 800px rev h complete_bare 800px by Sarah S1ddons, on Flickr Layout baseboards installed (described in next posting). Also old kitchen units and work surfaces have been recycled to give a decent workbench in the middle. 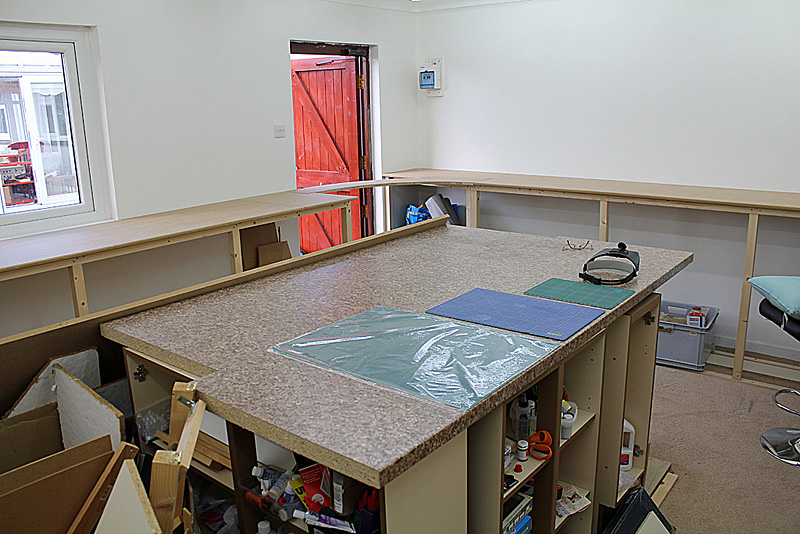 rev i complete 800px rev i complete 800px by Sarah S1ddons, on Flickr Next posting: Initial track work |
|
|
|
Post by metroland on Oct 30, 2015 16:25:54 GMT
Is that Code 100 rail? I know at one time you were seriously considering NOT using 75 after experience on the old layout.
|
|
|
|
Post by metroland on Jun 18, 2015 7:43:21 GMT
Nice work there bluebell87
|
|
|
|
Post by metroland on Jun 5, 2015 12:00:08 GMT
Very nice Arun - any plans to scale it down to 1/76 - OO ?
|
|
|
|
Post by metroland on Jun 1, 2015 15:47:40 GMT
Nice progress bluebell87 - what colour did you use to replicate the red/maroon on the chassis?
|
|
|
|
Post by metroland on May 30, 2015 9:21:30 GMT
bachmann.co.uk/details.php?id=359Too modern for me but nice to see a big investment in modern underground stock. However, the drive unit augurs well for the future with possible applications on other stock?
|
|
|
|
Post by metroland on Oct 15, 2014 18:53:26 GMT
Mitre Bridge (between Willesden and Olympia)
|
|
|
|
Post by metroland on Jul 21, 2014 13:58:24 GMT
Not sure if there's an icon for egg on my face. Have just realised what I posted was rubbish........
I did do a Chiswick tour in 1980 and did have a ride as a passenger on the skid pan, but what they were telling us about was Roger Moore practising for Live and Let Die (the film with the bus chase where the top was knocked off an RT). Otherwise the tale is the same. He did practice on the skid pan but insurers wouldn't let him drive on set.
|
|
|
|
Post by metroland on Jul 14, 2014 20:56:45 GMT
Obv it depends on what you have space and money for but it's a bit more complicated than just 2 tankers (TEAs).
Network Rail require(d) 6 wagons to act as brake force runners (because the S stock is in effect unbraked on NR metals) - this was in the days when there was just a single 20 either end.
Although the 20's can haul the load, their acceleration wasn't really good enough and if one 20 failed then they would really be in the way. So in the early days it was 20 / MLA / MLA/ TEA / S Stock / TEA / MLA / MLA /20.
After a while (sorry can't quote date) it was changed to 2 x 20 either end, with just 1 TEA either end as the locos could produce more brake force, and better acceleration to keep out of the way of units.
So the positioning moves without S stock should be either:
20/MLA/MLA/TEA/TEA/MLA/MLA/20 or 2x20/2xTEA/2x20
|
|
|
|
Post by metroland on Jul 14, 2014 14:55:22 GMT
|
|
|
|
Post by metroland on Jul 11, 2014 19:10:03 GMT
Cliff drove an RT - but the Young Ones (Rik Mayall et al), which was full of references to Cliff, featured a stolen RM in their last ever episode - RM1536 to be precise. (Routemaster fans look away now) I had a Chiswick Works visit back in 1980 including a ride where the group were taken as passengers on the skid-pan (H&S would have a fit these days). We were told that Cliff actually learned to drive an RT and practised on the skid pan, but the insurers wouldn't let him drive on the actual film set (ie too expensive for them if the got injured and fliming was delayed/cancelled). |
|
|
|
Post by metroland on May 22, 2014 20:41:24 GMT
Because its bang on the junction neck. A southbound spad would be on the point blades and a northbound pulling up short would foul the junction. Ask somebody in signalling for a definitive answer, but I bet you wouldn't get it approved. Any signalling experts on-line?? Err why do all 3 coaches have to be in the platform? Surely with 3 car trains and Selective Door Opening you could have 3 car trains on the branch but only 2 cars in the platform at Drayton Green? (Admittedly I can't think of anywhere off the top of my head where 'overhanging' coaches foul a junction but with SDO the whole purpose is that not all the train needs to be on platform or am I missing something?) |
|
|
|
Post by metroland on Apr 27, 2014 15:31:52 GMT
Used to love the long bus journeys. 5 from Becontree Heath to Waterloo, god knows how long some of those journeys took! In simiar vein, I remember doing Victoria-Abridge on route 10 where 1 bus per hour I think did the whole route. |
|
|
|
Post by metroland on Apr 27, 2014 9:01:45 GMT
Where can you get Endo trucks from? Look under 'Online Shop' and Motor bogies (Can't get a link directly to the page) |
|
|
|
Post by metroland on Apr 25, 2014 19:39:43 GMT
Glad to see another user of Endo power bogies on Intervale. I find them much better than Tenshodo and Black Beetle.
|
|
|
|
Post by metroland on Mar 21, 2014 10:04:49 GMT
Looks better than I thought. I wonder what it will go for? A good guide would probably be the RRP and box-shifter prices for current issues like Baby Deltic and Class 16 and then add say 5% |
|
|
|
Post by metroland on Mar 19, 2014 15:02:31 GMT
Apparently there's a pic of the EP sample on Heljan's Facebook page. I'm not on Facebook so can't give the link.
|
|
|
|
Post by metroland on Mar 4, 2014 13:09:27 GMT
I like what you've done with the 'Peckett'. As you say, it's a fun thing to do, and something I might try some time. I could never see myself building a kit along with all the other projects awaiting their slot in the works queue so why not?
|
|
|
|
Post by metroland on Jan 13, 2014 15:29:03 GMT
Nice work. A huge price difference from the Bachmann one AND you've done some modelling.
One minor point, I'm pretty certain the cabside doors are the same colour as the bodywork. Not sure if they look darker on yours as they are recessed, or if you have them a different colour?
|
|
|
|
Post by metroland on Jan 7, 2014 11:27:27 GMT
The chassis and bogies are given a drybrush of GW Charadon Granite with bubonic brown and bleached bone mixed in for highlights. I also paint the lift points on the chassis yellow prior to weathering. www.flickr.com/photos/25182511@N08/11805492794/Nice tonal variation with that mix of colours - good work. |
|
|
|
Post by metroland on Dec 31, 2013 9:51:13 GMT
Vey nice work metman. Not sure if you've decided on a power unit for your 6 car set? I have an Endo in my 4 car Q stock and it's really powerful - much better than Tenshodo. I've not tried the Replica motorised chassis as even the shorter one is too long for Underground stock. (Ref the layout - IF we get the place we're after I'll have a 16' x 10' room which is larger than present. I'm struggling with whether to redo the present layout or go for something like a simplified Rickmansworth-esque layout. The real Ricky would need about 32' in 4mm and I have only 16' but going for this would allow more of my mainline BR stuff to have reason for being there! Either way, because of the relative dimensions I'd have to cut up some of the baseboards for the move and then rebuild) |
|
|
|
Post by metroland on Dec 30, 2013 13:04:27 GMT
Nice work metman. Am well frustrated that I can only do minimal work at the mo' as the house is on the market, and I've had to dismantle part of layout and workspace to show the full potential of the room.
|
|
|
|
Post by metroland on Dec 9, 2013 13:12:57 GMT
[/quote]Shoe beams were on both sides of the coach, for the simple reason because the positive rail is not always on the left or right of the running rail .[/quote]
I don't doubt you DWS as it always seemed an odd quote to me. I'm sure I've seen it in 2 different publications but can only find one at the moment:
London Underground Steam by Kevin McCormack. Ian Allan ISBN 978-0-7110-3406-8
P.14 has a shot at Amersham of BR 42089 arriving from London. The final sentence of the caption is:
'The shoes were normally fitted to just one side of the carriage (the down side, ie outward from London). Pic by Micheal Allen. (My italics)
So folks, just 'cos things are in print (or on the Web) you don't have to take them as Gospel.
|
|
|
|
Post by metroland on Dec 7, 2013 12:59:57 GMT
Another wartime grey one. www.flickr.com/photos/geoffsimages/11240958516/Also of interest is the shoe beam on the Dreadnought brake coach. They were connected to the Met Bo-Bo's to prevent gapping. Some sources have quoted them as being ONLY on the south (west?) side of the coaches without showing photgraphic evidence. Most photters shot on the south/west side due to limitations of the film etc so decent pics on the 'wrong side for sun' are rare. This is only about the 5th I've seen showing clear detail and in all cases the shoe beam has been there. |
|
|
|
Post by metroland on Dec 3, 2013 13:56:56 GMT
I went for a ride today Uxbridge-HotH hoping the trial train might run again but it didn't. At least it was a chance to recce the line for Sunday and get a few shots of stations and nameboards etc without too many people milling around. You know the kind of thing, small hand-held camera, no tripod, no flash, nowhere near platform edge, no getting in the way of other people, non-commercial fliming.
All well and good until I got to Rayners Lane approx 11am. A voice comes over the tannoy something along the lines of "Please be aware that photogrphy is not allowed on this station without permission from Head Office or the station supervisor"
As I was on a bit of a schedule I couldn't be bothered to take time to seek out the supervisor and moved on elsewhere along the line.
One wonders if this 'gentleman' will be on shift this coming Sunday in which case:
a/ Will he lose his voice with constant repetition?
b/ Get lynched first?
|
|
|
|
Post by metroland on Nov 18, 2013 8:18:41 GMT
11 will be in wartime grey and 12 in LT Maroon. I've never seen any real photos of that grey paintscheme and therefore assumed it's fake. You never stop learning. Are there any pics of it? Pic here - it's in B&W but you can tell it's the wartime grey due to the way the number on the front of loco is on that 'shield' dewi.ca/trains/london/pix/n10_2_5.jpg |
|
|
|
Post by metroland on Oct 29, 2013 11:01:14 GMT
We have a possible house move on the horizon which means work on the actual layout has been suspended, so for the current modelling season I’m getting on with some stock (albeit BR on this occasion). The Hachette coaches caused quite a stir this autumn. For £3.99 they seemed pretty good and a comment I saw on one of the discussion boards made me think you could spruce them up without needing a complete repaint (at least, not if you're keeping them maroon). First up is the original out of the packet, a bit plasticky but by no means bad. In fact the roof ribs are much better than Bachmanns and also better than the latest engineering prototypes of Hornby’s Railroad Mk1’s which are due before too long (at around £15?) The main drawbacks are the solid underframe and the bevel around the edge of the glazing but from this angle (esp if train is moving) I can live with them.  First re-work: A coach with quite a bit of grime. I'm pleased with this as from approx 2-3' away it looks good (to me anyway). What I did was paint the inside of the maroon sides black which immediately gives some body to the red plastic. Then 2 thin coats of satin varnish outside. Finally 2 coats of black acrylic wash, in this case not wiping away the wash but letting it dry to build up depth. Some paint and powder on the roof, weathering on the underframe, and added No Smoking triangles to the relevant centre compartments. Everything came out of the spares boxes so no extra expense.  2nd re-work: Ex works and with Commonwealth bogies. For this one and the next, I bought Bachmann Commonwealth bogies so this was the only expense. As Commonwealths weren't fitted until 1962 on new build and that's the end of the period I do, I tried to make this ex-works but converted it to 2nd Open SO. This meant changing the roof vent layout (easy enough) and fitting No Smoking triangles on the end bays. I haven't got an interior for it yet. I tried to bodge the old Peco card kit but made a mess of it. As this was ex-works I gave it one coat of gloss varnish as a base for the coach crests. Over this I applied a coat of satin varnish. This time I gave it 2 coats of black acrylic wash but immediately wiped most off with a damp sponge. Absolute minimal weathering. I added ‘Emergency Lighting Point’ and star decals to the solebar as this coach has very little road grime.  Third re-work: Another corridor 2nd BSK but this time with more Commonwealth bogies. Weathering was somewhere between the ex-works and grimy ones.  (On these last 2 coaches they look a bit more plastic in the pictures than in real life – the camera can be very cruel!) Still to come 4 more coaches. I'll do an SO with Mk1 bogies and fairly heavy weathering, but after that I'm not sure about the other 3. |
|
|
|
Post by metroland on Oct 21, 2013 18:27:21 GMT
Looks like it going to be expensive November, Just hope the wife dont see them lol. Wives are like mothers they always see the things you don't want them to see.......  |
|
|
|
Post by metroland on Oct 19, 2013 18:55:34 GMT
Terrific!
|
|
|
|
Post by metroland on Sept 15, 2013 8:27:58 GMT
I seem to recall extra seats being installed but as it's over half a century ago I didn't take proper notes then! Afraid I can't help with the untidy bits underneath.
|
|