|
|
Post by metroland on Sept 14, 2013 18:45:21 GMT
|
|
|
|
Post by metroland on Sept 2, 2013 11:30:24 GMT
I got DLR - they said it's 'cos I'm different but that's why people like you. Clearly playing to my ego!
|
|
|
|
Post by metroland on Aug 29, 2013 10:06:21 GMT
Forgot to mention, this is mounted on a very large card so you need a large bag or bigs arms if you're going for a multi buy.
For younger viewers and listeners it's 42cm x 39cm, for seniors it's 16.5 x 15.5 inches
|
|
|
|
Post by metroland on Aug 29, 2013 9:57:02 GMT
This is being widely discussed on more general model railway boards and you may have seen ads on tv. modelrailwayvillage.com/Issue 1 is £3.99 and has a Mark1 coach attached. This seems to be either a dumbed down Bachmann, or use of the old Replica mould. Detail/prining is not as crisp and there's no lettering or maker's name on the coach. Comparisons I've seen elsewhere show it to be very close to the current Bachmann Corridor 2nd albeit with slight higher ride height, but it does have a close-coupling mechanism and NEM sockets. All in all for 4 quid it's a steal and if you search on other model sites you'll see people have been filling their boots! It clearly is great value for money for making long rakes or as a basis for bashing (eg into 4TC unit?) It seems to be widely available at WHSmiths, Asda, local newsagents etc (subject to other modellers not having got there first.....) For issue 2 onwards at higher prices, forget it...... |
|
|
|
Post by metroland on Aug 12, 2013 10:41:47 GMT
Thanks. I don't have the Met Rolling Stock book but would certainly be interested in one of these.
|
|
|
|
Post by metroland on Aug 9, 2013 19:48:02 GMT
Nice, would this have been B553 and/or B554 in LT days?
|
|
|
|
Post by metroland on May 10, 2013 15:11:53 GMT
I think for us modellers 3D holds great potential and as you say cost should come down and quality go up dramatically. However for sales in say the LT Museum shop, they are going to have to stick with die-cast adn injection moulded stuff as they're basically selling 'toys' which need to be capable of rough handling and of 'merchantable quality' Delicate 3D bodies should be ok for us modellers as we never mis-treat things do we?
|
|
|
|
Post by metroland on May 10, 2013 9:06:34 GMT
What a disappointment, I won't be getting one! XF Nor me. It would be nice if just for a change the LTM did some research into their past (which is what they're there for I'd have thought) and commissioned something accurate rather than another pretty cash cow for the gullible with money to burn. When you say commissioned do you realise we're looking at a ball park figure of £80k for a new model? Am not sure a museum (LT or otherwise) would find it easy to establish a business case. (Dapol do commissions for various retailers etc and the £80k is a publicly quoted figure from them as to the kind of up-front figure they would need for a project which wasn't one of their own commercial ventures) |
|
|
|
Post by metroland on Apr 8, 2013 12:43:21 GMT
Having done the footbridge, it meant I now had to work on the station building behind. As the era is late Victorian in the Home Counties, substantial amounts of brown brick (Scalescenes) are in evidence on the building, and the supporting walls carrying the bridge over the line that never happened. 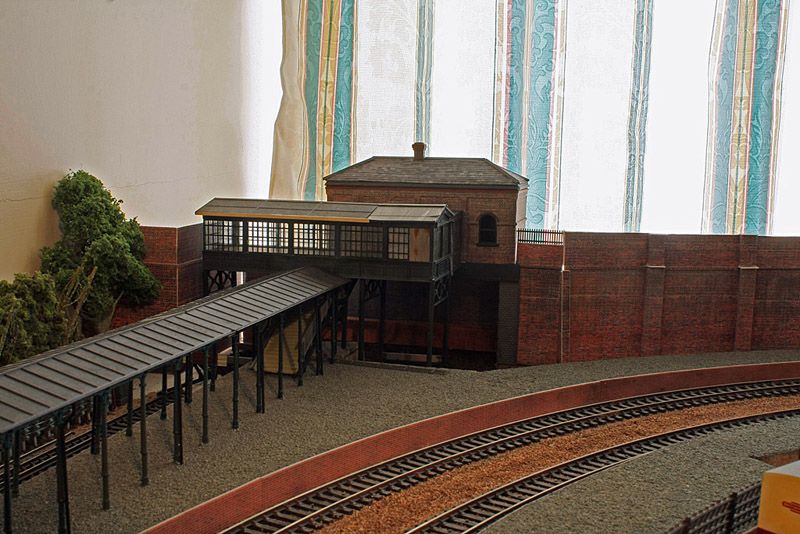 All the pieces are just resting at the moment as I need to get to the area off-camera to the left, so various bits of daylight are showing between sections. (The fence will be installed properly in time!) 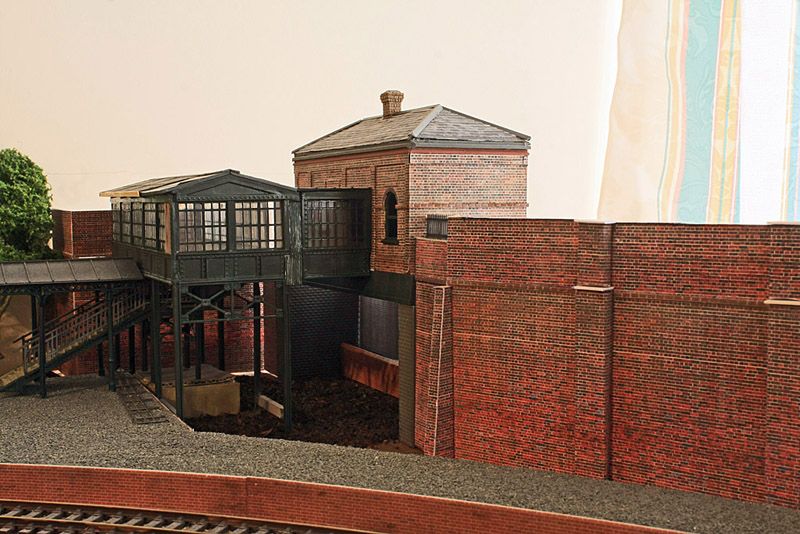 A view from the window side showing the method of construction using 5mm foam board for walls and supports with brick paper added. (The poor join by the fence should is again due to items simply being placed in position without finalising). 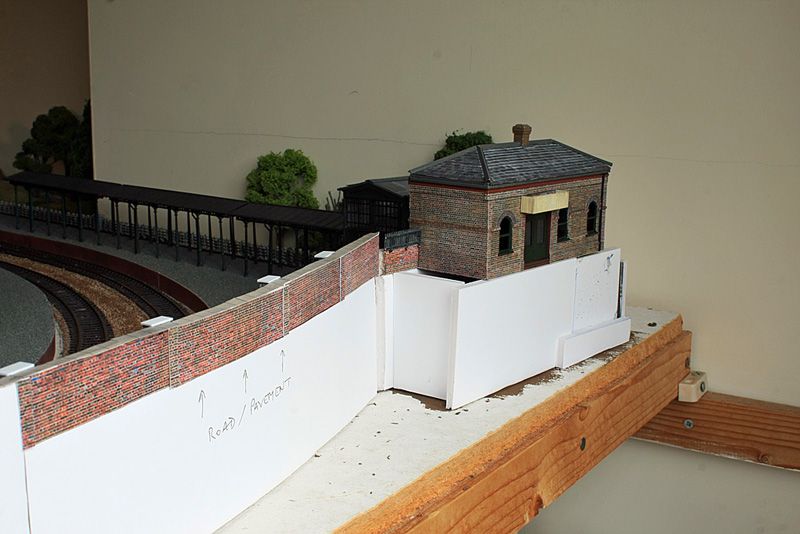 |
|
|
|
Post by metroland on Apr 4, 2013 17:14:15 GMT
That certainly looks the part. Would be interested to know how fragile the material is.
|
|
|
|
Post by metroland on Mar 26, 2013 15:10:17 GMT
There no problem with the links to the images, they all work! Unless I'm missing something the links to the pics of Locos 11-20 (further down the page) still aren't working? Most other links are fine. |
|
|
|
Post by metroland on Mar 6, 2013 12:50:47 GMT
Ref the trees, I find that I’m never happy with using the products of just one supplier and need to vary things, much as in nature. My trees so far have fallen into 3 categories: a/ Really good quality specimen trees. b/ Good quality at reasonable prices for placing close to the track. c/ Bangs per buck for those that I need to add density to the wooded area. a/ For really good trees I’ve been buying from Ceynix: www.ceynix.co.uk/ Jacqui attends quite few shows in the south east and also does commissions (though you have to be patient). By and large for OO her trees are £20-£40 though she does have others cheaper and more expensive. When you think a carriage to today’s standards will probably cost at least £30 and I’ve got far too much stock, I took the decision to try and cut back on coaches and locos a couple of years ago and invest in some better trees – less is more.  Above is a selection of Ceynix trees. The one planted by the station and the 2 at the front of the polystyrene were all £20-25 each I think, and bought off the sales stands. The 2 tall elms were made to order at about £35 each. Her trees are specific species, and not just some generalised ‘suitable for model railway’ items. b/ My 2 sources for good products at reasonable prices are Hedgerow Scenics (doesn’t have a working website – just a ‘shell’ here): www.hedgerowscenics.co.uk/ and Realistic Modelling Supplies www.realisticmodelling.com/Both these guys attend shows in south east and maybe a bit further afield. Both actually started with military dioramas etc and have expanded into railways as well. RMS do some very good low relief trees at reasonable prices (were £4.50 and £5.50 last time I bought some). 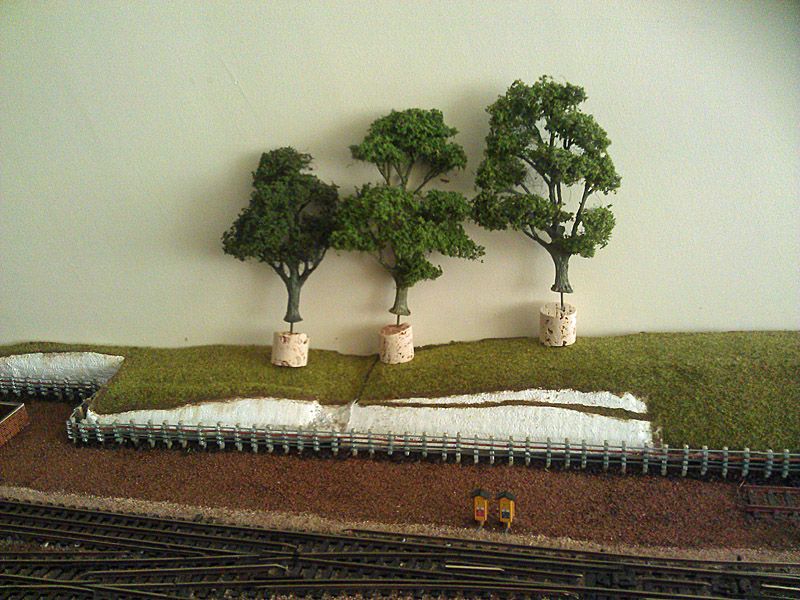 Hedgerow Scenics (as the name implies) started off by doing reasonable hedgerows. Sorry I can’t remember the price but I recall these were sold in packs of 2 similar:  c/ Other: The 2 main sources I’ve been using are Woodland Scenics, and The Model Tree Shop www.themodeltreeshop.co.uk/ I’ve been using their bulk packs of generic trees to fill out background areas Mostly these have to be in the background but occasionally you can use eg a Woodland Scenics tree away from the others. In this shot, the lone tree in the middle of the field is a Woodland Scenics walnut tree. 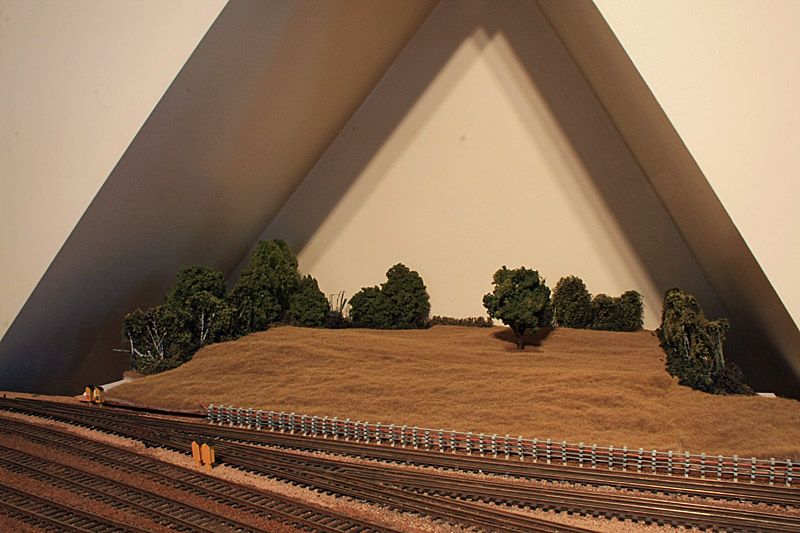 A few general snaps: 1/ In this shot the 2 tall elms are by Ceynix, most of the others are Model Tree Shop generic trees (with 1 from Heki as well I think) plus one Woodland Scenics walnut tree, and a couple of RMS low relief trees. 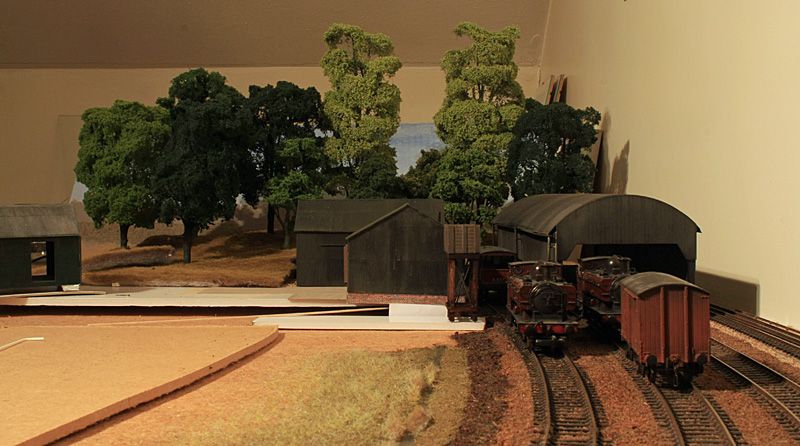 2/ To the left of the water tower all are RMS low relief trees. The large tree at the back is The Model Tree Shop, and the smaller one on the right is one of Ceynix smaller trees.  3/ Finally here, the edge of the field is Hedgerow Scenics hedgerows with Woodland Scenics generic trees behind and a walnut tree in the field (Yes it's the same pic as above) |
|
|
|
Post by metroland on Mar 6, 2013 9:23:16 GMT
Hi phillw48, I've not tried making trees myself, they're all RTP. However, they're from about 5 different sources to get the variation. I'll do some notes about them.
|
|
|
|
Post by metroland on Mar 5, 2013 19:20:43 GMT
After getting the Q stock substantially sorted, I thought it was time I tackled something else I’d been putting off for ages. The LNWR/Met Joint Line had a policy of providing grandeur on a budget. As Aylesbury Junction was only meant to be a temporary terminus, they provided a fairly substantial passenger footbridge at the original station which doubled as a waiting area in the early days. Up to date Victorian technology meant a cast-iron and glass footbridge could be provided cheaply but which looked ‘modern’. Had Prince Albert lived, I’m sure he would have approved of the ‘flat pack’ technology that was used for the Crystal Palace being applied to this more prosaic structure.A modest ticket office was situated on the overbridge behind. (Observant viewers will note the building and overbridge are yet to be built on the layout). Some while ago I bought a Faller item with a view to very substantial hacking – please be gentle with me as this is far and away the most substantial cut and shut job I’ve ever done! Anyway, the time has come to shoot some location pics to make sure I’ve got it about right. There are some improvements needed – see later text. The view from the station yard: 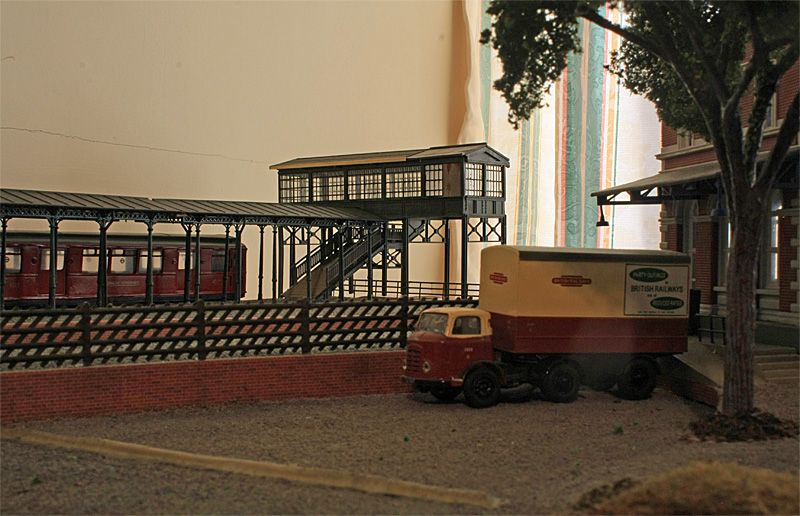 A crueller close up shot: Here we can see how the line was originally 2 tracks with an island platform. When it was clear the objective of Aylesbury was not going the be reached, the LNWR had a hissy fit and filled in part of one platform face and created a sharp curve to take their line off towards what is now the WCML. From this angle there is some light bleed around the bottom of the window frames which needs attention. As you can see, years of low spend on maintenance has lead to part of the roof being replaced by asbestos sheet and some windows being boarded up and covered with galvanised sheet. From here I can see the ridge tile along the asbestos area needs lowering a bit, but the overall size/location seems more or less ok. 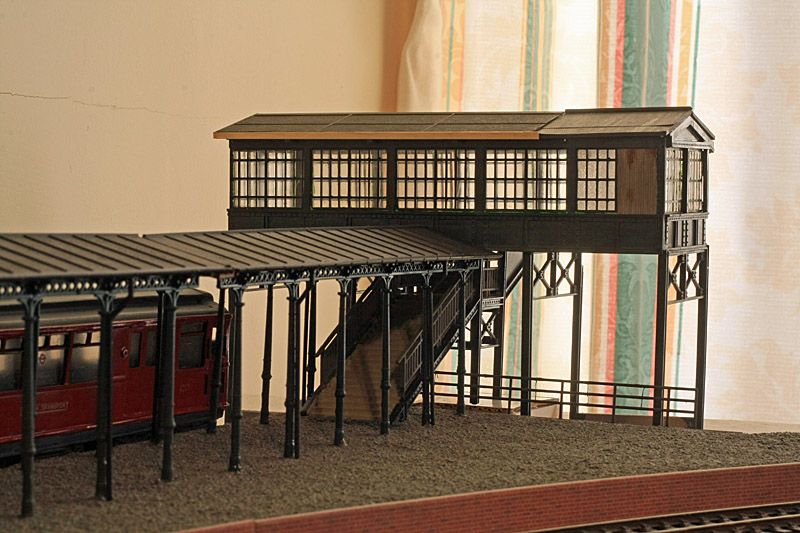 Finally a driver’s eye view from trains entering from the north on what was LNWR and later, LMS territory. The back wall is leaning in a bit at the top from this major cut and shut effort but will receive attention when the connecting bridge/corridor is taken from the corner to the ticket office. 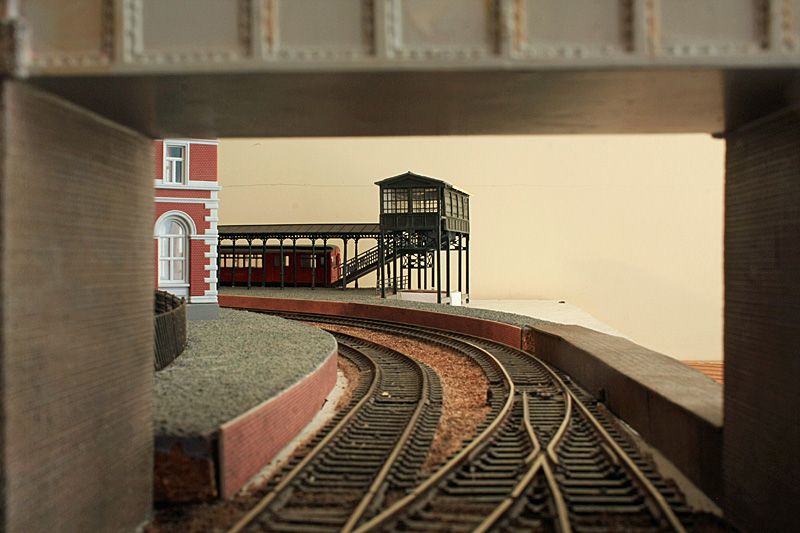 |
|
|
|
Post by metroland on Feb 28, 2013 17:54:08 GMT
Metman: Not too bad. Fortunately all 4 I've bought haven't suffered from warping, which i believe can happen with these. The Q27/35 seemed to have more flash than the earlier 2 which was tricky to file off the window bars. I didn't even attempt the LBC white metal bogies as I try and diguise RTR bogies under the cars. I don't like the flat underside of the Q38 with the 'bump' where the bogie pivots - I find this much more difficult to deal with than the other 3 with fairly deep wells underneath, which leave room to put layers of card and/or sponge to get the 'sit' right.
Needless to say glazing each window and vent individually on the Q38 was a PITA but just about worth the effort.
|
|
|
|
Post by metroland on Feb 27, 2013 14:34:11 GMT
A full 4 car set of Q stock has been spotted undergoing trial runs at AYJ: 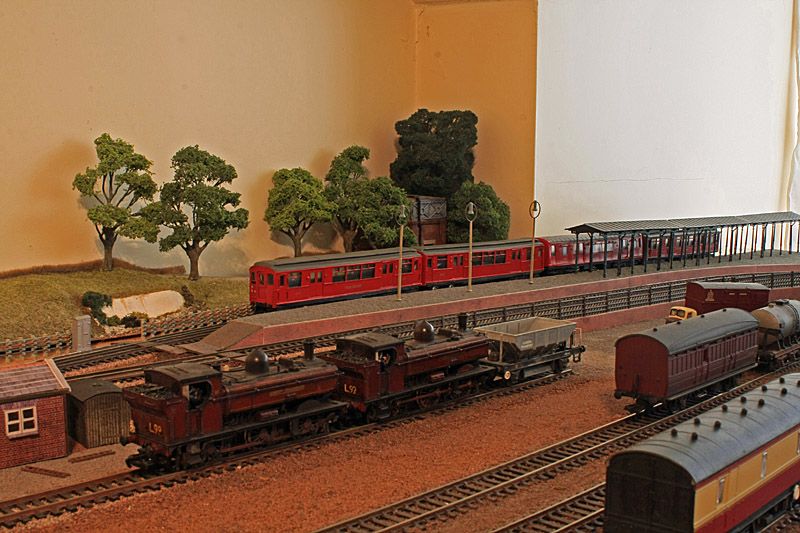 I originally had a couple of the old Little Bus Co resin kits bought on that auction site nearly a decade ago, hoping to get some more to complete a 4 car set. As you know the original ones were Q23 driver and Q38 trailer. I really wanted a Q27 driver for the other end and ideally a Q35 trailer car but would have settled for any other trailer. Blow me, when after all those years a pair came up late last year and they were Q27 driver and Q35 trailer so clearly a ‘must have’ for me. These aren’t for the faint hearted and indeed I’d never have tried to complete these a few years back but taking a deep breath, I completed 2 last year and have now almost done the other 2. I’d had a Tenshodo WB26 motor bogie in the drawer for years. You can tell it was from the last century as the price label is £9.85 – bought for another project. This is barely adequate for the job (even with plenty of weight over the bogie) but enabled me to get some practice fitting one of these and fettling it in. When funds permit, I’ll try an Endo motor. At the moment, the motor is under the Q35 trailer to get it more towards the middle of the train. These 4 kits have 3 different underframes. As a consequence, and due to the fact I might change the actual power bogie and its position in the train, all the cars are on accomodation bogies for now. I haven’t tried adding extra pickups as it didn’t seem worth it if I’m going to change the motor anyway. The Q38 has a flat floor underneath so is currently on Bachmann Mk1’s. Once I have the set finally sorted these should become Q stock bogies or at least Q sideframes disguising the Mk1’s. Because the other 3 cars have wells under the floors and because I knew the Tenshodo would struggle, the Q23 Q27 and one end of the Q35 are actually on Lima Mark 1’s. These normally come in for a lot of criticism but because of the deep wells under the floors and the fact these are very free running meant I could fettle them in quite easily. Dummy collector beams along the side, and the fact that the springs on Mk1’s are roughly where they should be on Q stock bogies mean you can’t really tell at normal viewing distance. One lucky accident of this is that after I’d cut the couplings off the Lima bogies, the couplings on the Bachmanns under the Q38 actually hook into a slot on the Lima bogies giving a good distance between cars. This meant I just had to fashion one one-off coupling to couple the Tenshodo under the Q35 to the Lima bogie under the Q27. 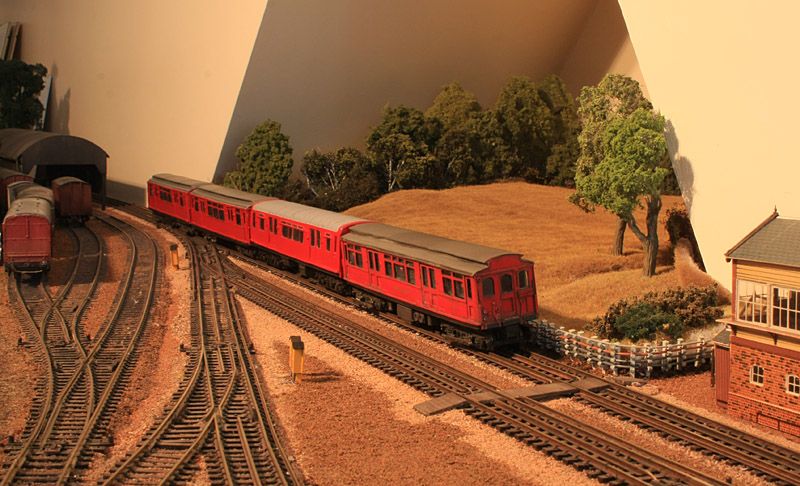 The fact that the wheels are 11.5mm/12mm is quite helpful with the ‘sit’ of the cars, and the deep flanges on the pizza cutter wheels aren’t a problem on Code 100 track. The Q27/Q35 still need weathering, but it was time to have a big tidy up, so I took these pics whilst there was room to set things up. |
|
|
|
Post by metroland on Feb 25, 2013 9:09:24 GMT
Great minds and all that! Am currently working on 4 car set Q23-Q38-Q35-Q27 which will have trailers smoking and Q23/Q27 non-smoking for 1960-ish.
|
|
|
|
Post by metroland on Feb 24, 2013 16:19:55 GMT
Thanks guys, I knew you'd know the answers.
|
|
|
|
Post by metroland on Feb 24, 2013 14:45:56 GMT
I'm having trouble finding a decent pic of a Q38 trailer say late 50's/early 60's with window detail. Most shots tend to be with the train 3/4 front showing the driver quite well but with other cars quite oblique.
It looks like Q23 and Q27 drivers were non-smoking (though some Q27 driving cars don't seem to have the window transfers).
Can anyone confirm the Q38 trailer cards were normally smoking cars?
Tks
Edit: Ooops I meant to say, there are a couple of pre-war B&W pics on LT Museum website which show a Q38 as NON-smoking and with window transfers in quite a low postion as compared with say the presrved Q23 driving car. What I'm looking for is confirmation of Q38 status in post war era particularly late 50's/early 60's.
|
|
|
|
Post by metroland on Feb 21, 2013 14:40:24 GMT
+1 Courchevel, France as seen in Tomorrow Never Dies
|
|
|
|
Post by metroland on Feb 20, 2013 18:08:01 GMT
Metman, I remotorised a Harrow Model shop white metel 4 car unit some years ago. The Endo bogies are far superior to the tenshodos and have about twice the pulling power. The unit would not run on a 2% gradient with Tenshodo bogies, they would just fall over. The Endos seem to work fine. I run a bus cable down the length of the train and use two pin micro connectors. These serve as couplers also in keeping the train together.[/quote]
Cyberman: For those of us who are all thumbs, could you post some diagrams or close-up pics of your arrangement pls? Sounds like I need to do something similar but can't quite get my head around the details. Tks
|
|
|
|
Post by metroland on Feb 15, 2013 11:53:20 GMT
Probably (Sat)
|
|
|
|
Post by metroland on Feb 13, 2013 16:19:17 GMT
Alternatively use Code 60 rail and move it out slightly - that's the cheat I use to try and get the look in OO (which of course is 4'2" or so anyway)!
|
|
|
|
Post by metroland on Feb 13, 2013 10:08:10 GMT
I've not used Endo so can't help there.
On my EFE tube stock I have a 1962 Central Line set with 4 cars (2 x Tenshodo in one of the middle cars) and I'd say it's over-powered on flat track and with Metromodels replacement bogies throughout.
I have 2 x EFE 1938 sets each with 3 cars and one Tenshodo power bogie (again with MM bogies throughout) and feel these should be ok for another car when I can get round to it.
|
|
|
|
Post by metroland on Feb 6, 2013 13:07:16 GMT
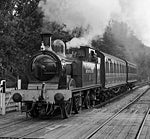
I bought a Bachmann J39 several years ago, and then discovered they weren’t all that common in the Chilterns! However all was not lost as the loco was 64838 and this was one of the last in service, and indeed several of the final active ones gravitated to Woodford Halse, and I found a pic of 64838 not far away. Like so many classes they were left to run down very quickly in terms of external appearance so a makeover was a necessity. Unfortunately the cabside numbers on my specimen weren’t all that good so I replaced them with Modelmaster ones even though a coat of filth was going on top. This is a solid little model which can give hours of modelling pleasure without needing any real technical skill. Apart from numbering and weathering, I’ve added coal, fire-irons, crew, electrification flashes, and close-coupled the tender. 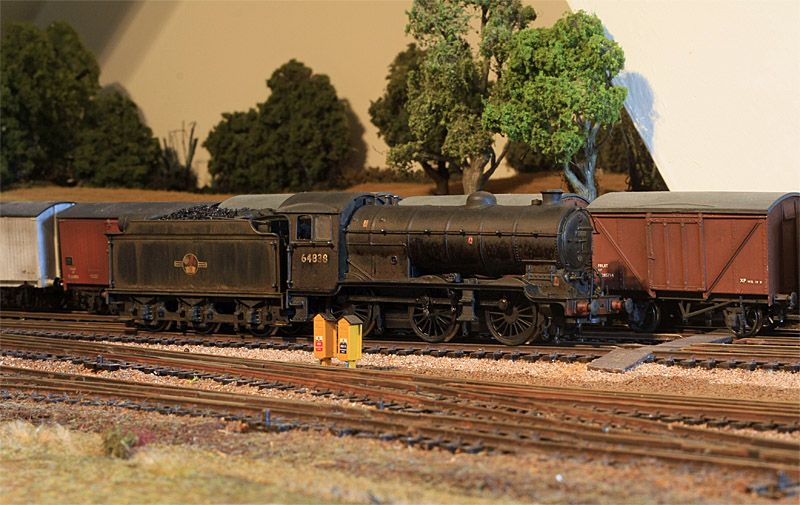 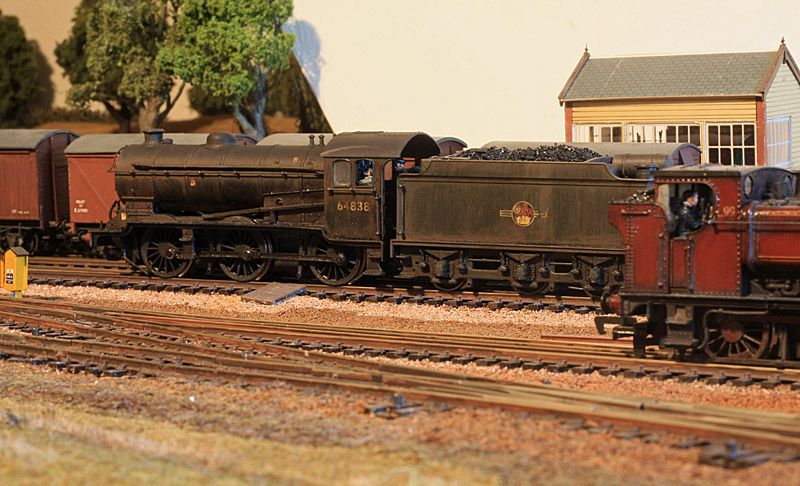 If the signalman can see past those box vans, he won’t be too happy about the loco running without lamps…. |
|
|
|
Post by metroland on Jan 25, 2013 18:18:25 GMT
Thanks for that Metroland, would you then recommend code 75 rather than code 100 track? My track is all code 100 - afraid I've never run any of my stock on code 75 so can't answer. |
|
|
|
Post by metroland on Jan 25, 2013 16:42:21 GMT
Coming along nicely. Is that Clan going to be 72009 Clan Stewart which was trialled on the GE?
|
|
|
|
Post by metroland on Jan 25, 2013 14:59:01 GMT
As others have said, it’s well worth getting the bogies from Metromodels they make a big improvement towards free-running. The coupling bar Metromodels can supply for the the bogies is on the right. If you should need anything longer (you probably won’t) it’s easy to make your own. The Metromodels ones were out of stock at one time, and in any case I wanted to try nose to nose coupling a couple of units. The spindly thing on the left is my version. Just a piece of brass rod and two brass washers. No soldering expertise needed, and you can easily build a few of differing lengths if you need to practice stock formations  One thing I did find with Peco Code 100 points (especially electrofrog ones) you need to file down the V a bit. When those tiny little wheels come through the point towards the V they had a tendency to jump on my ones. Only a few thou needs to be filed off – just to make it a bit more like a ramp than a flat end face. Similar to XF, a couple of pics of mine. Departures from the bay platform traverse a small radius turnout then immediately a medium one, then immediately another small one.   |
|
|
|
Post by metroland on Jan 23, 2013 12:49:06 GMT
I haven’t been able to work on the layout itself for a little while but have picked up a project that’s been hanging around for ages. I had a couple of green Airfix Class 31’s from way back, which still perform quite well but aren’t quite up to today’s standards. The dull green covering is really quite horrible and the cabside numbers aren’t quite right, and of course the cabs weren’t flush glazed. I’d held off attacking these for ages as I thought they’d need a full repaint but after taking the plunge realised this isn’t so. I took some T-cut to the cabsides to remove the numbers and discovered that if you’re not too ham fisted the horrible dull sheen can give way to a reasonable finish. In fact I went round the loco twice with T-cut washing in between. The cabs were glazed with SE Finecast glazing which I’d also had forever. New numbers and electrification flashes were from Modelmaster sheets. I’d decided to number it as D5537 on loan from Ipswich, which had been in service a couple of years and not exactly abused, but not given much TLC either. I then covered the model in a couple of thin coats of satin varnish which were followed by my usual gunge of Joe’s Model Trains shale and dark brown, which was then immediately removed with cotton buds. When dry, the louvres were treated to a thin wash of Modelmates oily brown as the loco at this stage wouldn’t have been too unloved. Original Airfix (except for flush glazing): 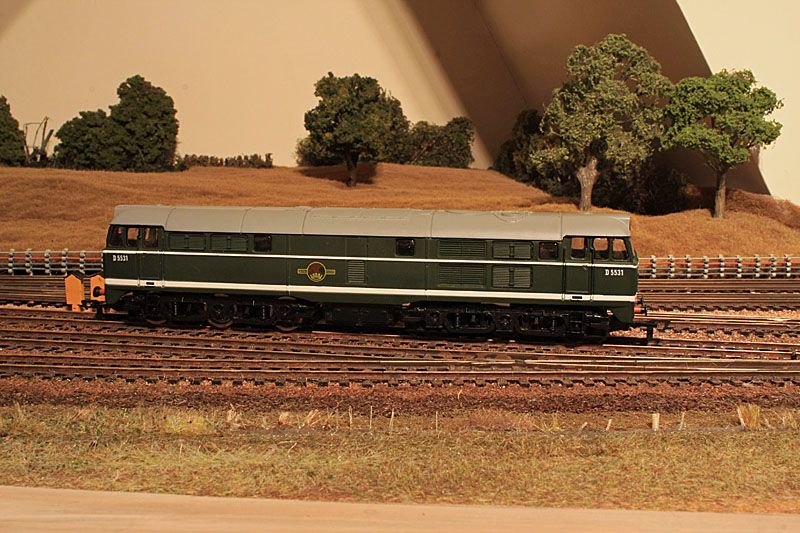 D5537 side on: 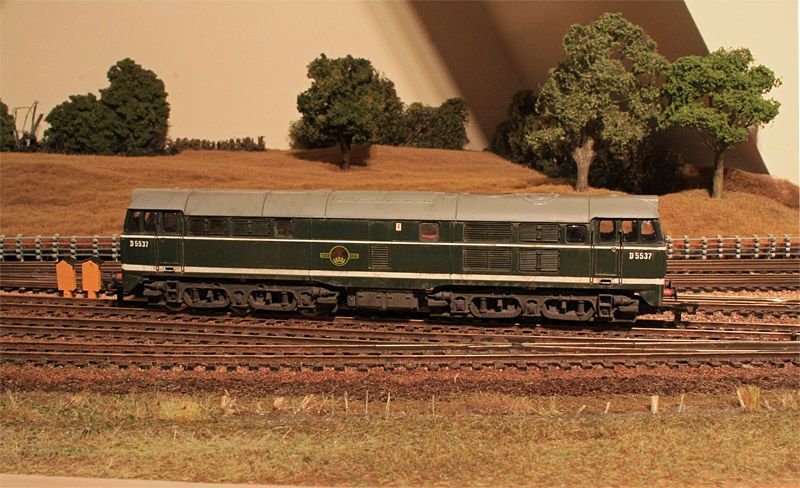 The bogies were treated to the same gunge, but with grey powder stippled whilst still wet, After drying, small amounts of Modelmates oily brown were added to parts of the bogies. After that had dried, some terra cotta powder was brushed over the bogies which is my choice for representing brake dust, and then over-dusted (including lower body sides) with dusty brown. I find a ladies blusher brush very good for this final light dusting stage. D5537 is caught on a trial run with some quad-arts: 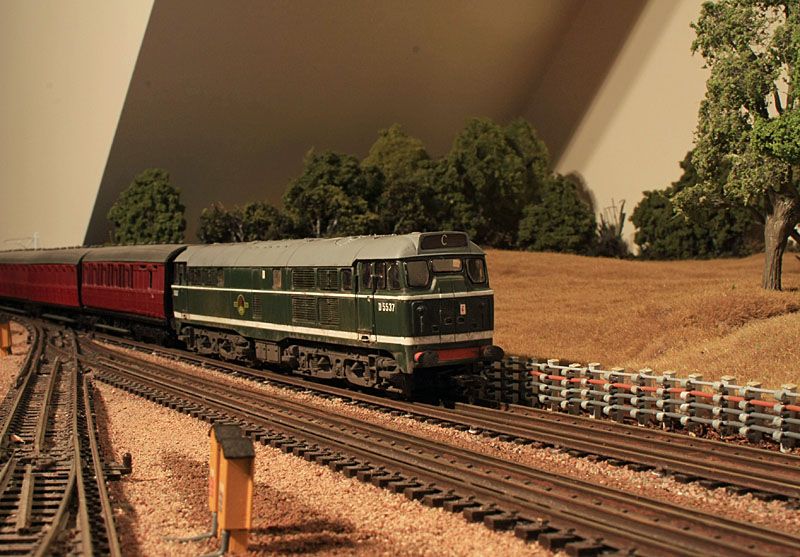 Head-on the weathering looks a bit heavier than side-on so I may clean the sides a bit more. The roof needs a bit more weathering and of course couplings and front end pipes need attention, along with doing some wiper blades, oh and of course the headcode panels. This has been quite enjoyable as it’s an inexpensive upgrade, and although it took several ‘passes’ none of them individually required any particular skill – just patience. In fact just lately, I seem to be doing more and more rehab of old Airfix, Mainline, and SOME Lima items. The joy of these is they are relatively cheap and you can do as much or as little as you want, and if it all goes belly up you haven't ruined an expensive item of stock. |
|
|
|
Post by metroland on Jan 21, 2013 19:21:12 GMT
|
|