|
|
Post by metroland on Dec 31, 2018 12:47:10 GMT
Happy New Year 1959 style! 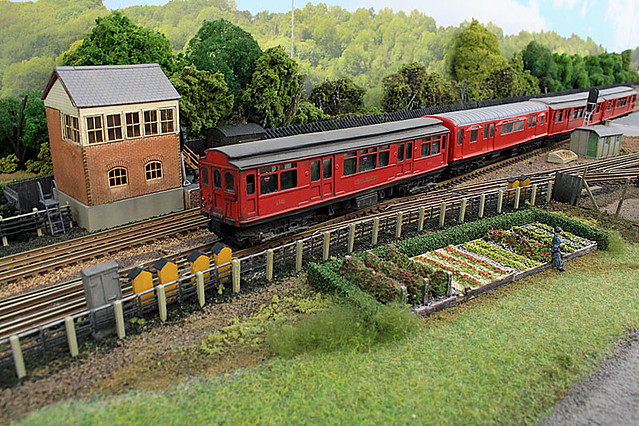 rev Q stock allotment rev Q stock allotment by Sarah S1ddons, on Flickr I was hoping to have the next module finished by now, and I can say hand on heart that it nearly is. I have several pics to process but having seen the first ones have noticed a few bits that need attention. Late 50’s and early 60’s still saw plenty of allotments close to the railways, and one of our local crew is grabbing a few minutes to tend to some fruit and veg. In the past I’ve built some modules to place behind the running tracks so I’m not continually leaning over and dislodging things. I thought I’d have a go at building a module for the front embankment as it meant I could make much more mess on the workbench. Here’s a snapshot of earlier progress, before it was installed. 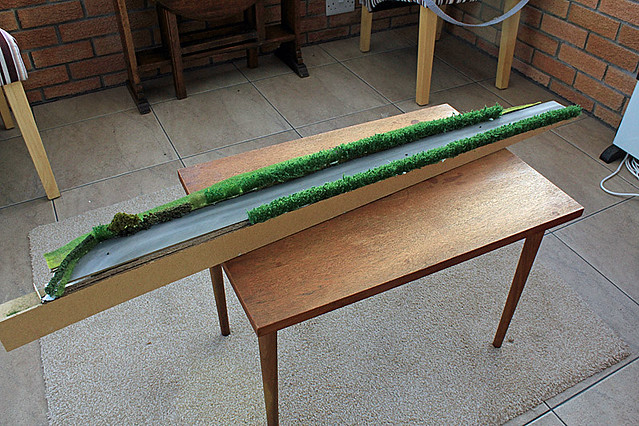 rev Front Module b 800px rev Front Module b 800px by Sarah S1ddons, on Flickr Hopefully not too long before I can show how that white area has been filled. |
|
|
|
Post by metroland on Oct 6, 2018 14:47:04 GMT
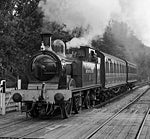
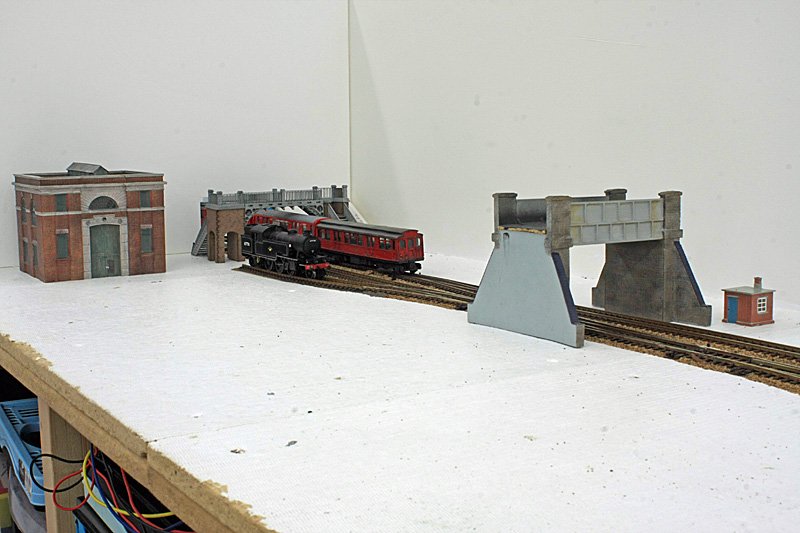
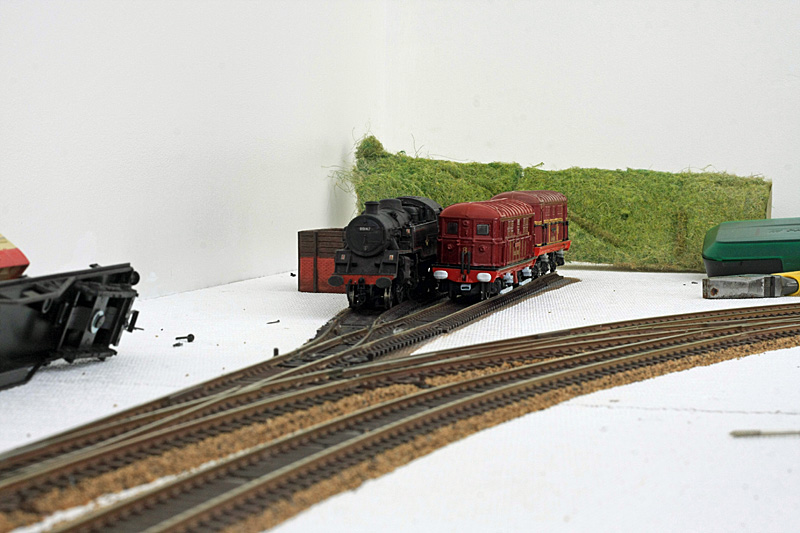
My wife died shortly after the last update. Needless to say very little progress has taken place since then. However, she was always very encouraging and I intend to carry on this autumn. This update is therefore a bit unusual as it’s mostly about what I intend to do rather than what I have actually done. I needed to construct a subway between the platforms. Stations such as Chorleywood and Chalfont and Latimer have these so it’s prototypical for the area. I’ve experimented with Archers rivets. From tutorials on Youtube etc they seemed to be a bit tricky and so it turned out. Carrier film is quite visible close up, though to be fair they do say these are meant to be applied before paint is added but I’d already painted these sheets battleship grey. 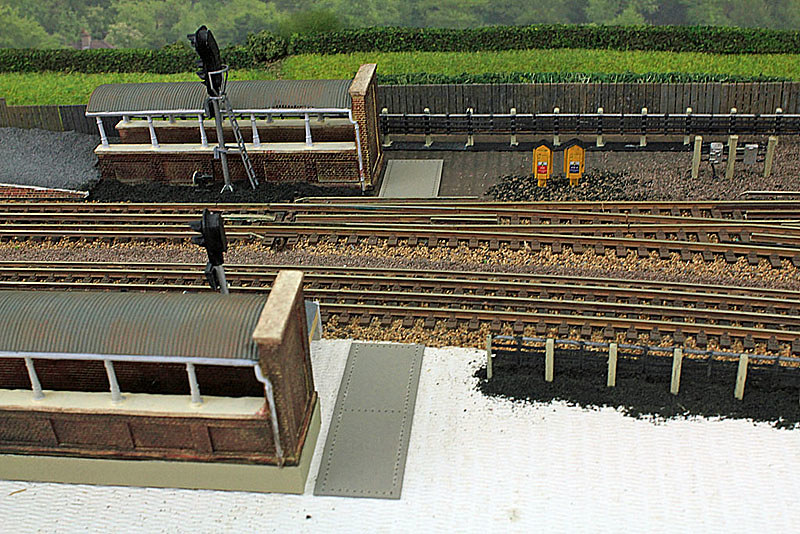 rev subway rivets a 800px rev subway rivets a 800px by Sarah S1ddons, on Flickr With weathering and viewed from a more normal distance the carrier film mostly disappears. I probably need to attend to the weathering once ground cover is added and/or have another go as this was my first attempt. 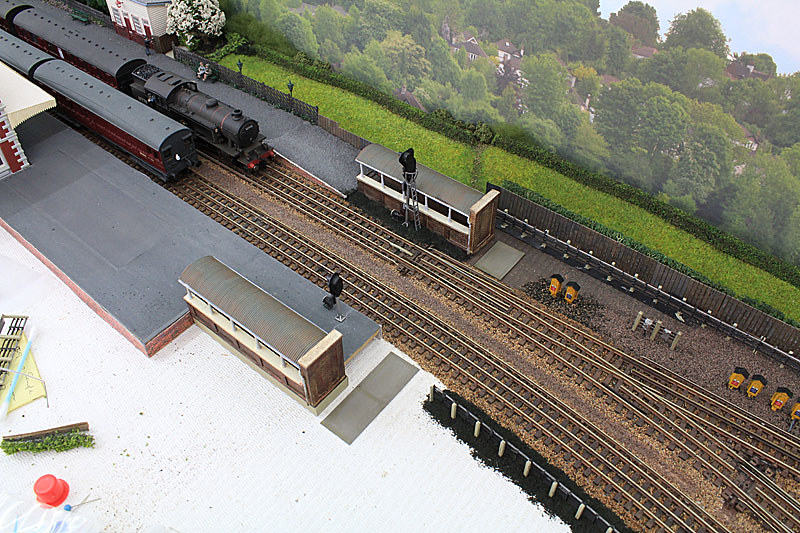 rev subway rivets weathered 800px rev subway rivets weathered 800px by Sarah S1ddons, on Flickr Just before we moved here OO Works produced a run of about 200 LNER C13’s which were available in plain black, LNER black or BR black. At around £200 each I couldn’t be certain I’d have a layout here, or what area it would be, though my last layout was the same general area. It’s one of those decisions that even with hindsight you’re never sure if you did the right thing or not. Anyway, by the time I had something of a layout here and knew I could accommodate a C13 they were long sold out. In 4 years down here this is only the 3rd I’ve seen come up on ebay and they’ve all been LNER ones. This time I bit the bullet and got this LNER one which shouldn’t be a difficult job to change to BR. 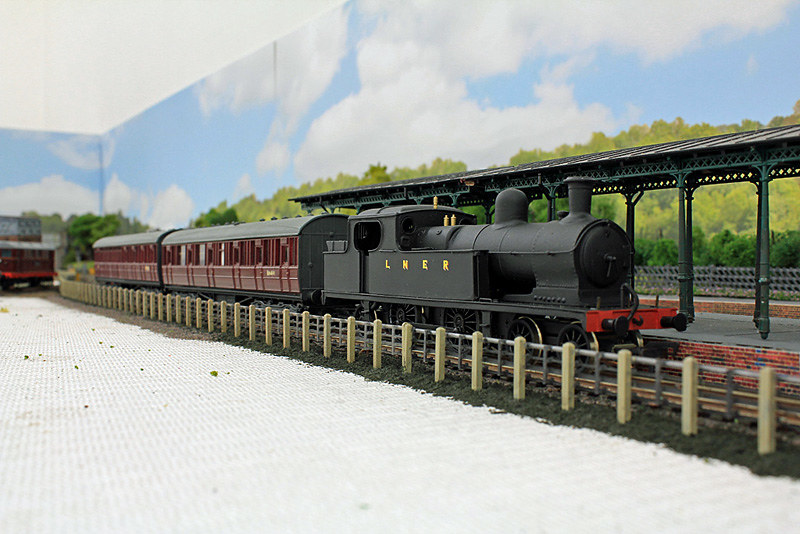 rev LNER C13 front 800px rev LNER C13 front 800px by Sarah S1ddons, on Flickr I doubt I’ll ever have an Ashbury set but as I’m not specifically doing the Chesham branch, decided to pair her with an LNER push-pull set. The composite has now been replaced by an all 3rd (which is actually a downgraded all 1st). 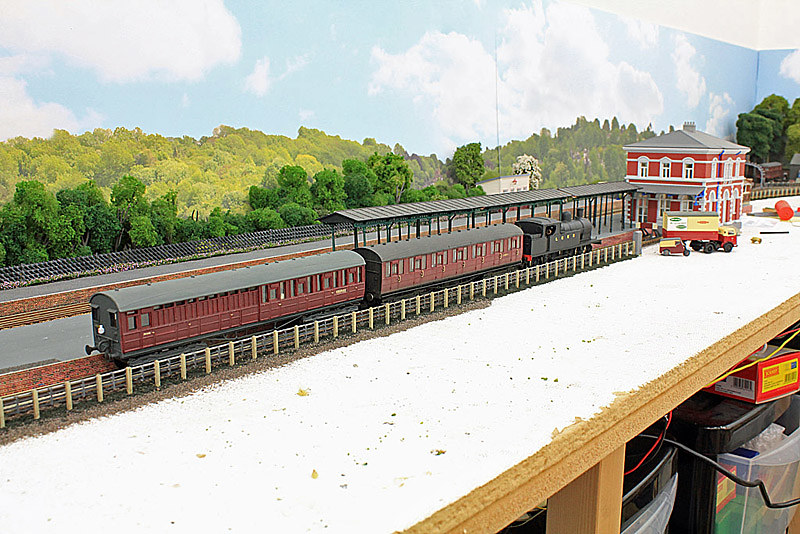 rev wide view C13 propel 800px rev wide view C13 propel 800px by Sarah S1ddons, on Flickr 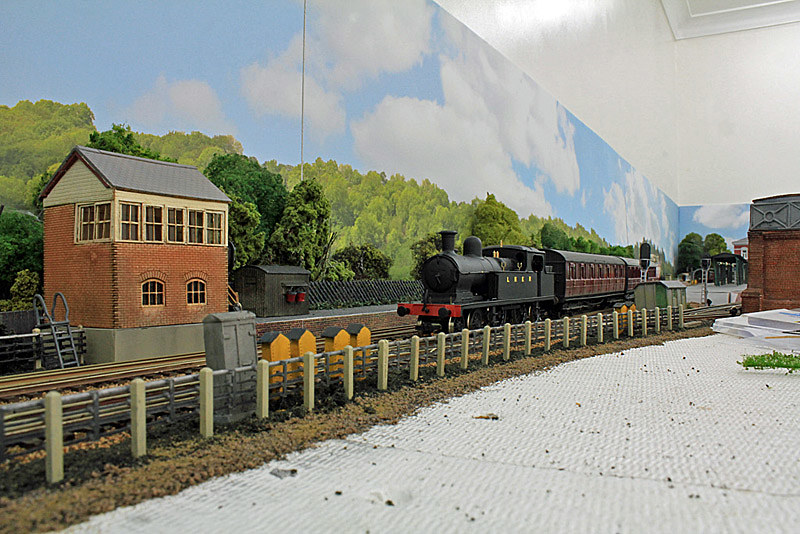 rev ground view C13 leading 800px rev ground view C13 leading 800px by Sarah S1ddons, on Flickr I’m quite happy with this set as it seems to fulfil a need for some rural connecting service towards the end of the Metropolitan Line. At the moment the plan is to concentrate on filling the foreground at the ‘London’ end of the layout to produce some better ‘train in the landscape’ photo opps. 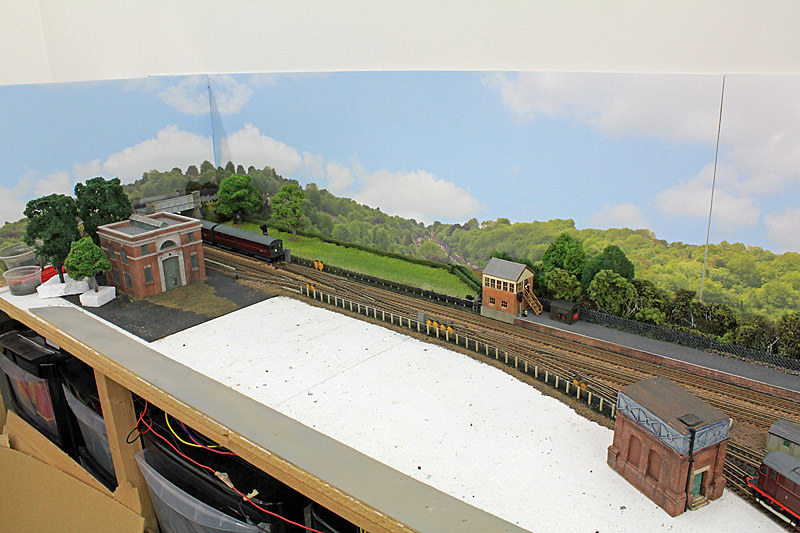 rev wide view scenic space 800px rev wide view scenic space 800px by Sarah S1ddons, on Flickr |
|
|
|
Post by metroland on Jul 22, 2018 10:59:25 GMT
It’s been an odd couple of months. Rampaging growth in the garden, a prolonged hot spell, and carer duties have conspired to stop me spending any long periods in the garage. However, I seem to have engineered quite a lot of 30-40 min sessions to work on stock and got quite a lot done. Additional scenery will have to wait until the autumn but here’s some new stuff. I’d had a Heljan Sherlock Holmes for some time. It’s a great loco but of course the finish is ex-works. At over £100 I wasn’t keen to make a mess of it. 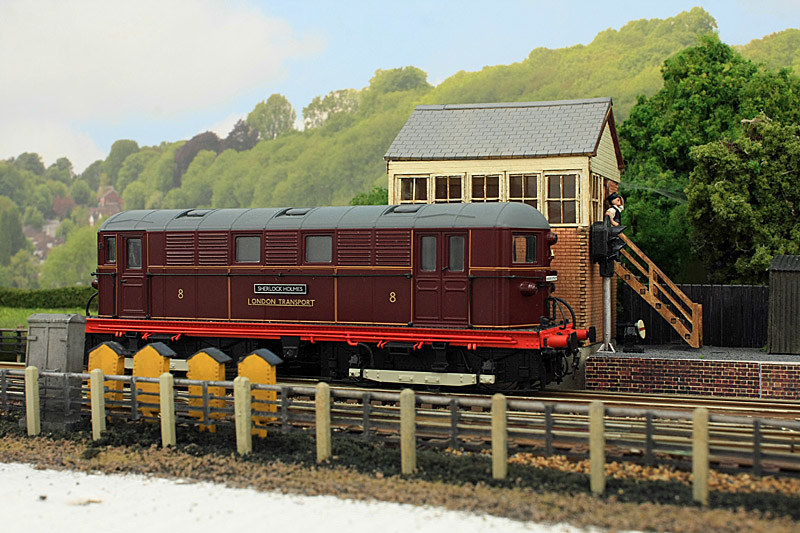 rev Sherlock Holmes 800 px rev Sherlock Holmes 800 px by Sarah S1ddons, on Flickr Recently Hattons have had George Romily for about £75 – whilst not exactly small change, given the price of new locos these days it’s by no means a bad price, so I took the plunge and had a go at converting her to Sir Ralph Verney in weathered condition. (Modelmaster have stopped doing Met BoBo nameplates so I snapped up 4 of them, though doubt I’ll have that big a fleet but it was another reason to ‘have a go’) 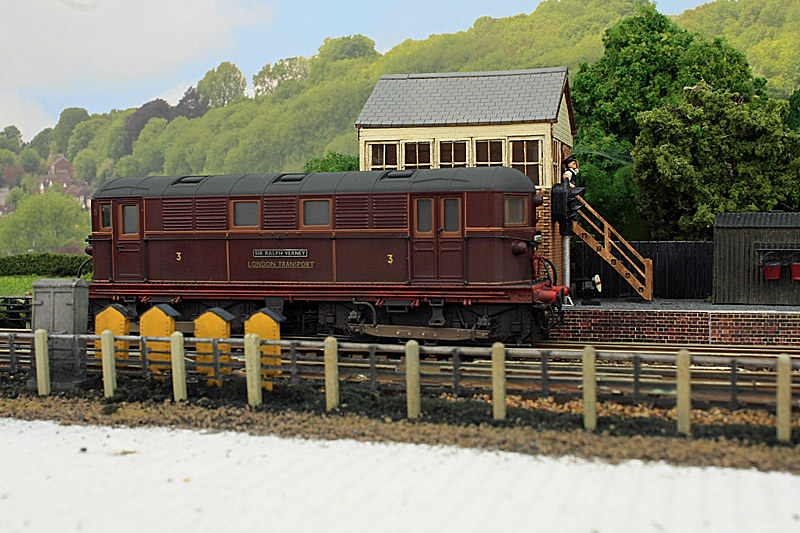 rev Sir Ralph Verney box 800 px rev Sir Ralph Verney box 800 px by Sarah S1ddons, on Flickr A shot of No.3 in the stabling area awaiting her next turn. 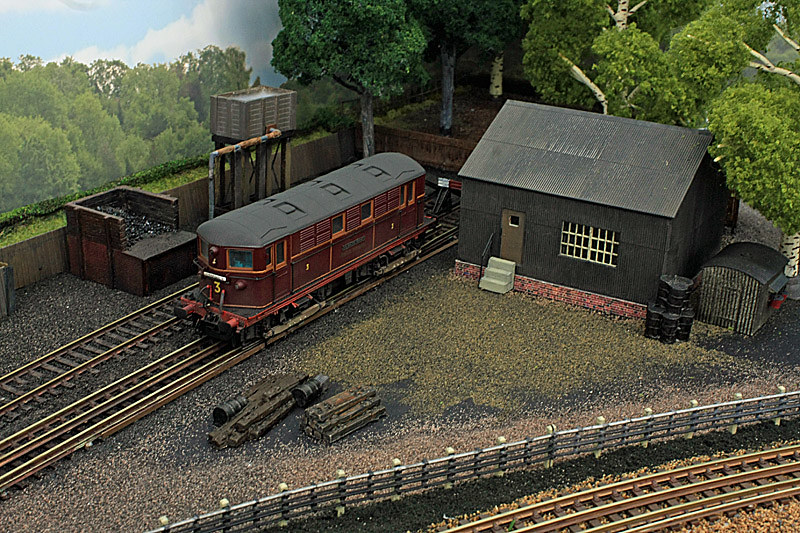 rev Sir Ralph Verney shed c 800px rev Sir Ralph Verney shed c 800px by Sarah S1ddons, on Flickr Many of you will be familiar with the series of pics on the ltmuseum web site of the final coal delivery to Chiltern Court (the building above Baker Street station). I can’t recreate it exactly so in my world, deliveries continued a while but of coke/coalite in hired-in BR wagons. 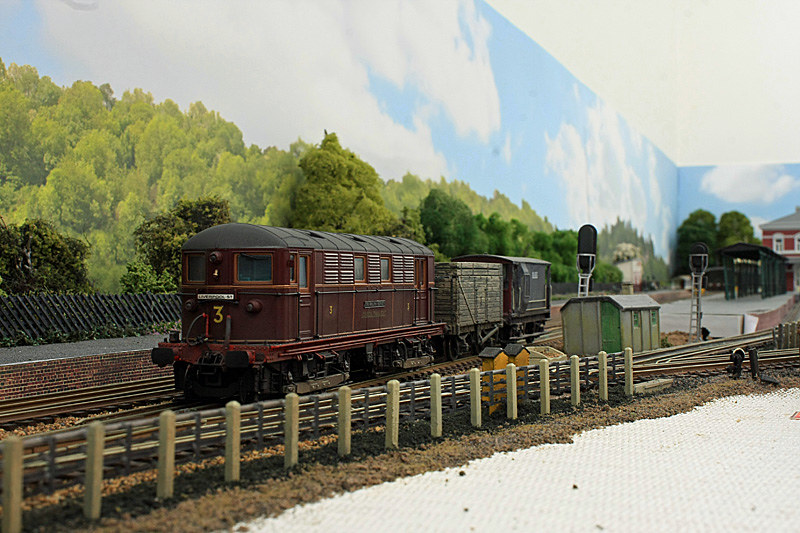 rev Sir Ralph Verney goods 800 px rev Sir Ralph Verney goods 800 px by Sarah S1ddons, on Flickr Hornby’s Britannia is a great loco but they’ve been trying hard lately to turn it into more of a toylike appearance. 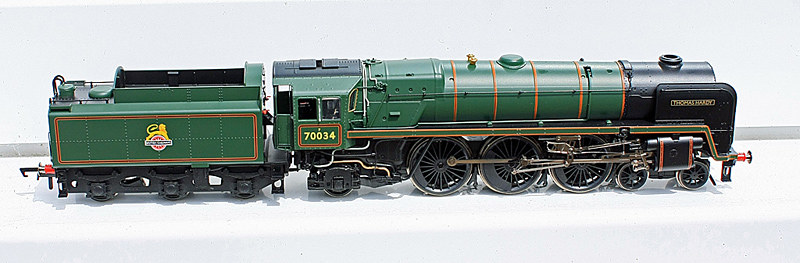 rev Thomas Hardy RHS 800px rev Thomas Hardy RHS 800px by Sarah S1ddons, on Flickr With a bit of work she can be made a lot more realistic. I wanted one with the revised WR smoke deflectors and what better choice than 70026 Polar Star which caused the change? I’ve found pics of 3 locos that have the revised deflectors and the earlier crest but decided to go with Polar Star – seen here on a Saturday poshex using the stock from the South Wales Pullman which would otherwise have been idle. 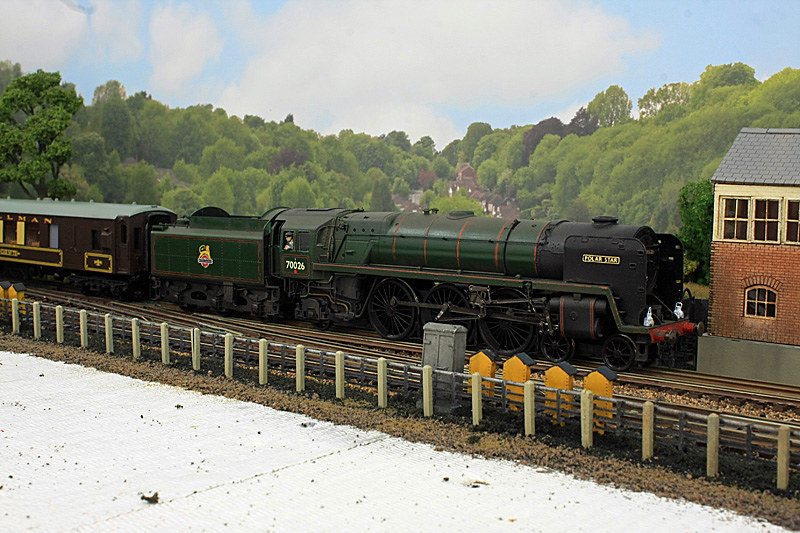 rev Polar Star 800px rev Polar Star 800px by Sarah S1ddons, on Flickr And finally…… I’ve found a way into the Hornby Gresley compartment stock without doing much damage, so managed to put a smattering of passengers in them so they’re not so bare, and don’t have to run ecs any more. 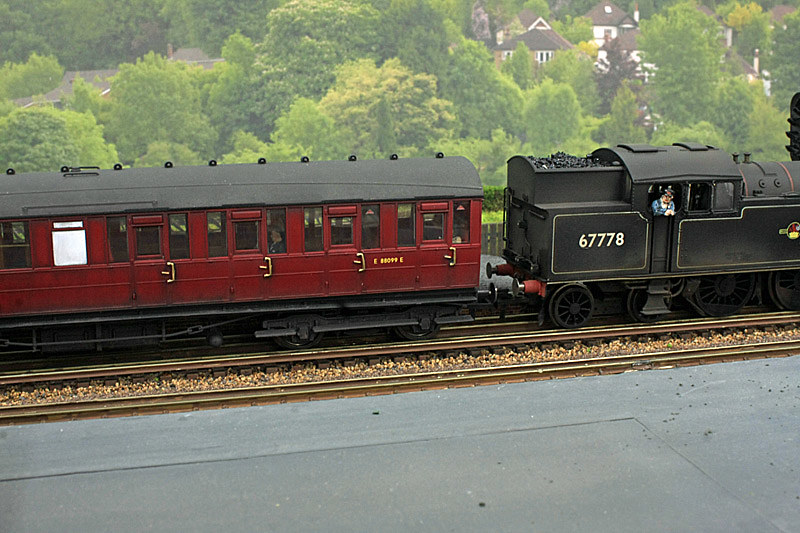 rev Gresley plus L1 800px rev Gresley plus L1 800px by Sarah S1ddons, on Flickr |
|
|
|
Post by metroland on May 10, 2018 12:39:37 GMT
Thanks for the suggestion but I think 'seamlessly' is beyond my skill set!
|
|
|
|
Post by metroland on May 9, 2018 16:54:06 GMT
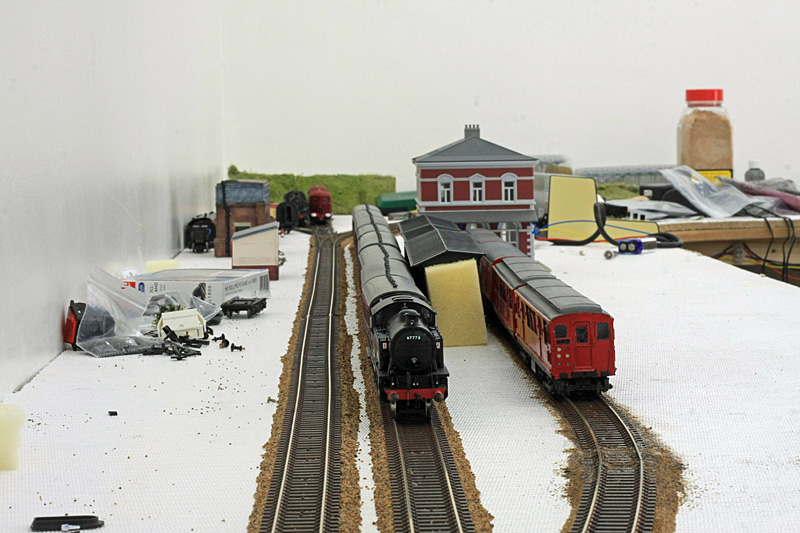
Unfortunately early March 2018 saw the ‘Beast From The East’ roll in, and for the first time it was too cold to work in the garage for some days. Normally in winter the temperature drops to 4 deg C overnight (or more properly 39F for the period of this model). Occasionally it drops to 2C but in any case with good insulation, a couple of electric fires and a zipper jacket, it becomes bearable fairly quickly. Not so this winter! For the first time ever it was zero (or 32F) and with the cold winds, and just trying to walk a few steps from the house to the garage kept me out. This was followed by some periods of family illnesses which rather put paid to further scenic work for a while as I couldn’t find enough long periods to be able to do the work I wanted. All was not lost as my mojo remained fairly intact. It did mean however, I was restricted to short spells of painting and weathering stock – grabbing a few minutes here and there. As a result this update is just ‘new’ items of stock. Ex-LNWR G2a 49061 from Bletchley shed has been seen quite often recently wheezing her way around with coal trains. 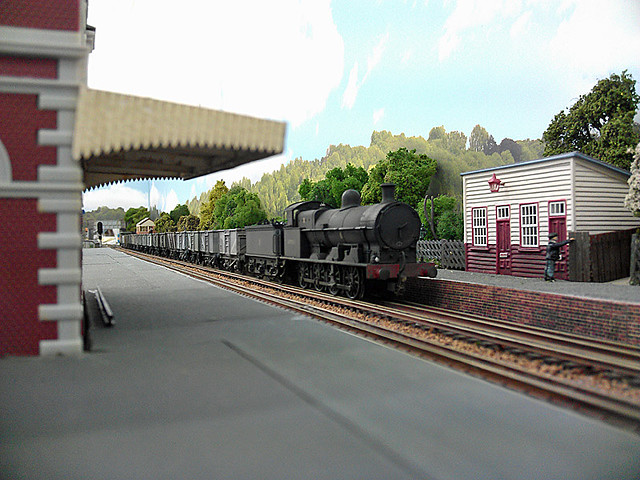 rev 49061 front 800px rev 49061 front 800px by Sarah S1ddons, on Flickr 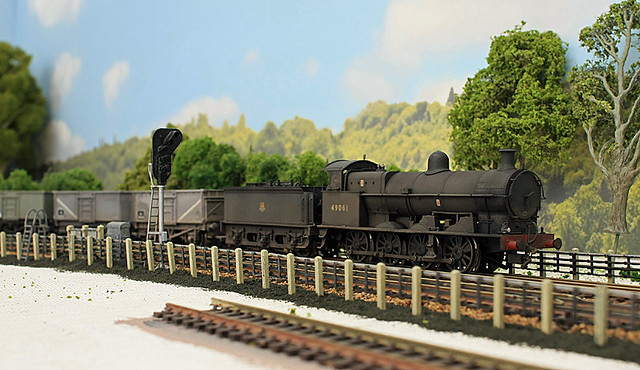 rev 49061 curve 800px rev 49061 curve 800px by Sarah S1ddons, on Flickr Our local carriage enthusiast has got quite excited with sightings of some cascaded Eastern Region stock including this Thompson Composite on an Oxford-Cambridge working. 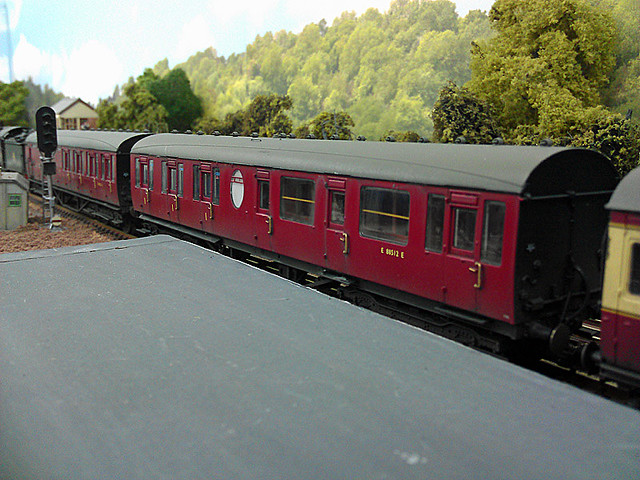 rev Thompson Composite 800px rev Thompson Composite 800px by Sarah S1ddons, on Flickr This Gresley 8 compartment 3rd looks like it’s spent far too much time commuting to the smoke.  rev Gresley 8 compartment 800px rev Gresley 8 compartment 800px by Sarah S1ddons, on Flickr I’d like to add some figures to the Hornby coaches but those footboards are just so delicate I can’t seem to get the bodies off without wrecking them so I guess they’ll have to spend their lives working ecs. |
|
|
|
Post by metroland on Feb 18, 2018 15:29:11 GMT
Thanks. You're very kind. Now where did I put my application form for the Turner prize?
|
|
|
|
Post by metroland on Feb 17, 2018 17:19:23 GMT
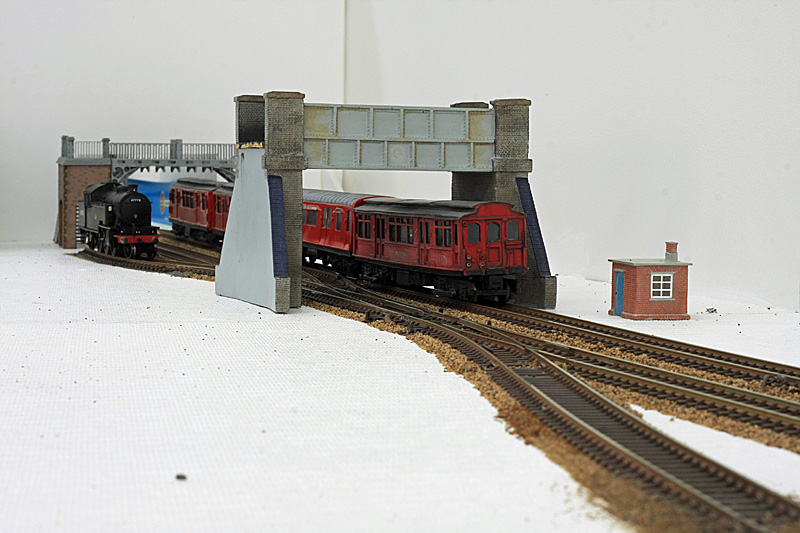
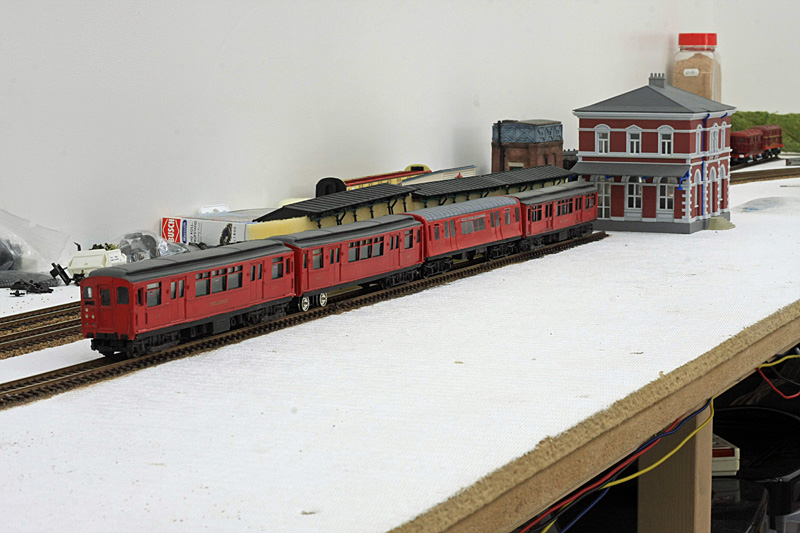
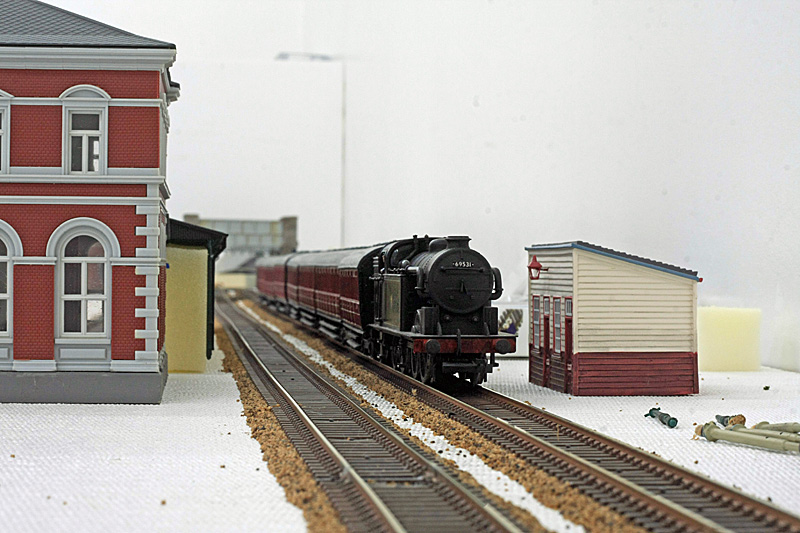
Welcome Back! It’s been a while. Unfortunately I had quite a disaster with scenery which dented my mojo a bit, followed by a lot of family illnesses which were a major call on my time – hence no updates for ages. In the meantime, early 2017 was quite a good time for decent locos being available in the new year at reasonable prices and I had some time to tinker with loco weathering and detailing, working a few minutes at a time. A Hornby D16 was renumbered as 62584 which was a Cambridge loco and worked Cambridge-Oxford services 1954-57 so was a good candidate for a cross-country train being diverted due to weekend engineering. 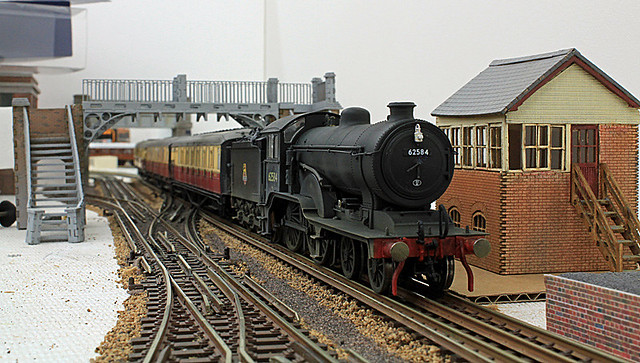 rev 62584 800px front rev 62584 800px front by Sarah S1ddons, on Flickr Also Hornby’s delightful J15 was renumbered as 65405, one of the handful that were allocated to Neasden for the Watlington branch 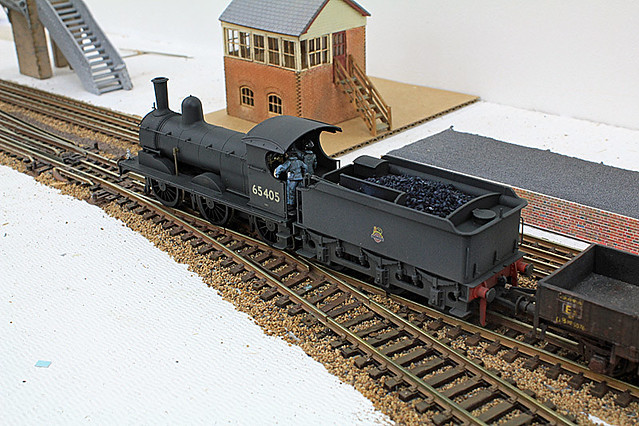 rev J15 c 800px rev J15 c 800px by Sarah S1ddons, on Flickr I missed out on the SLW Class 24 D5000 first time around, but this loco did work Marylebone-Nottingham trains (albeit slightly later than my timeframe). A 2nd-hand one came available on that well known auction site that often drains me of my funds and although not cheap at £140 buy-it-now was too good to pass. This is the one that changed everything. 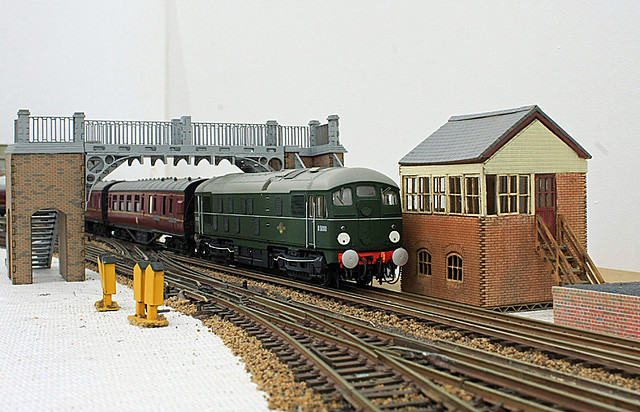 rev D5000 excursion 800px rev D5000 excursion 800px by Sarah S1ddons, on Flickr It turned out that the vendor was a lady selling off her late father’s estate of railwayana and models, and this had been in a wardrobe along with other models waiting for that last great project that was sadly never going to happen. Whatever my problems, at least I was alive and kicking, and had had a decent amount of track down since mid 2015, so if I don’t get on with it, when would I? In the interim, I’d been mulling over whether to have a backscene, and whether to have an additional spur for a standby electric loco at the London end of the station. This would mean relaying the bay platform road and a complete rebuild of the station. In the event, I went for both. Not sure why, but the backscene seems to come out more lurid in pics than to the naked eye. Possibly this is due to the fact the garage his 8 fluorescent lights, and the fact the camera resolves this differently than the human eye. New spur for electric loco 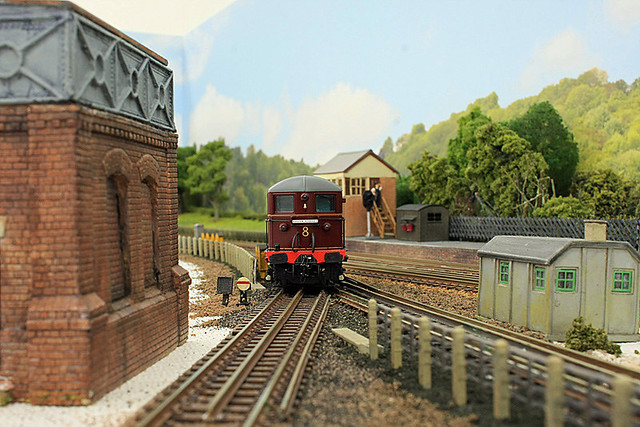 rev Ground Signals 800px rev Ground Signals 800px by Sarah S1ddons, on Flickr New spur seen from above 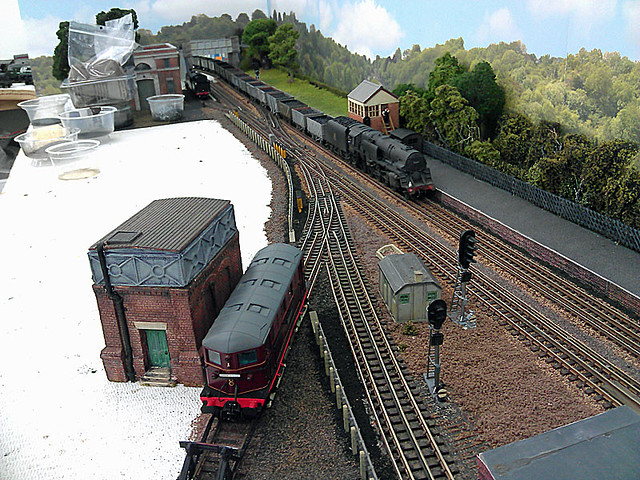 rev IMAG0194 800px rev IMAG0194 800px by Sarah S1ddons, on Flickr The photos are a mix of my camera and camera-phone. I’ve discovered I can squeeze my phone in places the camera won’t go, but depth of field is tricky. However this shot hopefully illustrates the long view from the steam loco spur siding. 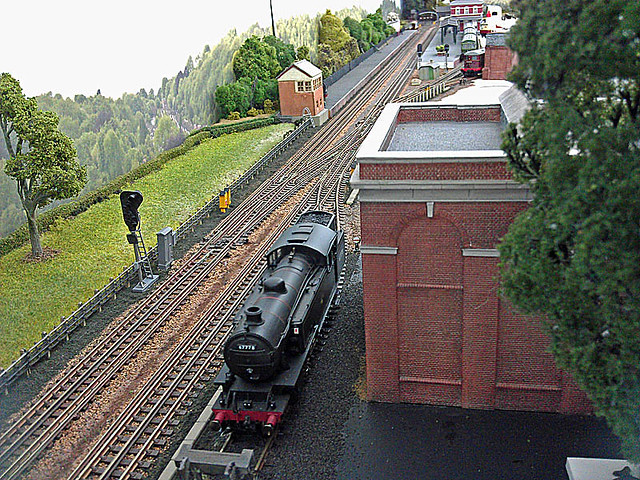 rev IMAG0190 800px rev IMAG0190 800px by Sarah S1ddons, on Flickr During the long layoff, I also discovered 3D printing. This is a real boon though does come at a price. It meant I could lay quite long lengths of lineside cabling quickly and without it looking too untidy. Also the advent of a cable gantry (albeit at a price) got me out of a real jam where I had to bypass the loco stabling point at the country end in order to continue cabling round to the turnback siding. 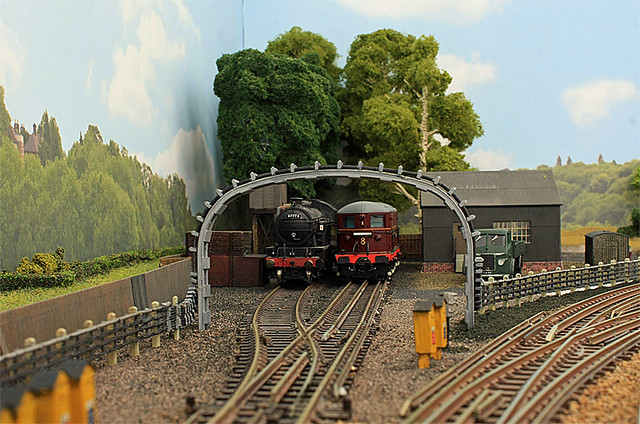 rev Gantry 28mm lens 800px rev Gantry 28mm lens 800px by Sarah S1ddons, on Flickr 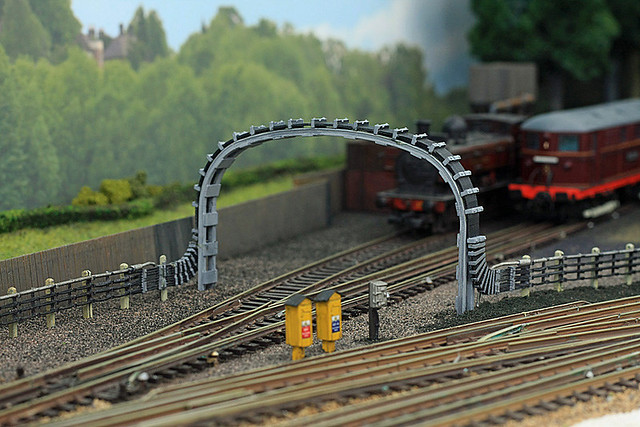 rev Gantry 50mm lens 800px rev Gantry 50mm lens 800px by Sarah S1ddons, on Flickr A couple of pics of Q stock in areas which aren’t yet complete 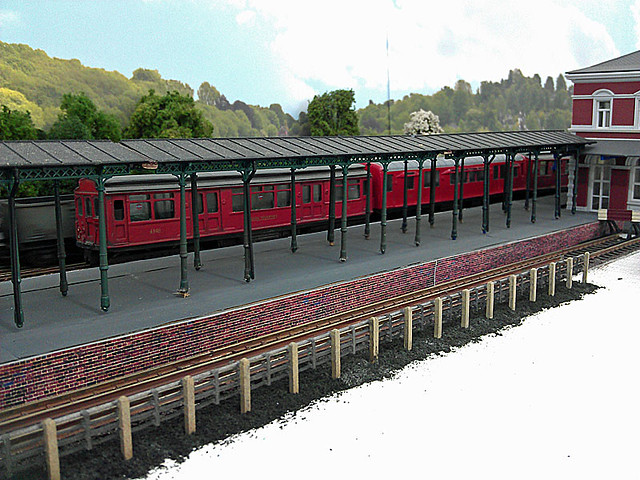 rev IMAG0198 800px rev IMAG0198 800px by Sarah S1ddons, on Flickr  rev IMAG0200 800px rev IMAG0200 800px by Sarah S1ddons, on Flickr With the loco servicing area almost complete the railwaymen have found some time to tend to their allotment which is coming on well but needs further attention to blend it in completely 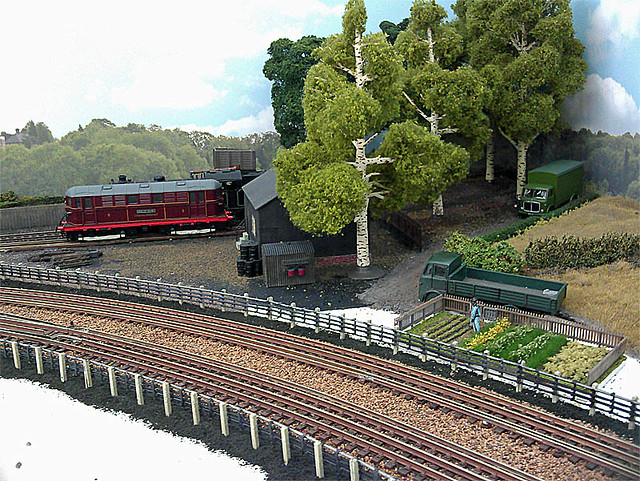 rev IMAG0188 800px rev IMAG0188 800px by Sarah S1ddons, on Flickr I really don’t know when I’ll be able to do further updates but hopefully this catch up is of interest. |
|
|
|
Post by metroland on Jul 1, 2017 19:25:50 GMT
A few years back, I put up a thread on here about weathered LT Panniers districtdavesforum.co.uk/thread/18138/weathered-lt-panniersWith the recent photobucket problems all the pics are 'lost' as far as this board is concerned, however all is not lost by any means. I only ever put low-res copies of pics on Photobucket so my originals rest with me on my home pc and external drives. I had a copy of the same thread on rmweb and although the pics were initially 'lost' on there as well, rmweb now offers the facility to upload pics directly onto their board (not sure it did 5 years ago). If anyone's still interested in this topic which has lain dormant for a while it can be viewed: www.rmweb.co.uk/community/index.php?/topic/48281-weathered-lt-panniers/The only real difference between the boards is the comments/own additions people have made. |
|
|
|
Post by metroland on Oct 2, 2016 18:37:47 GMT
What is the origin of your Hurst-Nelson Brake Van? Thanks, I've been away myself so only just seen your note. The duckets are from a Smallbrook Studios LSWR Road/Brake Van, grafted onto a Parkside LMS Brake (D.1659). I should have sanded the duckets smooth of course! |
|
|
|
Post by metroland on Aug 29, 2016 13:19:29 GMT
Just a little update to show some practice work. On my previous layout I installed the lineside cabling quite early, but this involved quite a bit of stretching with the electric drill to reach awkward corners. Although I don’t have to stretch so far on this layout, I am expecting to have some tricky shapes. Sooo as is my custom I’ve spent some time trying to find an easy way to do this. As an experiment I drilled a line of holes in some foam-board (also called artist’s board and Dahler board I think). It doesn’t matter that the ‘peg’ in the Radley Models posts sticks a little bit proud as this is a practice, and in any case I’m thinking it would be covered by ground material. A little blob of PVA holds the peg in place. My thinking is that I should be able to create runs of cabling on the workbench, and then offer them up to layout, thus being able to work from both sides if needed. 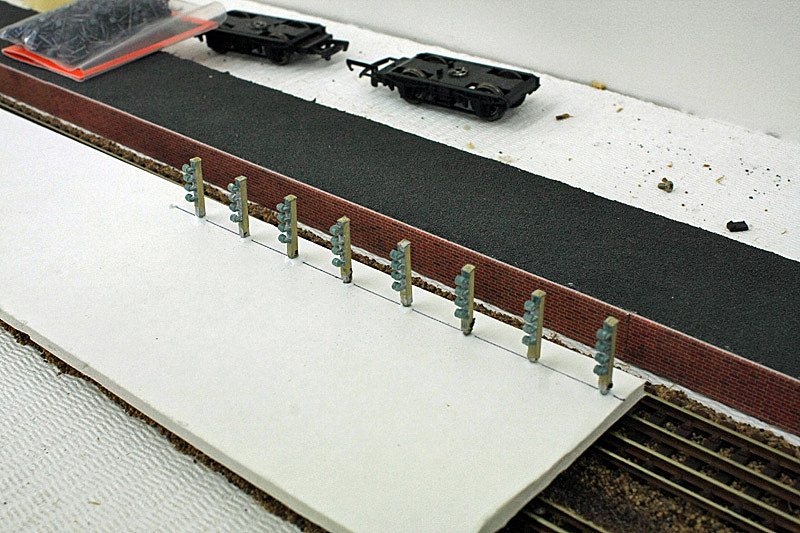 rev Posts plan view 800px rev Posts plan view 800px by Sarah S1ddons, on Flickr 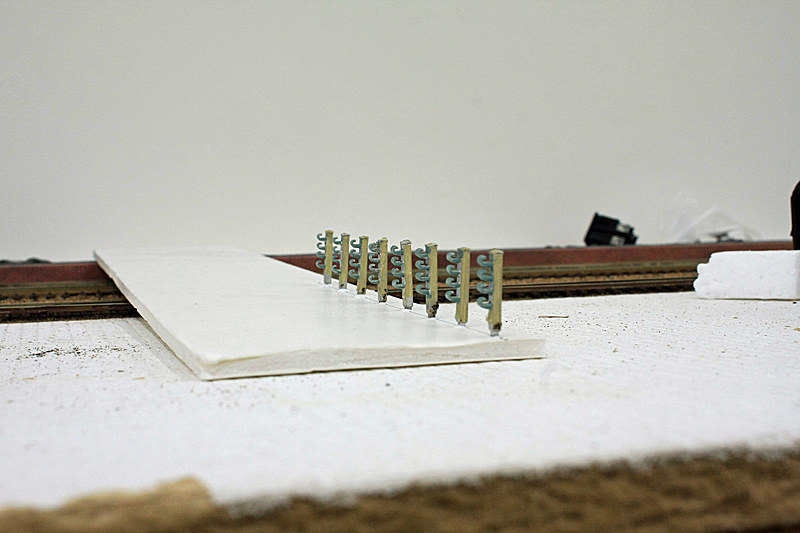 rev Posts end view 800px rev Posts end view 800px by Sarah S1ddons, on Flickr |
|
|
|
Post by metroland on Aug 18, 2016 9:22:05 GMT
I wanted a fairly small signal cabin for the London end of the station, something like the size of Rickmansworth or Chorleywood. As the back-story is along the lines of it being a joint Metropolitan/LNWR line there was no such thing as a prototypical signal cabin. Metropolitan boxes were wooden with ‘4 square’ windows. LNWR boxes were generally brick base with wooden boards on the top half and more complicated windows. I thought I’d found the answer in that ABM Railcraft started doing SECR boxes which were the same as some District Railway cabins and the right size. Unfortunately the owner became ill and closed the business. Scratchbuilding is beyond me at the moment but I’m up for some butchering. LCUT Creative make a number of buildings in laser-cut material and I bought the signal cabin LCC B OO-03 which was a good size for the position. Unfortunately the windows are GWR style with 3 small windows over 2 large ones. Fortunately LCUT sell all sorts of building parts and they had some ‘4 square’ windows. 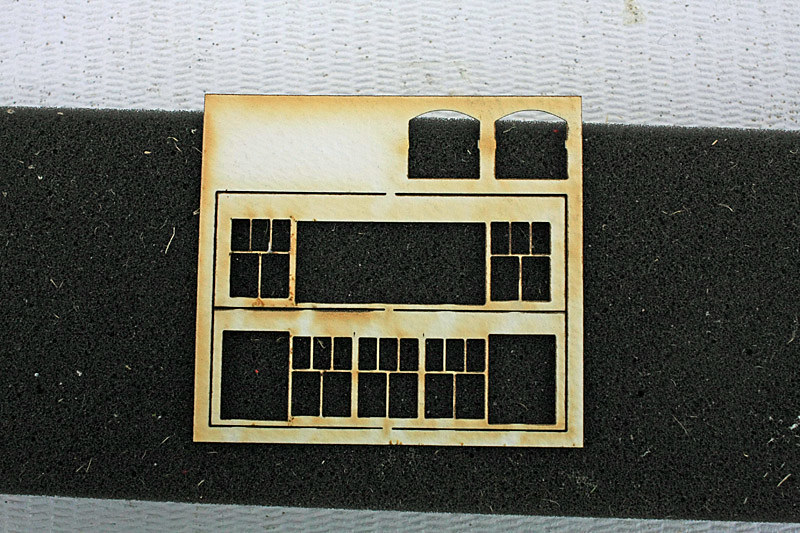 rev1 windows as supplied 800px rev1 windows as supplied 800px by Sarah S1ddons, on Flickr Until I got them on the bench I hadn’t realised the new windows were a different size from the ones supplied with the kit so some very careful scalpel work was needed to make them fit. (The material is VERY thin, especially the widow bars). 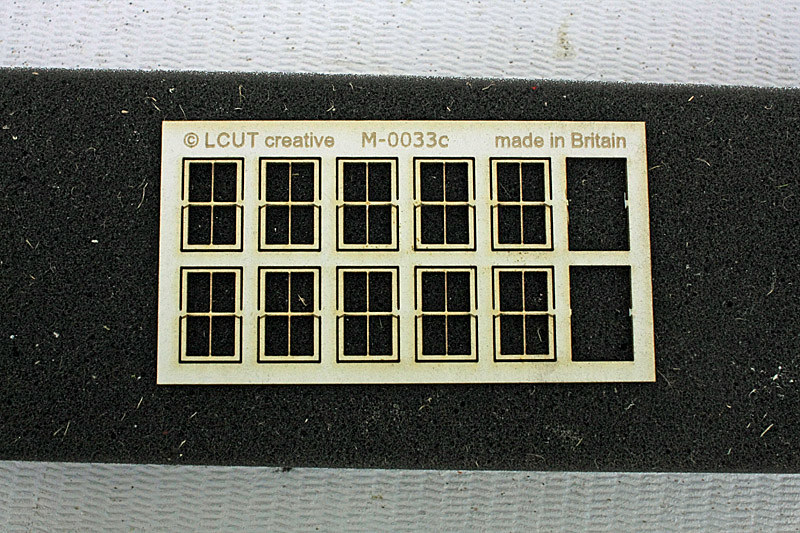 rev2 4 square windows 800px rev2 4 square windows 800px by Sarah S1ddons, on Flickr Some while later I had a partially-built kit to check the ‘footprint’ and I was happy with this.  rev3 initial placement test 800px rev3 initial placement test 800px by Sarah S1ddons, on Flickr After a few more hours squinting and cursing, I had the overall structure. 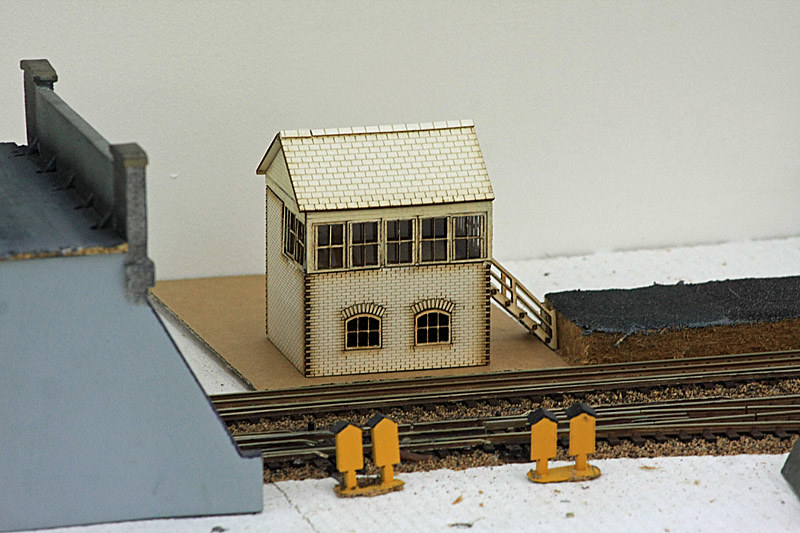 rev4 structurally complete 800px rev4 structurally complete 800px by Sarah S1ddons, on Flickr I decided to enhance the planking as it’s quite feint to the naked eye (though appears quite good in the previous photo). Redutex make a planking sheet though only in brown AFAIK so some was cut to shape and painted off-white. Woodwork was painted off-white or maroon as appropriate. (Note the roof is only plonked on and not finally positioned in the next 2 pics). The brickwork was then coloured and weathered. 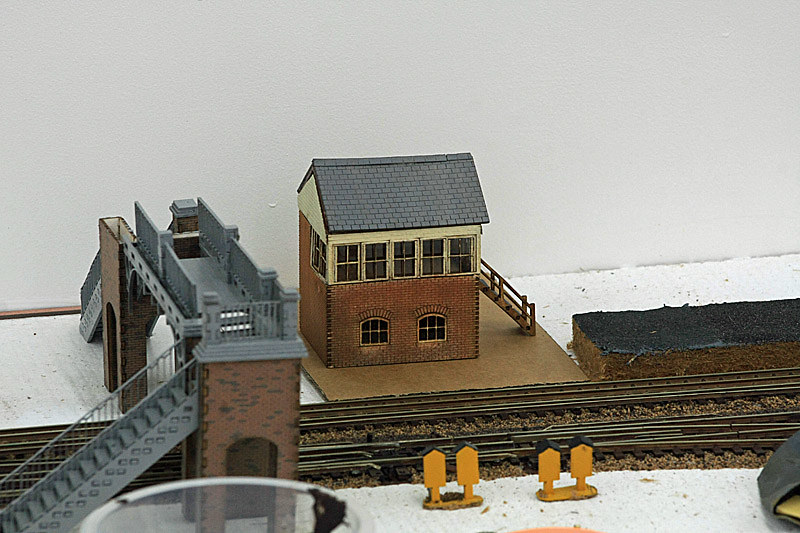 rev5 painted_weathered a 800px rev5 painted_weathered a 800px by Sarah S1ddons, on Flickr For the BR maroon I used Testors Long Island Maroon which I felt was a good match for weathered paint on buildings. A comparison here with a Skaledale shelter shows it to be a good match (though the cream will have to change on the shelter).  rev6 painted_weathered b 800px rev6 painted_weathered b 800px by Sarah S1ddons, on Flickr I’ll leave it for now apart for a couple of minor tweaks which are still to be done. I have half a mind to extend the wooden planking to just below the main windows as that would make it more like LNWR but I’m happy with the compromise for now. |
|
|
|
Post by metroland on Jul 18, 2016 15:43:01 GMT
I thought it was about time I did an update. Some of you asked about the ‘performance’ of the garage. We had a relatively mild but very wet winter. I live about 20 miles from Eglwyswrw (pronounced eggla-sooroo) which you may have seen in the news early 2016 as it nearly gained the record for the most continuous days rain in the UK…. In general, the 10am temp in the garage was about +4C though on a couple of very cold nights this dropped to +2C. By early March though, the 10am temp was a creditable +7C, a position from which the room heated up quite quickly. If anyone is considering a garage conversion I’d recommend a high-spec finish if you can afford it. So far as I can tell the 3rd and 4th rails haven’t buckled due to temperature variations though some were a bit wonky – probably because I rushed some of the later work. Quite a bit of time has been spent correcting bits I should have done better in the first place, and I’ve redone the weathering on several lengths of rail – a tedious but eventually rewarding task! My attention has lately turned to getting the platforms done which as always involves compromises. I’m lucky enough to be able to have quite long platforms (approx. 6’ 6”). The down side of this is, what do I use to get a realistic coverage of the platform surface? Various manufacturers offer products but these are always quite short relative to my needs and would mean a join or joins which I would like to avoid. Some people have made realistic surfaces of smooth asphalt with eg DAS modelling clay but again, there’s no way I could make a 6’ 6” length look adequate. Another problem again, is the fact that most ballast is way too large and ‘grainy’ to represent a platform surface. I’ve used ½” insulation board which I had left over from my old layout. Overview of platform area: 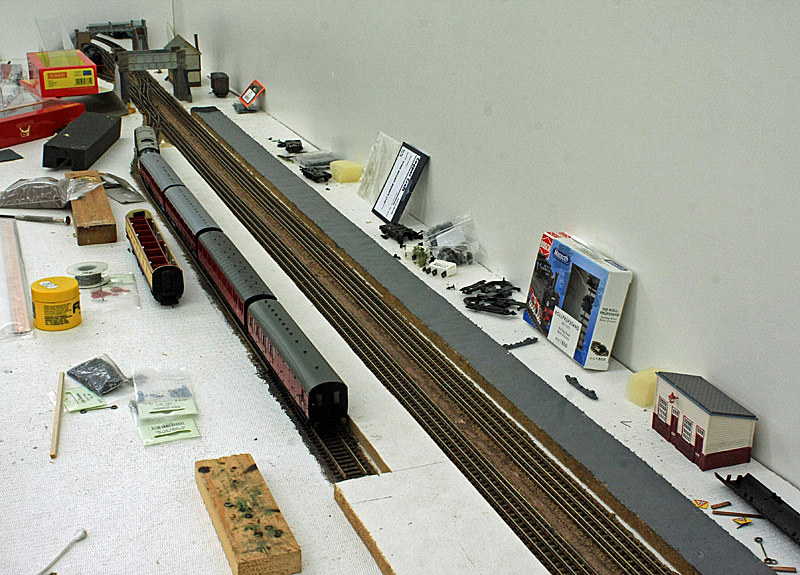 rev Platform overview 800px rev Platform overview 800px by Sarah S1ddonsWhat you can’t see from the pic is the narrow platform was first sealed with PVA before grey undercoat was applied. The front face was also sealed which should help with attaching the facing later. I had a supply of Carrs 2mm grey ballast but this was really too coarse, however I hit upon Busch quarzsand 7524 in black (they don’t seem to do a grey). 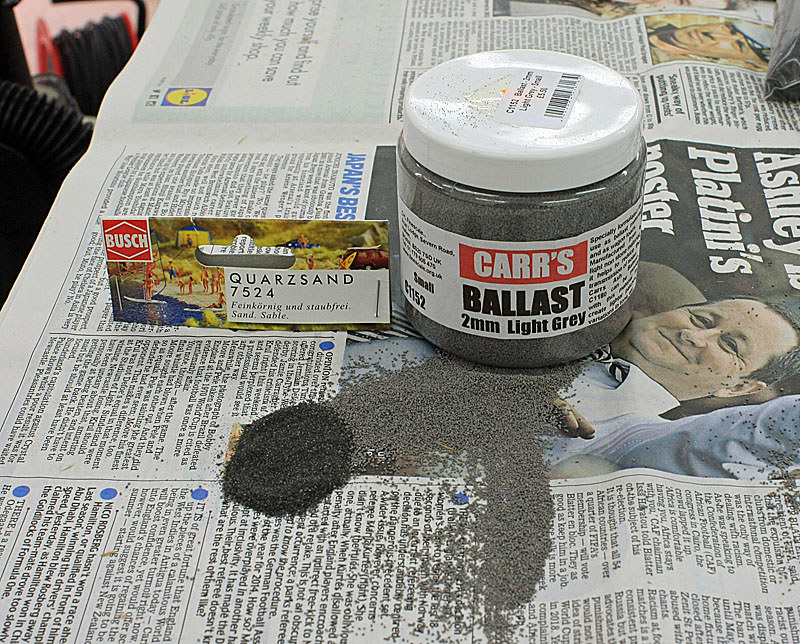 rev Carrs_Busch comparison 800px rev Carrs_Busch comparison 800px by Sarah S1ddons, on Flickr The platform was then covered again with PVA and the quarzsand liberally sprinkled on top. (Yes I know the bench needs tidying, don’t nag…..)  rev Platform Busch quartzsand 800px rev Platform Busch quartzsand 800px by Sarah S1ddons, on Flickr Some shots of it in situ after 24 hours and the excess had been shaken off. 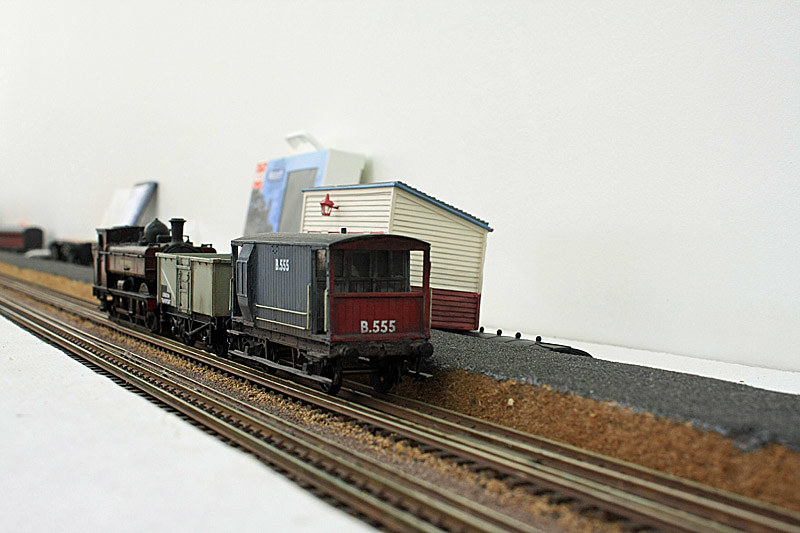 rev Platform plus goods 800px rev Platform plus goods 800px by Sarah S1ddons, on Flickr 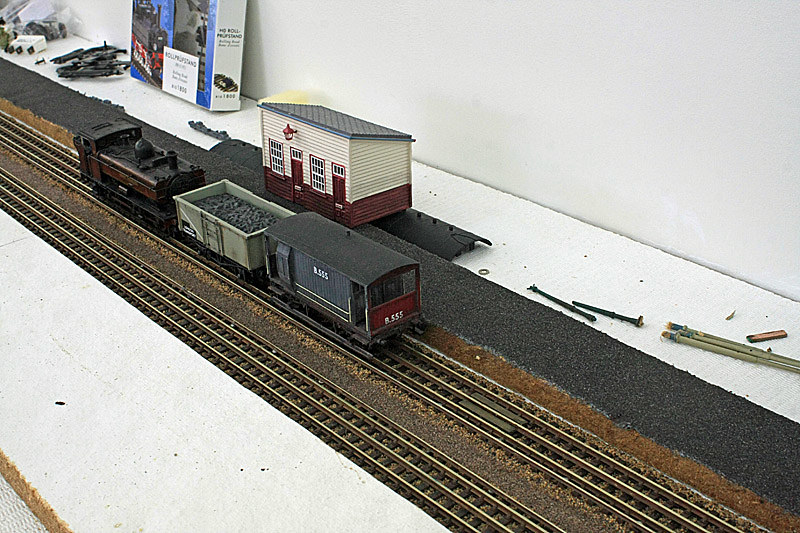 rev Platform plus goods high 2 800px rev Platform plus goods high 2 800px by Sarah S1ddons, on Flickr One of the things about asphalt is that when it’s laid, it tends to be black, but after a lot of traffic has worn it down it goes grey, except where there’s little use. This final shot shows an early attempt to try and get this effect on the end ramp. This was done with brushes and really needs an airbrush to get it looking more correct.  rev Platform plus goods incl ramp 800px rev Platform plus goods incl ramp 800px by Sarah S1ddons, on Flickr |
|
|
|
Post by metroland on Jun 24, 2016 19:01:52 GMT
|
|
|
|
Post by metroland on Jun 24, 2016 18:58:33 GMT
As LT Modellers on this forum may have heard, Kernow Model Rail Center have announced the OO Scale 4-TC. I couldn't find many photographs of 'Sarah Siddons' and the Met Liveried 4-TC units together, however certain evidence leads to a particular event that took place around 1993/1994. If anyone has any photographs they would be happy to share, that would be great! Are you thinking of 1995ish? 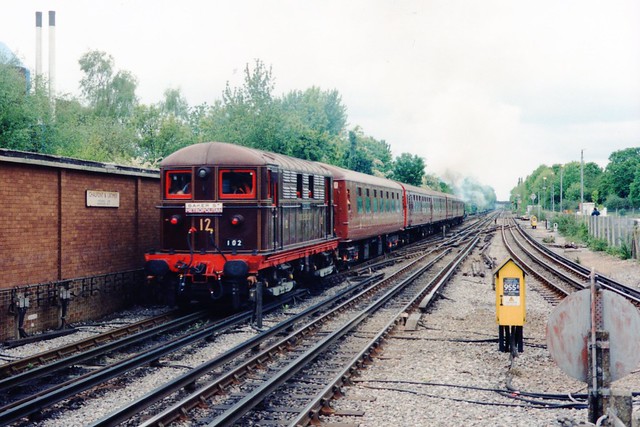 12 "Sarah Siddons" 12 "Sarah Siddons" by Sparegang, on Flickr |
|
|
|
Post by metroland on Feb 6, 2016 16:00:30 GMT
I think the centre rail is 1 -I/2" above r/ rails not 3" OK but that's 0.5mm difference between the two? Way betond my skill level! |
|
|
|
Post by metroland on Feb 6, 2016 15:58:23 GMT
Wow! Continues to be fascinating to follow. Incidentally, would enamel or just possibly masonary paint in a matching shade on those soldered joins be acceptable after sanding? I use a small pot of acrylic Tamiya rusty brown which is the same shade as the spray can. You can just see a pot of it in the pic after the phrase 'approaching the turnback siding'. Nickel silver track is a bit funny, sometimes paints stick and sometimes not. I suspect an enamel paint may need and undercoat/primer. |
|
|
|
Post by metroland on Feb 6, 2016 13:45:18 GMT
I’ve been able to make progress with the outer conductor rails in January. The work isn’t yet finished, but here’s an update. On my old layout I used N gauge track for the outer rail (Code 60). This was glued to Peco track pins and took quite a while to do, as it wasn’t easy keeping the track on the pins whilst the glue hardened. It had been suggested that I should solder the rails to the pins. I was going to use this method on Mantles Wood, but I found that I couldn’t actually solder anything to the Peco track pins, so back to the drawing board….. I had quite a bit of Peco HOm track lying around from another project which is Code 75 rail so I decided to give this a go for the outer rails. Of course Code 75 is available in its own right as Peco OO finescale so you don’t need to seek out HOm. After a few experiments I continued using the Gaugemaster track pins which are quite chunky but actually have helped here. (Bear in mind I’m no engineer and always looking to apply the KISS principle to create the look and feel of 4 rail track whilst working within my own limits and the fact that OO track is only 4’2” wide). For outer conductor rail an insulating pot is needed every 5 sleepers or so, and with over 60’ of track to do, that’s quite a bit of tinning and soldering. In order to tin batches of pins I hit upon the simple solution of using old jiffy envelopes. A few dozen pins at a time can be held in place whilst flux and solder is added to the heads. 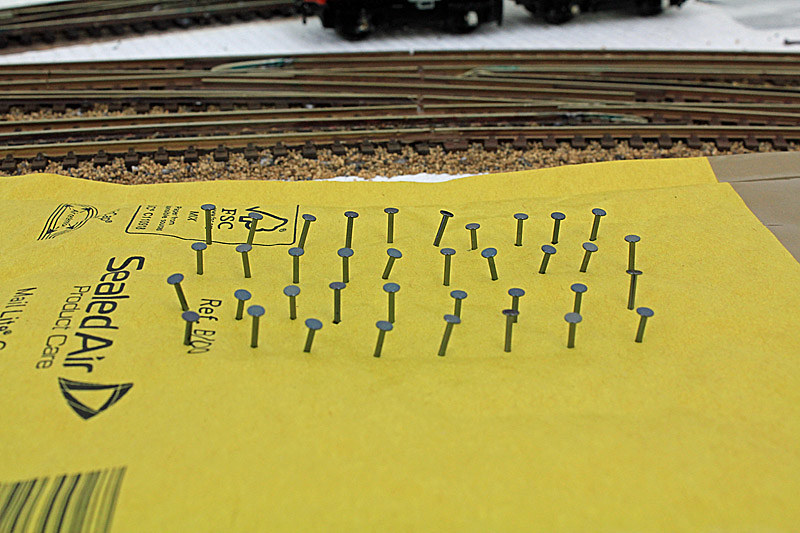 Outer 1 800px Outer 1 800px by Sarah S1ddons, on Flickr The relatively wide heads of these pins turned out to be quite an advantage. If I solder the rail to the pin and got the rail too close/far from the running rail I had room to unsolder the joint and move it slightly. Bearing in mind that most pots disappear under grime, adding a dab of off-white colour to some of the pins hopefully makes them look like pots from a normal viewing distance. A couple of wider shots of the junction shown in my previous posting: 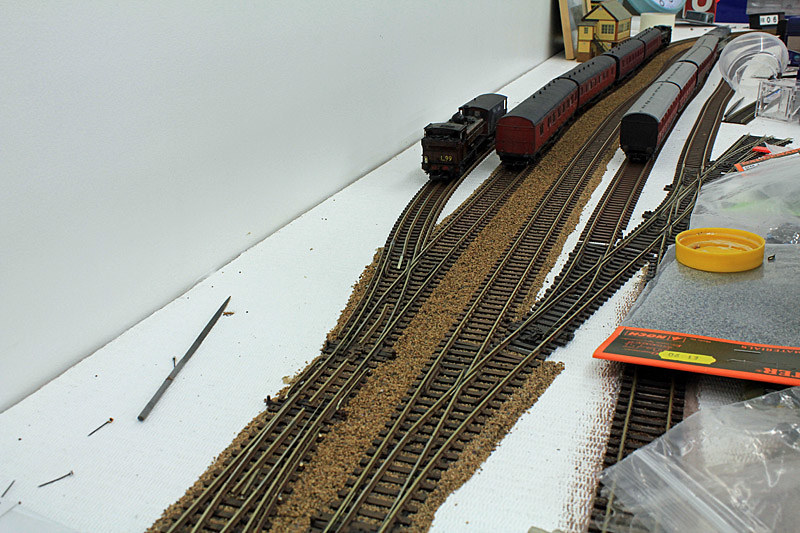 Outer 2 800px Outer 2 800px by Sarah S1ddons, on Flickr  Outer 3 800px Outer 3 800px by Sarah S1ddons, on Flickr On my previous layout I didn’t have to lay 4 rail track on any really difficult curves. I had a bay platform, and a siding, both of which had gentle curves. On Mantles Wood I have 2 concentric curves of 3’ radius turning through a right angle. I wasn’t looking forwards to this, but in fact after having had some practice with the new method on easier sections, this didn’t go too badly. Some joins had to be re-soldered, but again from a reasonable distance they pass muster – I hope. Most of the curve is shown here. 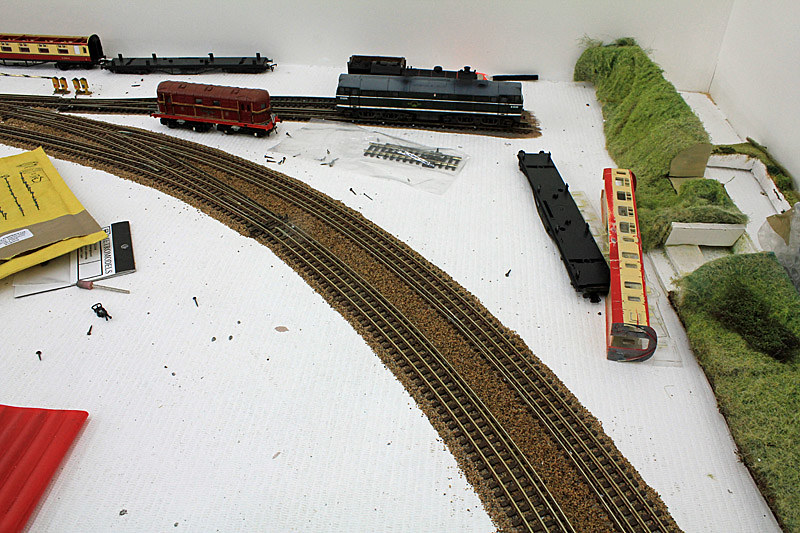 Outer 4 800px Outer 4 800px by Sarah S1ddons, on Flickr A close-up of the track at the western/northern end of the curve. 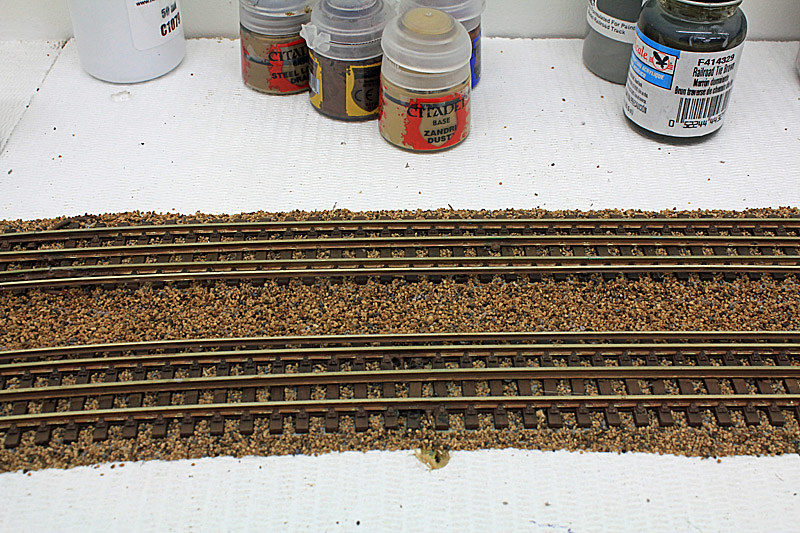 Outer 5 800px Outer 5 800px by Sarah S1ddons, on Flickr Because Rickmansworth station is on a tight-ish curve it’s difficult to find pictures showing the whole length of rail without trains covering most of the tracks. So far as I can tell both the centre and outer conductor rails do not have any breaks and continue unbroken alongside the whole length of the platforms. Although I’m not doing Rickmansworth this does mean I have 2 x 8’ runs which need 4 rail and of course no-one makes rail in that length. I wasn’t looking forwards to this either. I’ve now done the Down side. This meant I had to solder 3 lengths of Code 75 together, and cut to length. I’m quite pleased with this (the outer rail has not been weathered yet). 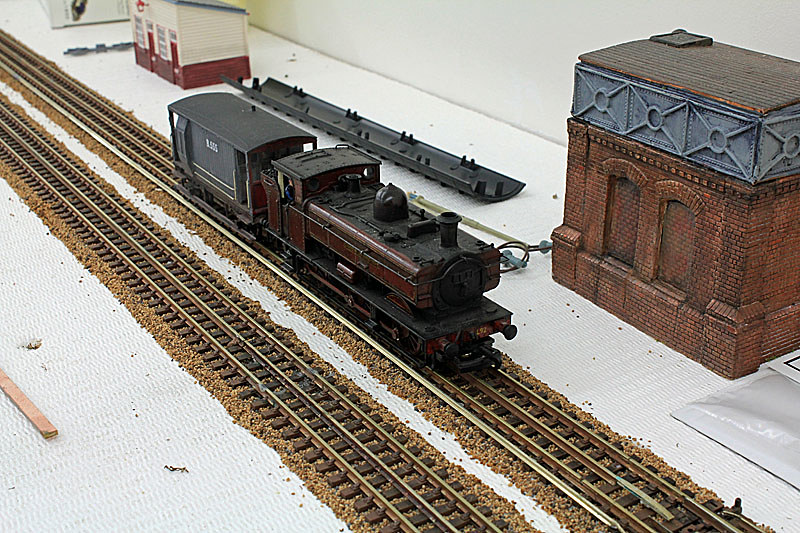 Outer 6 800px Outer 6 800px by Sarah S1ddons, on Flickr A cruel close-up of one join in the outer rail. Hopefully a bit of careful sanding and then weathering will disguise the join. 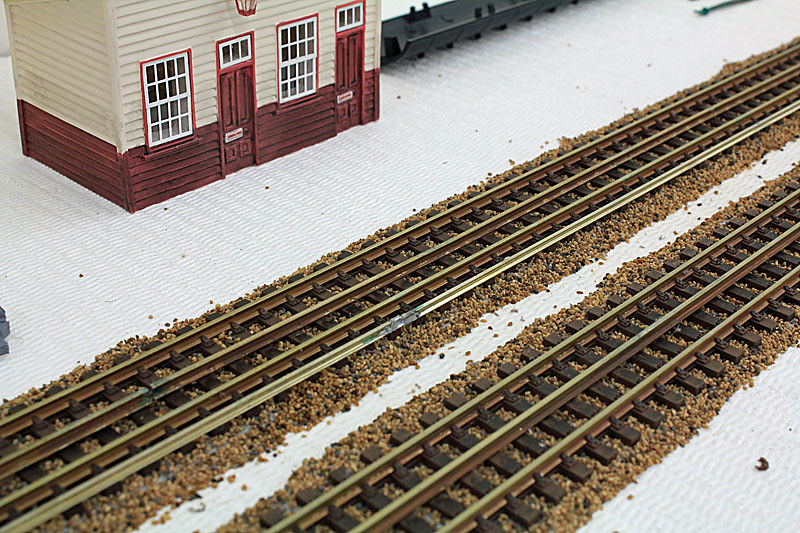 Outer 7 800px Outer 7 800px by Sarah S1ddons, on Flickr As I’ve said so many times, I’m no engineer, simply trying to get the look and feel of 4 rail in OO, without the need for any specialist tools or skills. Hopefully some of you will be encouraged to experiment. |
|
|
|
Post by metroland on Jan 13, 2016 11:10:49 GMT
Unfortunately my wife had a week in hospital in December which meant progress since the last update has been slow. I’ve now installed outer conductor rail at the entrance to the turnback siding, and the crossover for trains to exit and return to ‘London’. 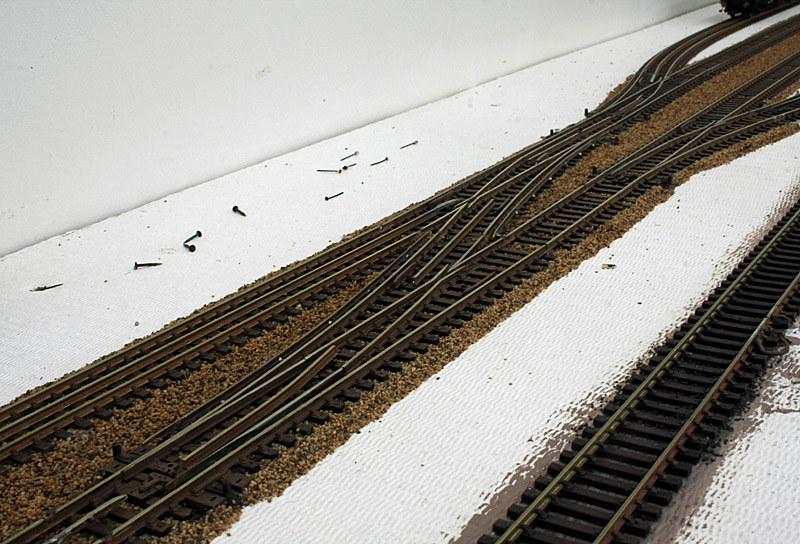 rev IMG_1399 800px rev IMG_1399 800px by Sarah S1ddons, on Flickr |
|
|
|
Post by metroland on Dec 11, 2015 9:54:17 GMT
This is the simplified plan I used for initial track-laying. The outer circuit is Down, powered by controller C2 and the inner circuit is UP/C1. Track is Peco code 100 Electofrog and shows the power feeds (DC) and insulating breaks. The scenic section goes from 11 o’clock to 5 o’c clock. Generally sidings and passing loops are not shown as they were added/modified later. The long bay platform at 12 o’clock didn’t work, so the longer of the 2 spurs on the Up side was made the bay, and the crossover changed from trailing to facing so trains from ‘London’ could cross from Down to Up and enter the bay. Points are shown for 2 potential turnback sidings at 3 o’clock but in the event I felt it worked better with just one turnback line. The facing crossover at 5 o’clock was never laid as I changed the storage siding arrangement along that wall. Lots more sidings were laid along the LH side for storage and a trailing crossover added at 10 o’clock between the Up and Down lines so I can run stock from pretty much any stabling point to any other – subject to train length. 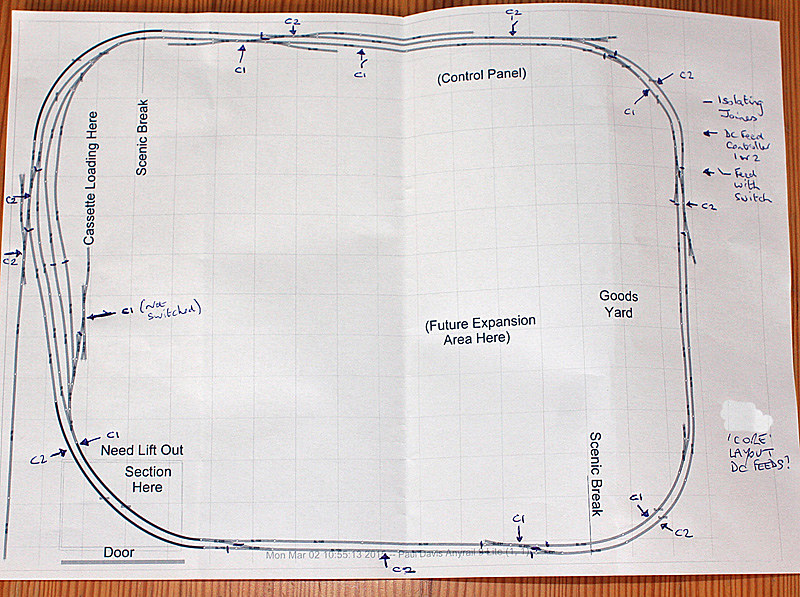 rev ver 9-Lite DC electric feeds rev ver 9-Lite DC electric feeds by Sarah S1ddons, on Flickr |
|
|
|
Post by metroland on Dec 10, 2015 15:23:06 GMT
OK the time has come to start 3rd and 4th rail track-laying. Laying the centre rail has taken place during November and part of December. On my old layout I glued the centre rail to the sleepers. This was generally successful but I’m trying another way this time. On the real thing the centre rail is elevated approx. 3” compared with the running rails but as that’s only 1mm there’s no way I’m going for super accuracy. However, on my old layout the centre rails didn’t have to curve much, just eg into bay platforms. On this layout they have to do a complete 90deg turn for the ‘electrified tracks’ to reach the turnback siding, so glueing probably won’t stand the test of time. For the centre rails (these are much too clunky for normal track-laying) I’ve used Gaugemaster ‘Hornby’ pins. 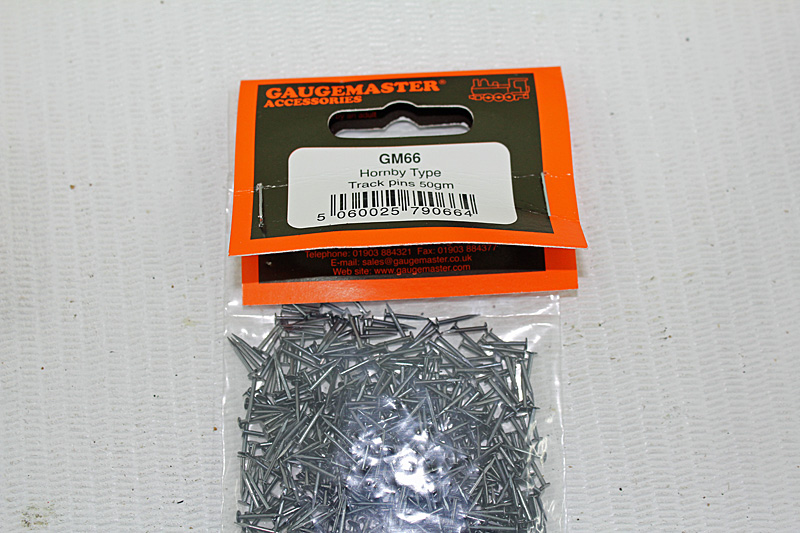 Centre 1 800px Centre 1 800px by Sarah S1ddons, on Flickr I then added a blob of solder to the heads. 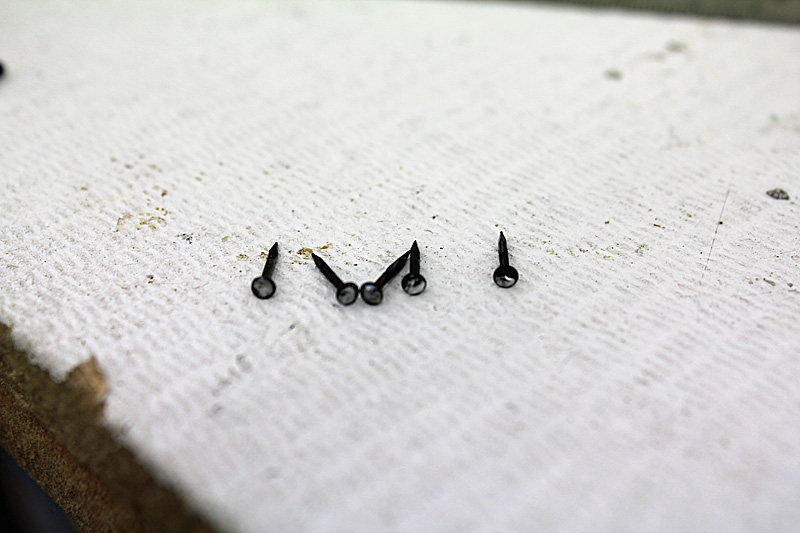 Centre 2 800px Centre 2 800px by Sarah S1ddons, on Flickr Pins are then pushed into the ballast between sleepers. It doesn’t matter (in fact it can be quite helpful) if the pins are some way proud of sleeper level at this stage. 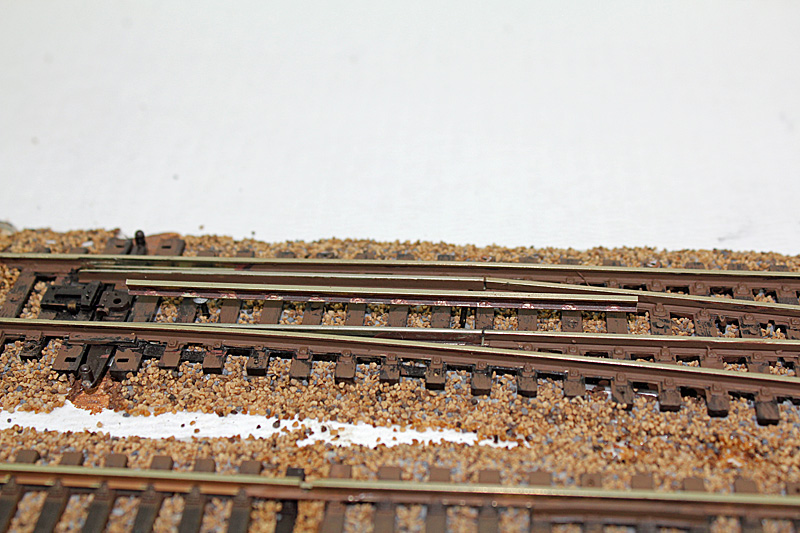 Centre 3 800px Centre 3 800px by Sarah S1ddons, on Flickr Solder the centre rail to the pins and then push the whole ensemble down to the correct height. I recycled some rail from the old layout here so the rail needs re-weathering, but hopefully shows the principle. A facing crossover taking shape. 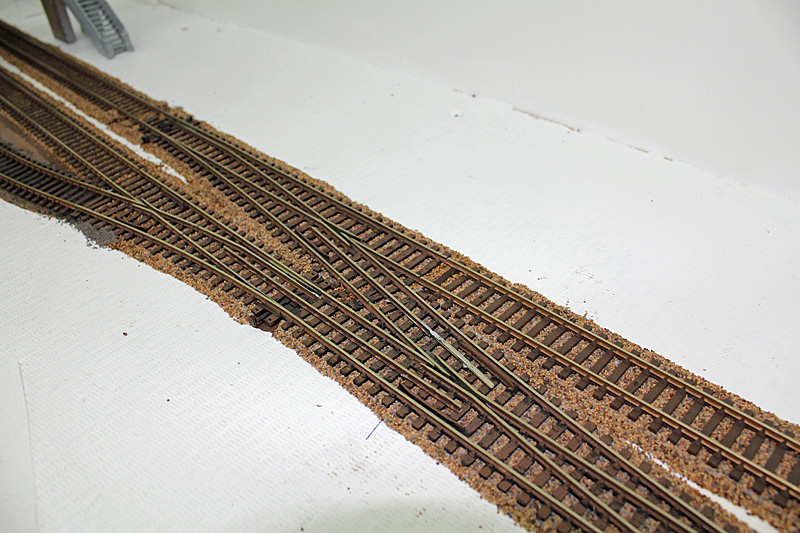 Centre 4 800px Centre 4 800px by Sarah S1ddons, on Flickr  Centre 5 800px Centre 5 800px by Sarah S1ddons, on Flickr I’ve started using C&L Finescale ramps. At £7 for 4 they’re not cheap (but then brass castings are never cheap these days). Here’s a close up of one attached to some new rail. I’m hoping that further weathering and ballasting will provide some visual tricks to take the eye away from the joins where these ramps need to be soldered onto Peco rail.  Centre 6 800px Centre 6 800px by Sarah S1ddons, on Flickr The C&L ramps aren’t designed to fit end-on to Peco100 so there’s still work to be done blending/disguising the joins. A few pics of progress to date: The London end: 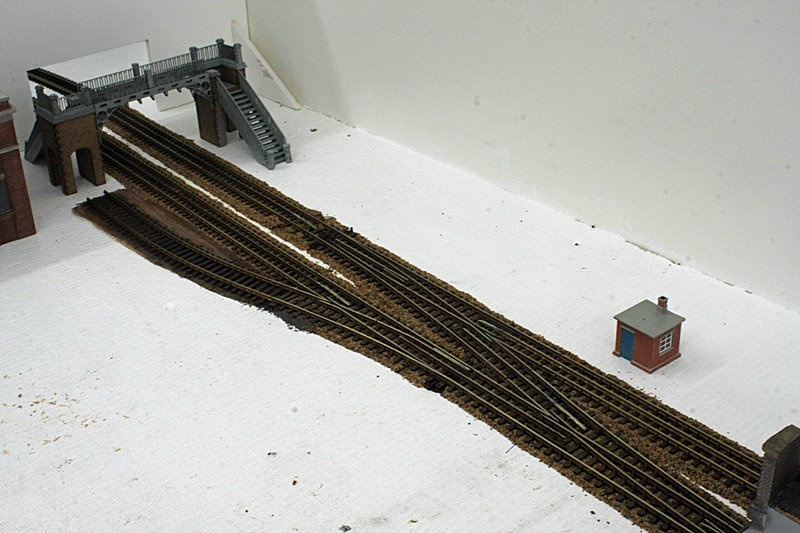 rev a IMG_1389 rev a IMG_1389 by Sarah S1ddons, on Flickr At ground level:  rev b IMG_1389 rev b IMG_1389 by Sarah S1ddons, on Flickr Loco servicing sidings 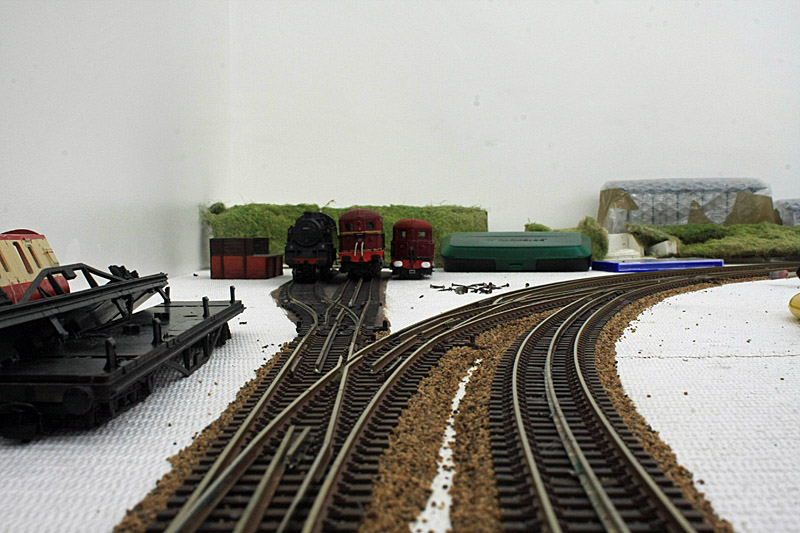 rev c IMG_1389 rev c IMG_1389 by Sarah S1ddons, on Flickr Approaching the turnback siding: 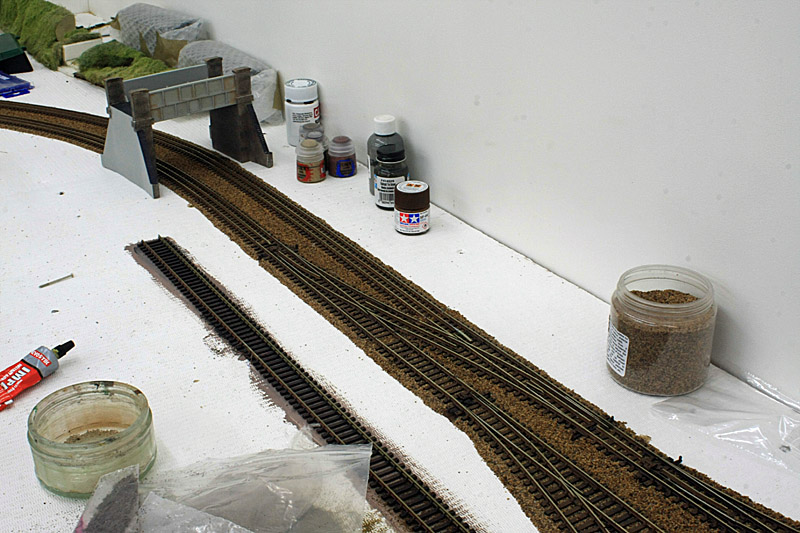 rev d IMG_1389 rev d IMG_1389 by Sarah S1ddons, on Flickr The turnback siding: 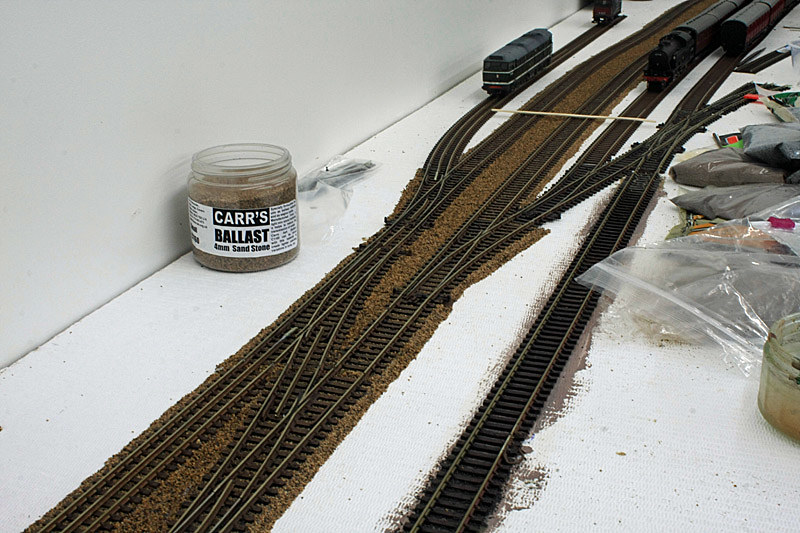 rev e IMG_1389 rev e IMG_1389 by Sarah S1ddons, on Flickr |
|
|
|
Post by metroland on Dec 8, 2015 16:33:23 GMT
Thanks - that's really quite neat - I was expecting the Endo to protrude more inside the car
|
|
|
|
Post by metroland on Dec 6, 2015 11:06:40 GMT
Any chance of a pic of the inside of the car showing how you managed this pls?
|
|
|
|
Post by metroland on Nov 28, 2015 20:46:53 GMT
I find it is better to wire both motors together in a single car as most people suggest however if you only have one motor bogie extra pick ups on the other trailing bogie help you out over point work. That makes sense! |
|
|
|
Post by metroland on Nov 28, 2015 12:40:32 GMT
I have an Endo in my 4 car Q stock set and it's way better than Tenshodo. I'm not quite sure how you'd fit it into a tube car but the power should easily be enough for a 4 car EFE. Am not quite sure why you'd need a pick up bogie as it runs ok on its own?
|
|
|
|
Post by metroland on Nov 28, 2015 11:45:11 GMT
Afraid the answer's a bit like how long's a piece of string. The bogies that come on the EFE cars have a lot of friction. The Rolls Royce solution is to replace all non-powered bogies on all cars with the MetroModels offering at £7 per bogie, which is what I've done. www.metromodels.net/efe_product_range.htmThere's a cheaper solution which involves taking some bits off the original bogies to make them a bit more free-running (afraid I can't give more details as I've not done this). I've seen sets on which this has been done BUT a lot depends on how level your trackwork is, because there is still quite a bit of friction. |
|
|
|
Post by metroland on Nov 11, 2015 9:37:07 GMT
|
|
|
|
Post by metroland on Nov 8, 2015 21:40:46 GMT
I don't envy you having to work out the geometry of 3rd and 4th rails!
|
|
|
|
Post by metroland on Nov 8, 2015 11:23:41 GMT
Initial ballasting, and track weathering. Those of you that remember my old layout will recall that I don’t profess to have any great skill levels and am always looking to create the right ‘look and feel’ without being a master-builder. To this end there’s been some evolution to my trackwork. The first change is to get some quick weathering to the track. On youtube I discovered people spraying their track with Tamiya TS1 red/brown. This year I sprayed most track with a dusting of this before laying (don’t forget to wipe the top of the rails before it hardens!) 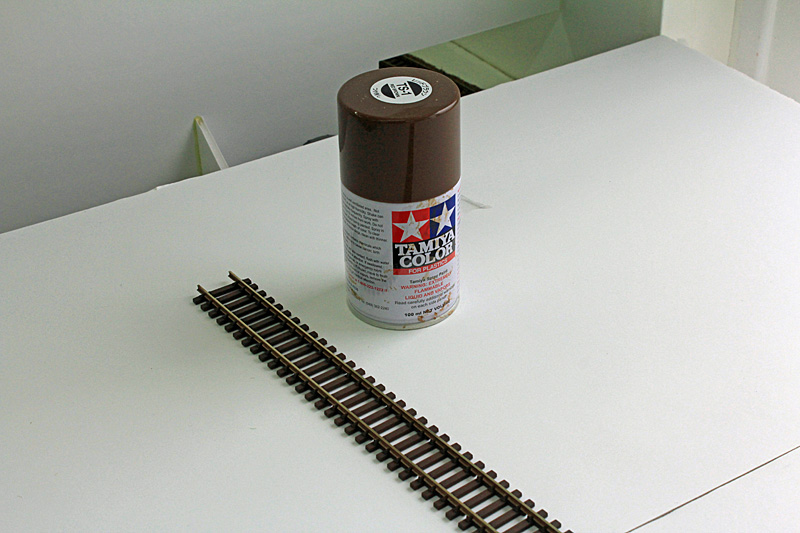 rev a Tamiya Spray 800px rev a Tamiya Spray 800px by Sarah S1ddons, on Flickr The 2nd change is to use ready-mixed ballast. I the past I mixed my own as I wasn’t happy with most commercial offerings. However I discovered Carrs sand-stone mix which I’ve used on this layout. Note: it appears a bit more orangey in these pics than to the naked eye. 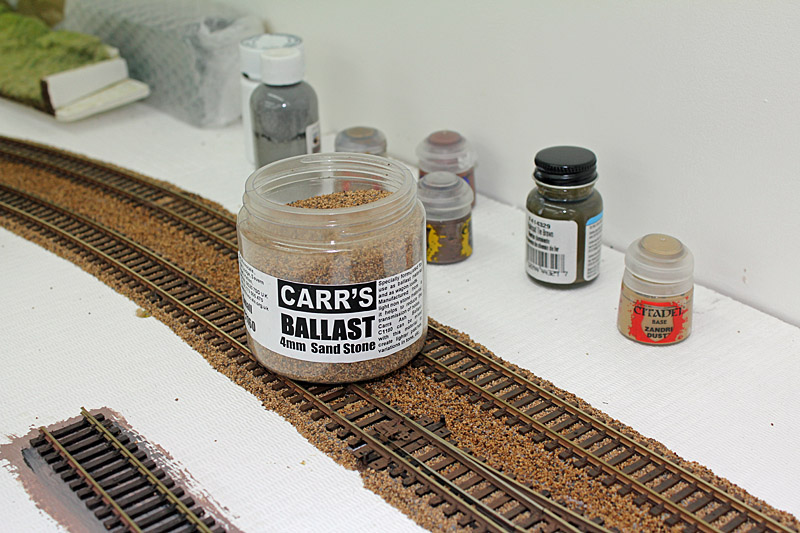 rev b Carrs ballast 800px rev b Carrs ballast 800px by Sarah S1ddons, on Flickr The main thing to remember this isn’t the end of weathering ballast or track but it does give a reasonable and reasonably quick way of getting something down that looks ok for now, and I don’t need to come back to it until after I’ve done 101 other jobs. 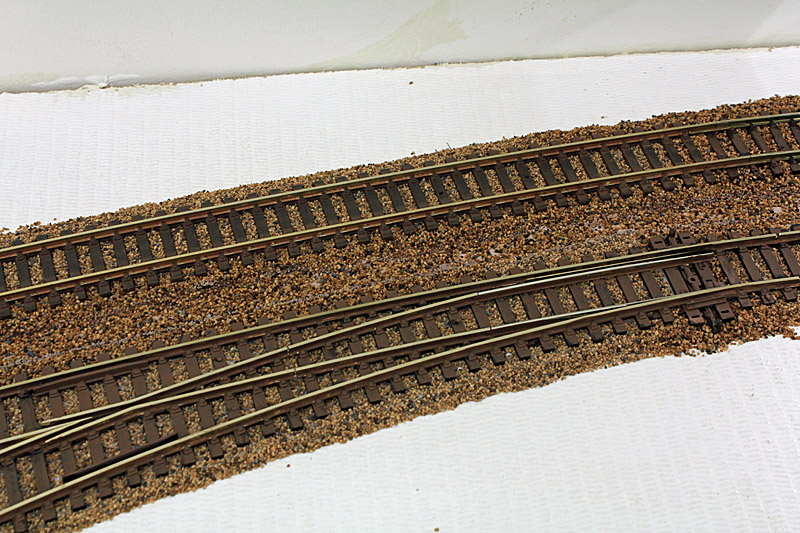 rev c ballasted track 800px rev c ballasted track 800px by Sarah S1ddons, on Flickr The sidings and passing loops here need to be ballasted to a lesser standard hence all the white underneath some track. 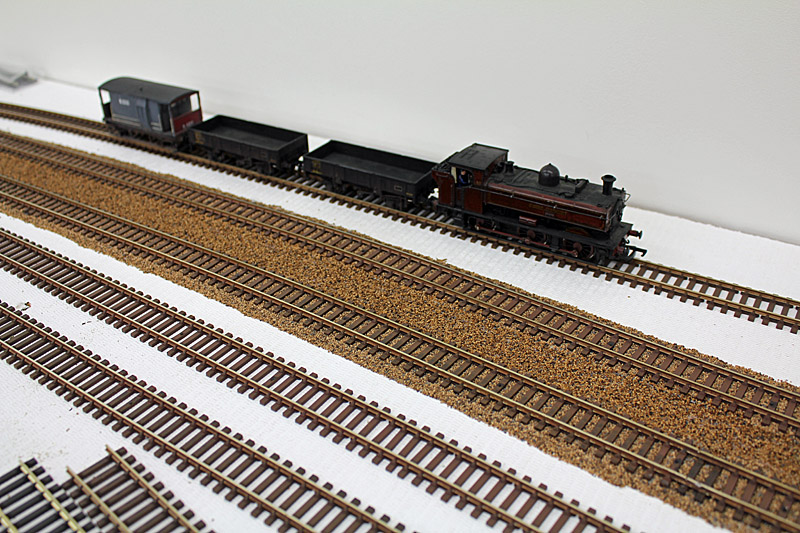 rev d ballasted track 800px rev d ballasted track 800px by Sarah S1ddons, on Flickr |
|
|
|
Post by metroland on Nov 6, 2015 9:59:48 GMT
Welcome Back. (Initial Track Work) Finally in the spring I was able to think about track laying, but first of course I needed something to lay it on. I’d looked at various suppliers of kits for baseboards, some of which looked rather good, but having spent quite a bit on the garage conversion I felt there were just too many additional costs after what I’d already incurred. My carpentry skills are ok-ish but with a room this size I really wanted something decent to do it justice. Step forward (again) the local carpenter. He’d never done model railway baseboards. I was confident enough to work with open-frame baseboards this time round but he wasn’t. Basically he was confident with MDF. I’m sure he could have done open-frame boards but the time factor would have pushed the cost up. You can see from the last picture in my first post that he constructed a framework all around, with MDF ‘table’ on top. This only took him 3 and a half days to do an excellent job that I could never hope to match. I drove him a bit crazy with the lift-out section – it was quarter circle which (if not done properly) would have had a tendency to fall away outwards under gravity. The position/shape etc was dictated by the entry door position and my need to try and keep all ‘main line’ curves to 3’ radius or better. As I was planning to lay my own version of 4-rail, I needed a layer of half-inch insulation board on top, which I thought would be easy to source. After all that’s what I had before. Wrong! Most insulation board is now 40mm and/or some other material. Jewsons had some board in their catalogue but none in the local store in Llandysul (I’m out in the sticks now). They found some in stock at a branch elsewhere and several days later it was due to be delivered to the Llandysul branch. When they did it was all damaged….. Fair do’s to the local bloke behind the counter. He spent some time trying to source 8’ x 4’ x 1/2inch insulation/fibre boards and eventually found some and I had them delivered. The carpenter was then able to cut them and fit them quickly as he had the in-situ baseboards as templates. I was now able to test track configurations…. or not…….. I’d used Anyrail program to plan my layout (no disrespect to SCARM but I just couldn’t get on with it). So I was ready to try some general arrangements. 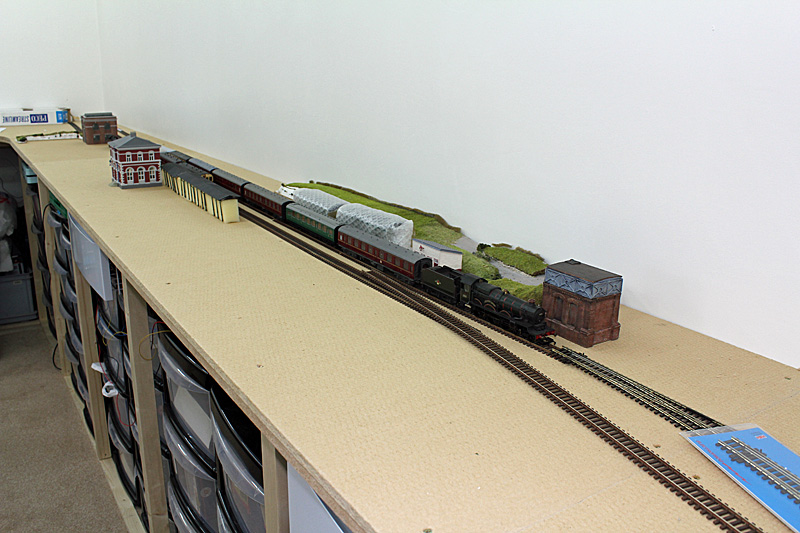 rev a IMG_1272 unpainted board rev a IMG_1272 unpainted board by Sarah S1ddons, on Flickr You may not be able to see from this pic but the insulation board is very finely rippled – a bit like the patterns you see in compacted sand when the tide goes out. This was creating quite a bit of very fine dust and looked like it would be a problem over time. Consequently I had to spend several more days covering it with a coat of wallpaper paste then 2 coats of white emulsion. The next few pics are a bit bland but give you an idea of what should be evolving. I have a lot of stock but was wary of over-complicating the layout and wanted something running before too long (ie before I got bored with track-laying etc). In effect I have 2 sides with ‘scenery’ (or will have) and 2 sides for storage. (In practice I have about 14’ of one 17’ side, a full 13’ side, and 3’ of another 17’ side). Two views of the intended station area 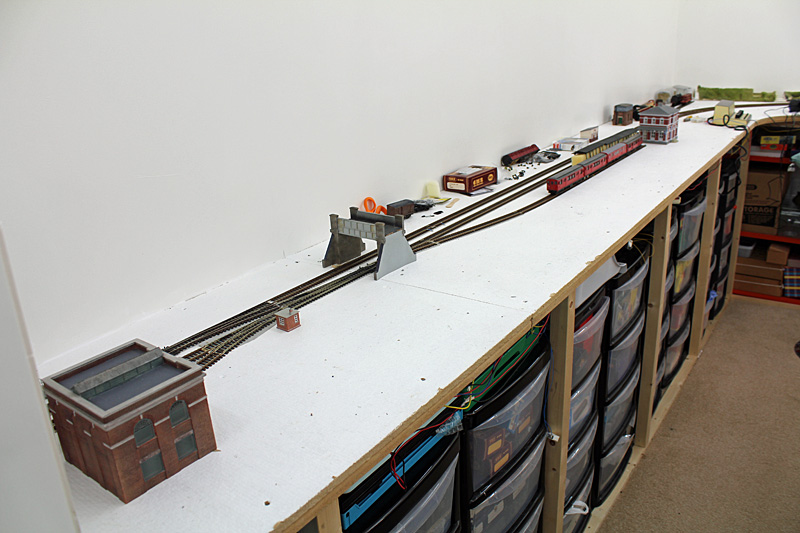 rev b view 800px rev b view 800px by Sarah S1ddons, on Flickr 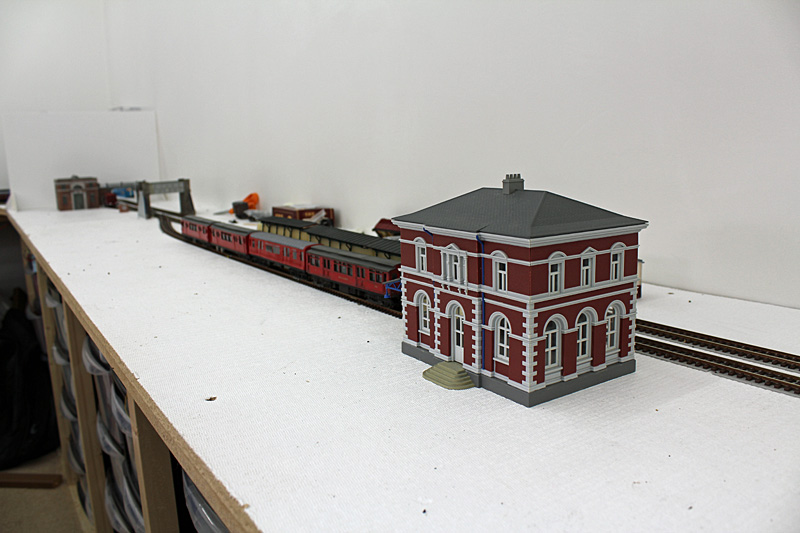 rev c view 800px rev c view 800px by Sarah S1ddons, on Flickr Through lines with siding, Up and Down Goods loop, and entrance to goods yard. 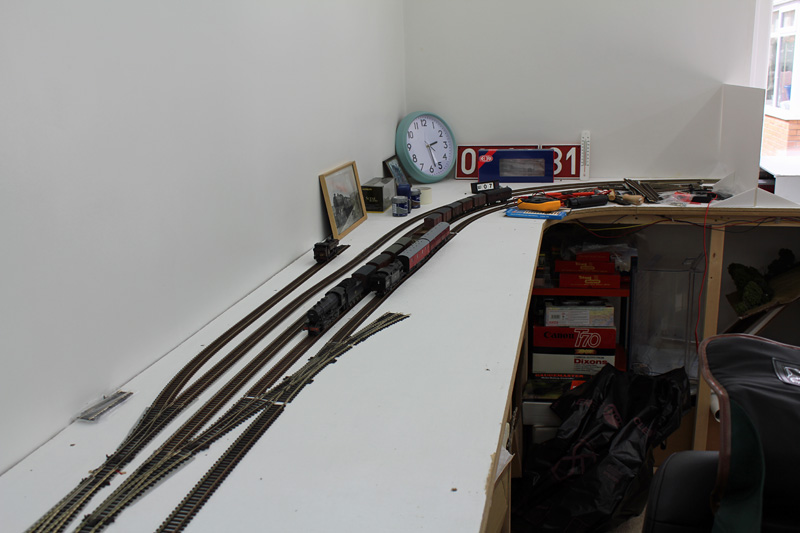 rev d UandD Loops 800px rev d UandD Loops 800px by Sarah S1ddons, on Flickr Storage roads by window (with sun cover). 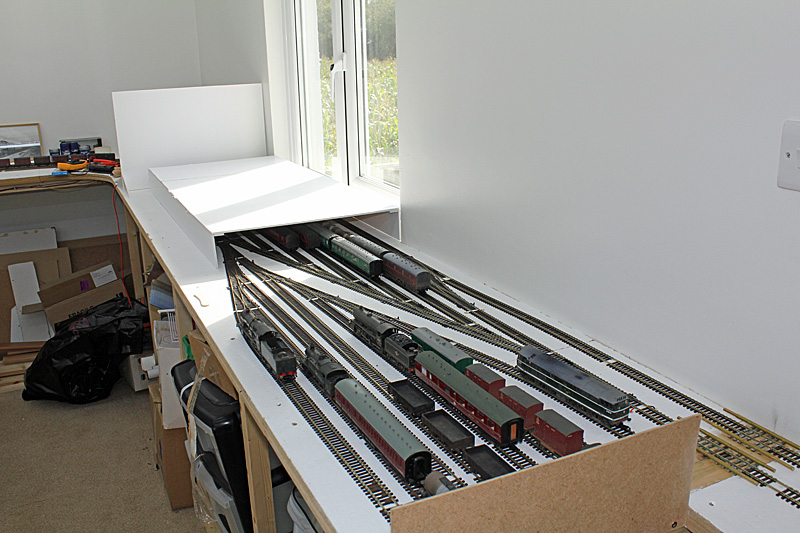 rev e window a 800px rev e window a 800px by Sarah S1ddons, on Flickr Storage roads on end wall. 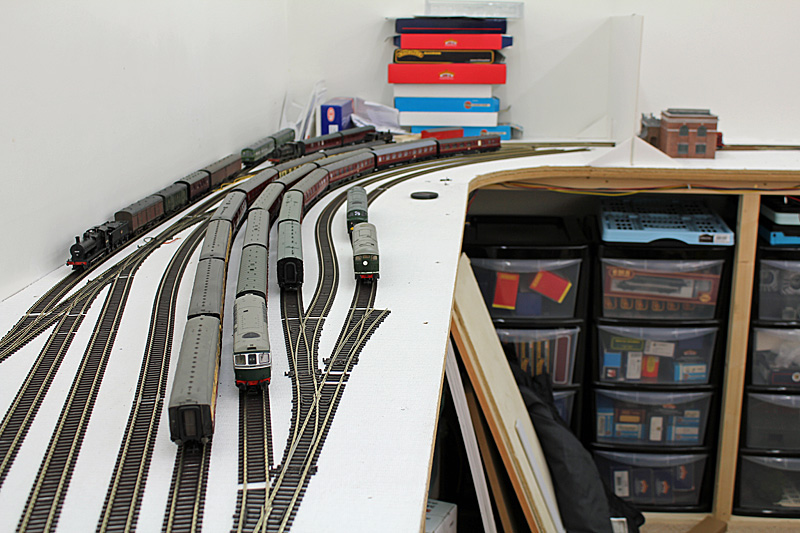 rev f passing loops 800px rev f passing loops 800px by Sarah S1ddons, on Flickr So following the KISS principle the scenic part of the layout is 2 through lines, a bay platform at the station with facing crossover. Facing and trailing crossovers for the U and D goods loops/goods yard, plus some simple sidings and headshunts. It may not be terribly clear, but on the main lines I used Tracklay under the track which I’ve used before and find is a boon to easy ballasting (well when I say easy, I suppose all things are relative…..) tracklay.co.uk/(No connection other than a happy user on 2 layouts) Needless to say Track is Peco Streamline Code 100 which I’m happy with. I like the ‘plug and play’ simplicity, but even so, it works, and I feel you can do a lot to make it reasonably convincing. With the exception of a few turnouts for short sidings and headshunts all turnouts on the main circuit are either large or medium radius. I’m fortunate to have the room to do this and it’s a great aid to smooth running. In fact from late July onwards, once I’d got 2 complete circuits running, I was able to test the trackwork extensively (not play you understand). Such is the beauty (to me) of Code 100 that anything which plays up now has to be a problem with the stock not the track. With a variety of RTR and kitbuilt stock, and various couplings etc problems arise from wheel back-to-backs, couplings and buffer lock, but at least if I have troublesome trucks now I can be confident I need to work on the rolling stock, not the track. The one area that was terrifying me was the 2 main lines traversing the lift out section. 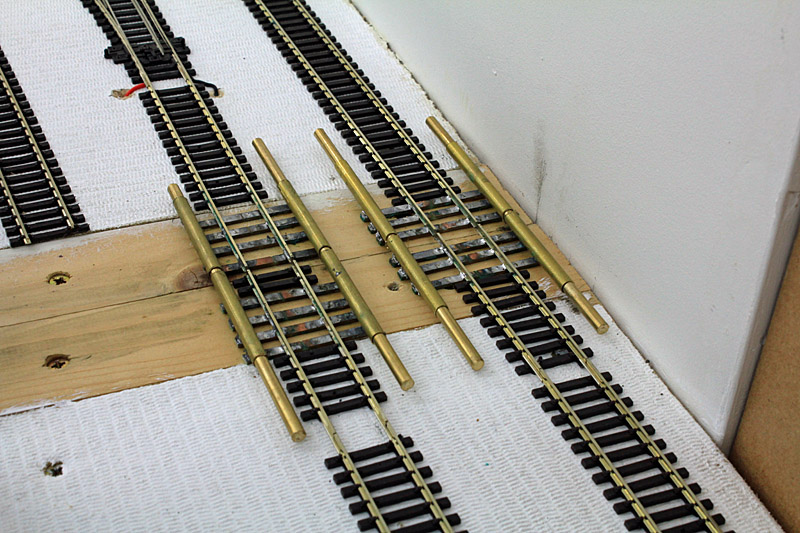 rev g lift-out section rev g lift-out section by Sarah S1ddons, on Flickr The poor old carpenter couldn’t really understand the need to have wood at the ends with insulation board inlaid for the rest of the trackbed but he made a good job of it. My soldering isn’t terribly elegant but you can see I followed a traditional route of replacing plastic sleepers with copper ones (scored top and bottom to avoid shorts!) These were then glued to wood, not insulation board. To these I soldered brass tubes which had rods inside as an interference fit. Then I cut the tubes and reinserted the rods. Hey presto! Physical and electrical alignment. I’m sure there are more elegant ways of doing this but I’m a pragmatist and the lift out section is in the non-scenic area, and it works (so far…. 4 months and counting….) Next posting – Track weathering, and ballasting. |
|
|
|
Post by metroland on Nov 4, 2015 16:47:22 GMT
Thanks. I've actually got 4(!) more updates in preparation.
I don't want to rain on anyone's parade but I get a bit irked when people put up their new layout/blog/gallery etc in a rush of enthusiasm and then don't follow through. I had decided not to post anything initially until I'd got enough to get beyond the prep work. Now I've got about 10 months progress there's a mini-mountain of writing to do. Hey ho....
|
|