Deleted
Deleted Member
Posts: 0
|
Post by Deleted on Feb 9, 2016 19:53:23 GMT
Thanks Metman Sadly I don't have much time to do my own kits or models these days but I thought I would share this one as I have been after one of these kits for some time. K's Kits Metropolitan A-Class white metal kit an early 70's model is quite a difficult thing to find and when you do they go for silly money on auction sites. Luckily this one I was offered on a forum, which hadn't been touched since purchase. 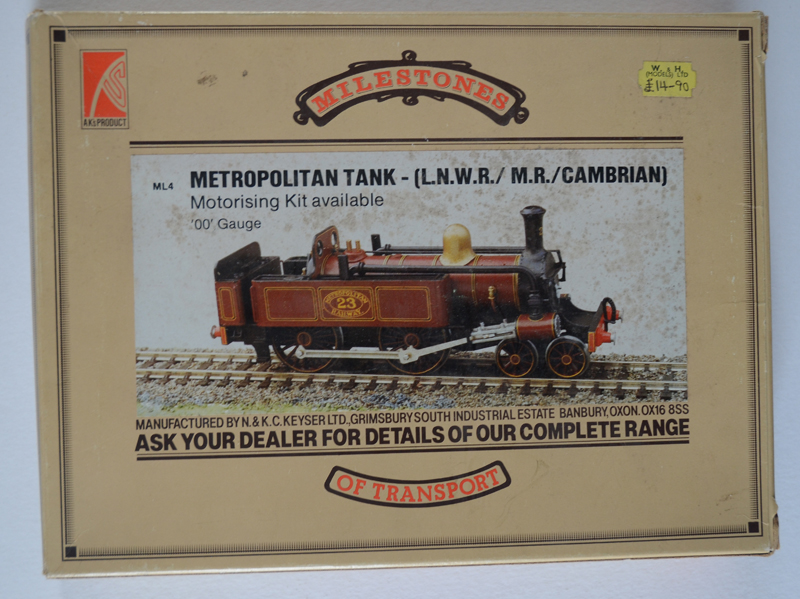 It's been a few years since I tried to get hold of one of these on eBay, which was part built but sadly missed out. moving on a year or so, I started following a topic on a forum, where I mentioned I was after one, luckily a member saw my post and he still had one of these K's Kits of a Metropolitan A-Class in its original box and packaging a kit which was manufactured in 1970. Purchased for £80, wishing the original price of £14.90 still was today's price, but considering how hard to get they are and how rare it is to still be in its original packaging, I didn't mind. The kits is mainly white metal, which a brass bar / plate chassis. Looking at the condition of the wheels it was clear that they required replacing due to the rust on them, but they were good enough to get some measurements for replacements. The kit will make 3 variations of the A-Class, one being number 23 which is preserved in the London Transport Museum in Covent Garden, which is the one I will be building. The list of items needed to get this kit modelling: - New wheels (Driving and Bogie) - Motor / Gearboxes - Detailing parts (brake rigging) - Various transfers ect... |
|
Deleted
Deleted Member
Posts: 0
|
Post by Deleted on Feb 24, 2016 16:09:14 GMT
Firstly new wheels were the order of the day, due to the rust on the kit originals, a visit to Scale Link sourced the driving wheels, 23mm (5.75 ft) but had to compromise on number of spokes as that was the only ones available. The bogie wheels were easier to get and were purchased from Mainly Trains, and made by Gibson (3 ft) During my return to the mainland and back in my workshop I managed to modify the rather bulky brass chassis fames, these were thinned down and the shape of them modified to some drawings of a metropolitan A-Class that I had come by on a web search, while the chassis sides were shaped I drilled holes to take some etched brake rigging as K's kits never had this detail It may be tough to get this to work but quite determined to detail this old kit. The screws and nuts on the kit were nylon / plastic.. I opted to replace these with brass ones, ordered from Eileen's emporium, 2mm and 2.5mm with various nuts and washers. Firstly I built up the running plate, tanks and bunker, the bunker needed quite a lot of refinements and fettling to fit together which is to be expected with some K's kits, everything was test fitted to make sure everything just about fitted. The body is made up 2 main parts the tanks, bunker and main running plate, and then the front assembly which bolts to the front of the chassis, and takes the smoke-box, cylinders and also boiler. 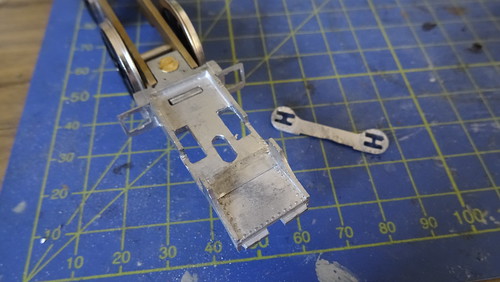 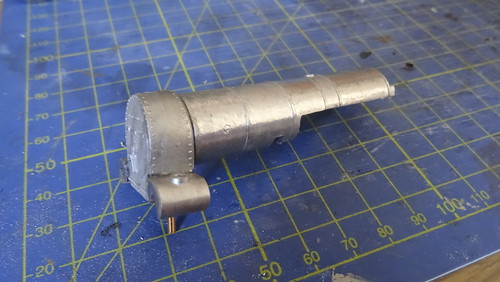 (Left: Front sub frame for smoke-box and cylinders, Right: Smoke-box, boiler barrel and cylinders attached, 2mm cheese head machine screw glued in place.) (Left: Front sub frame for smoke-box and cylinders, Right: Smoke-box, boiler barrel and cylinders attached, 2mm cheese head machine screw glued in place.)The main attention for adjustment on the above items was the boiler barrel in to the smoke-box and the slot under the barrel which locates on to the main body, which dictates the position on the smoke-box. Next was work on cylinders and slide bars, the slide bars do require some shortening, as you can see below, approximately 2mm was removed and the slide bar and brackets moved backwards. The sliders also required some cleaning up to allow them to slide freely. Once happy there were glued to the rear of the cylinder block. 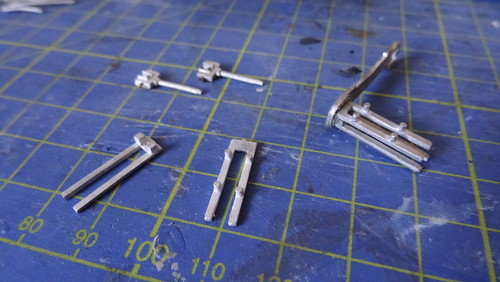 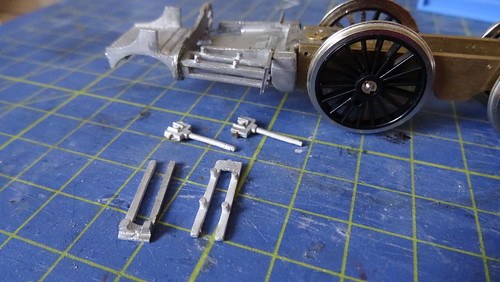 ( Sliders, and slide bars assembled and test fitted, required some trimming) ( Sliders, and slide bars assembled and test fitted, required some trimming) |
|
|
|
Post by rogere on Feb 25, 2016 13:14:14 GMT
I built one of these Keysers kits many years ago as a P4 loco, using the, then available, Mike Sharman wheels.
I still have another, obtained unbuilt, second hand, but without the box.
I had to replace the white metal sliders and bars after one season of running. I originally made my own, but they wwere not too successful. I then managed to obtain an underframe kit from IKB (do they still exist?), and this is still running perfectly.
John Redrup (London Road Models) modified one to run on London Road as the LNWR version, and I understand he scratchbuilt the chassis.
|
|
Deleted
Deleted Member
Posts: 0
|
Post by Deleted on Feb 26, 2016 21:10:25 GMT
Hello Rogere
IKB disappeared years ago (tried looking for them) some things were sold off sadly I don't think anyone is doing these kits or newer etched chassis wish there was, I have tried to improve it as much as possible although the chassis still requires a lot of work.
|
|
Deleted
Deleted Member
Posts: 0
|
Post by Deleted on Feb 27, 2016 15:02:29 GMT
Anyway carrying on...
Obviously you can solder white metal if you have the correct temperature controlled iron and low melt solder, if not you can always use Araldite which is what I will be using, in some cases small spots of super glue are used to hold smaller items together. The motion was test fitted and made sure the sliders ran smoothly and had no catching or resistance.
Continuing work on the boiler barrel as there are various holes for different variations of A-Class, as I am modelling No 23 which is on display at the London Transport Museum, and luckily a diagram of this model is provided and requires some filling due to the different position of the dome. So the first hole behind the smoke-box needs to be filled as well as 2 small depressions for the Salter springs for the safety valves.
While filling the hole I also added the chimney to the smoke-box which required some cleaning up. A small 0.8mm hole was drilled in the smoke-box to take the brass rod which has been bent in to shape.
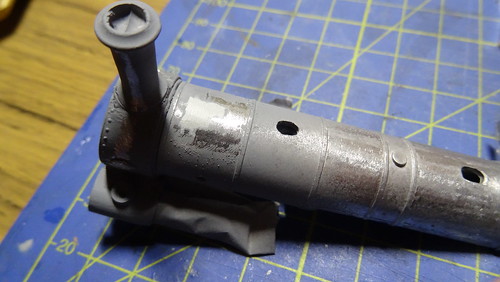 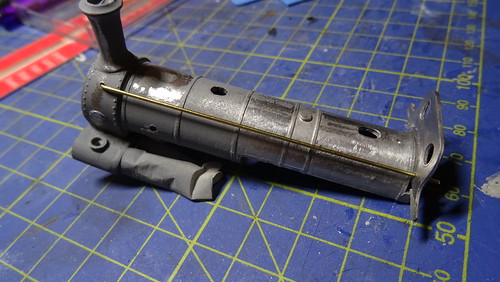
(Left: Small white patch of filler behind the chimney covering the additional hole. Right: Brass rod fitted to cab front)
I am a person who if I see an area that needs improving in terms of detail then I will go to the effort of changing it. My pet hate is moulded smoke-box door handles / dart, it's relatively simple and cheap enough to do, I order mine from Mainly Trains as I get 2 for the price of one from other places, these are made by Gibson and need a little trimming. All that needs to be done is remove the casting, drill a small 1.2mm hole to insert the dart in to the hole, then you can decide the look by deciding the positioned of the handles.
I added the cylinder covers to the cylinders while I was working on the front end.
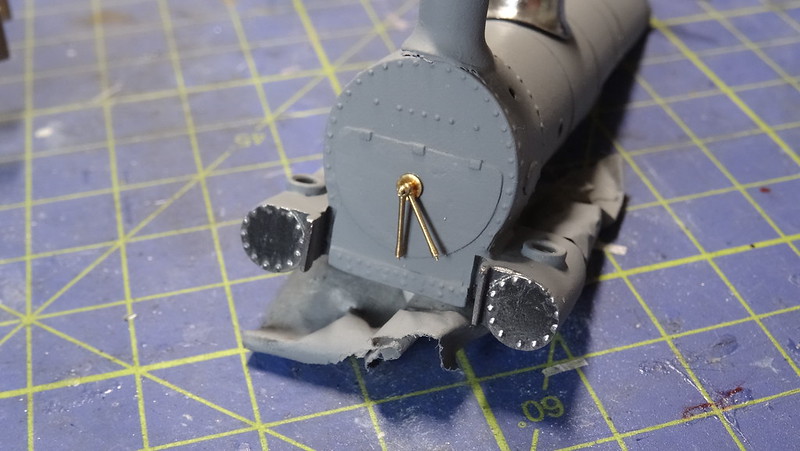
(old smoke-box cast dart removed and replaced with a turned brass version)
As mentioned a bit further up the page, the chassis plates have been shaped and also drilled to take etched brake parts, sadly there is nothing on the market that is close to what is actually on the loco. However things can be modified or bent to be exact.
Using 0.45mm wire to go through the chassis to act as the brake hangers, these were soldered on the chassis, the brake assembly comes from Mainly Trains (MT175) using the bottom row of brake blocks and then bending the ends to give it a curved profile. On the underside I used Mainly Trains (MT186) brake rigging etches to tie the two pairs of brakes together. These were all soldered together using an Antex 25 Watt iron.
But still a lot more to do on the chassis.
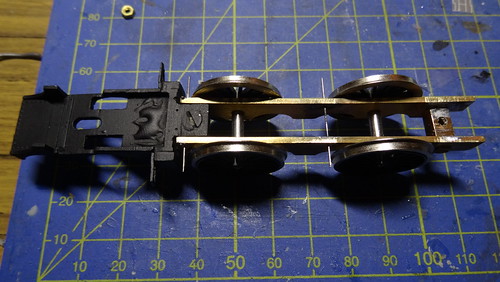 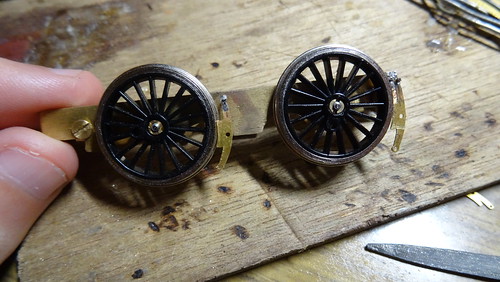
(Building up of the brake gear and rigging using Mainly Trains etches)
|
|
roythebus
Pleased to say the restoration of BEA coach MLL738 is as complete as it can be, now restoring MLL721
Posts: 1,275
|
Post by roythebus on Mar 1, 2016 11:30:31 GMT
I recently found my almost built one from many years ago, sadly minus a few parts, but complete with original Ks motor and wheels. the wheels will have to go as they're rusty and I may well use something like a Portescap motor and gearbox if ever I get round to rebuilding it. the use of etched brake gear is interesting as Ks never bothered with such details. ISTR mine was built with cab.
I've got a couple of Ks Black 5's for sale if anyone's interested, agin minus a few bits.
|
|
roythebus
Pleased to say the restoration of BEA coach MLL738 is as complete as it can be, now restoring MLL721
Posts: 1,275
|
Post by roythebus on Mar 1, 2016 11:43:42 GMT
These Chesham/Bluebell coaches are great. Some of the above comments show how important it is to maintain the information paper-trail when rolling stock is rebuilt, refurbished, restored or otherwise modified. The Met itself started the confusion by designing them for loco haulage, then converting them to EMU, then some back to steam haulage after WW11. The mention of Joe Brook-Smith took me back. In the mid '60s he got some way to producing a Met Bo Bo in 4mm to be made by the vacuum forming process. He estimated that the price of a couple of sides and ends would be around 7/6d (37 1/2p). This was way outside my budget at the time, so I lost interest. Does anyone know if anything did happen with this project? I bought a set of Brook-Smith Chesham coaches back in 1974 I think. They were some sort of vacuum formed sheet plasticard and were very well detailed. I never got round to building them as the daunting task of cutting out so many windows put me off. I threw away the set in the last 5 years as the plasticard had become very brittle. I remember meeting joe Brook-Smith back in the 1970s when I ran GS Models, producing cast metal bus kits. It was around this time that people like ABS, MOPOK and George Alan were producing revolutionary things like printed plastic sides for coach kits, etched brass was making an appearances, there was also Colin Massingham producing cast metal and aluminium coach kits. He also made an etched brass 1938 tube stock. I bought a quantity of these etchings but they are of such poor quality they were unusable. Mine ended up in the scrap box. pity as they had a good idea there, but the etches were heavy with rivet detail etched in instead of out and nobody seemed to use a straight edge when drawing anything, I also made an early Triang M7 into a representation of a a Met 0-4-4T at that time, I've got some pictures of it somewhere. |
|
Deleted
Deleted Member
Posts: 0
|
Post by Deleted on Mar 2, 2016 15:13:27 GMT
Seen a few people build MET 1 from a triang/Hornby M7,sort of inspired me to build mine on a newer chassis from Hornby plus I had one lying around for years, so might as well do something with it. Going back to the main body now adding additional bits and pieces. The tank vents were added as well as the steps mainly due to them possibly going missing if I didn't attach them at this point in time. Also added were the buffer castings, usually I replace these with sprung versions but the buffer housings are a bit different to what's available so I opted for the castings. 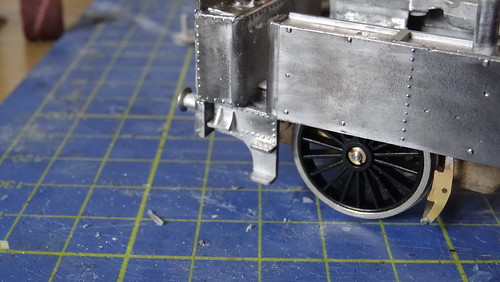 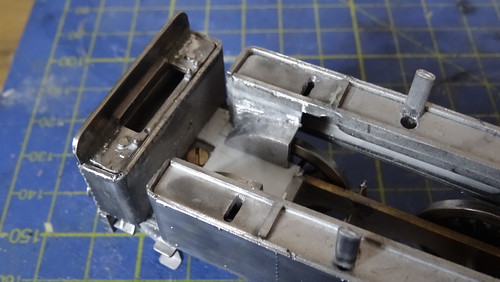 (Left: Cab space taking shape with splashers added, Right: The step castings were also fitted, to avoid losing them) (Left: Cab space taking shape with splashers added, Right: The step castings were also fitted, to avoid losing them)
Next came some more details, hand rails, the kit doesn't show hand rails on the front of the tanks but on the real thing there are. 1.5mm holes were drilled in the middle of the tank at the top and bottom, using short hand rail knobs and 0.45mm brass wire. A small amount solder to attach the wire to the handrail holder and the jobs a gooden. On the cab opening a handrail is required either side this time just using the wire, 2x, 0.45mm holes were drilled on the apex/mid way on the curve, these hand rails require a bit of glue or as mentioned before you can also solder them. 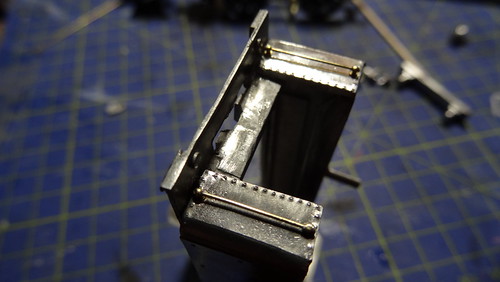 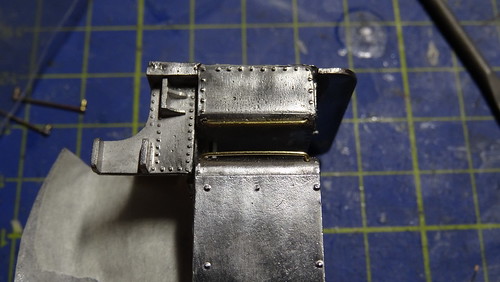 (Handrails fitted to the front of the tanks, and also on the cab opening) (Handrails fitted to the front of the tanks, and also on the cab opening) |
|
Deleted
Deleted Member
Posts: 0
|
Post by Deleted on Mar 8, 2016 20:00:21 GMT
I took a break from making things and went to painting individual components, I brought some new paint although I do use their varnish, Vallejo, these paints are water based paints but a lot better quality, easier to use, and great coverage. I have recently got a bit un-impressed with some of Humbrols paints recently, as they have been very thin and drying tacky despite following the instructions.
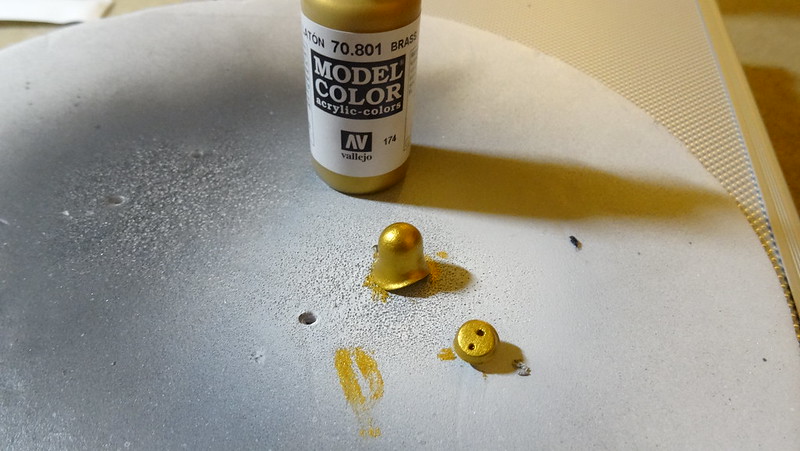
I decided to use, Black, Brass, Copper and silver from the Vallejo range as these are some of the worst from Humbrol, the picture below of the dome and safety valve housing after a couple of coats of white primer and one coat of the Brass Vallejo paint.
Meanwhile priming the main body and front sub frame continued, the front sub frame got a lick of satin black with red paint used in-between the frames, you can also see 2x 0.8mm holes drilled at the back of the sub frame which will come in to use later. The front buffer beam received a coat of buffer beam red.
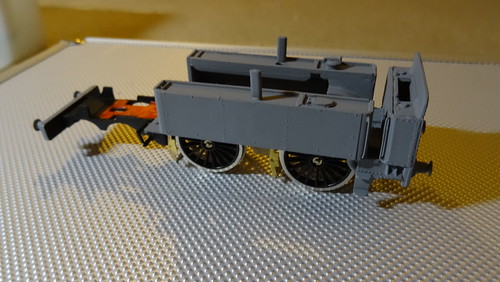 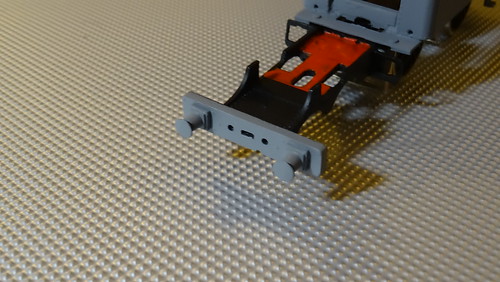
(Left: main body primed, ready for checks, Right: Sub frame painted, 2x holes drilled the rear for use later)
The boiler assembly was pre-painted due to access at the under the front end of the barrel, so this was painted with Phoenix paints London Underground maroon (P861), the smoke-box painted with Vallejo's black, it is very tight putting the boiler barrel in after but it was done for reasons explained above.
It also allows me to line up all the various brass rods and wires to replicate what is on the actual loco, and with access difficult to the back of the cab front.
Also fitted are some spare brass safety valves, which look a lot nicer than the cast ones that came with the kit, with the boiler in position I can check the alignment and fitting of the condensing pipes.
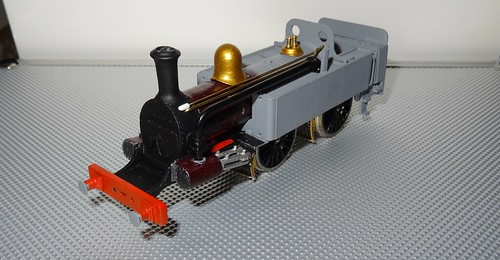 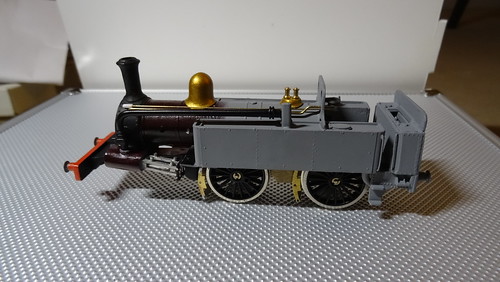
(Checking the alignment and fit of various components)
Once happy the boiler casting was attached to the main body, using Araldite to fix the 2 parts together. Once dry paint could then be applied on the rest of the models body. While this dried I could work on various updates and extra sections to the chassis.
Firstly the bogie swing arm, originally a casting was a bit cumber sum and large so I the decision to replace this by making a new swing arm out of some spare brass sheet, a 2.5mm drill was used to drill the hole in the brass, then using the template as guide I cut the new arm out and shaped it, soldering a 2mm nut to the top side of the arm.
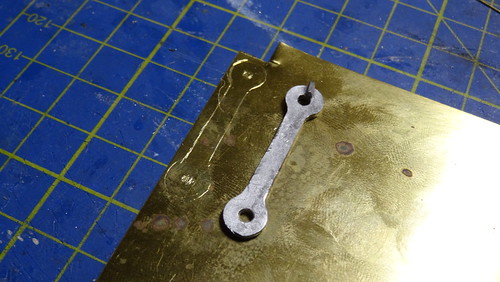 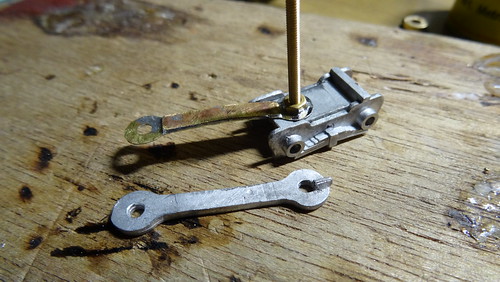
(New slimmer and more refined swing arm being test fitted)
|
|
Deleted
Deleted Member
Posts: 0
|
Post by Deleted on Mar 14, 2016 21:17:41 GMT
While working with the brass I continued with the main chassis, sadly the updated etched chassis by IKB have long since disappeared from the model scene, so I decided to try and update the chassis with what I had available. Firstly I made up some spring hangers and the bracket for at the rear for the brake gear/rigging, which is connected by 0.5mm brass rod, with 0.8mm rod between the rear brackets. You may also of spotted the vacuum brake cylinder fitted behind the step just for some added realism. 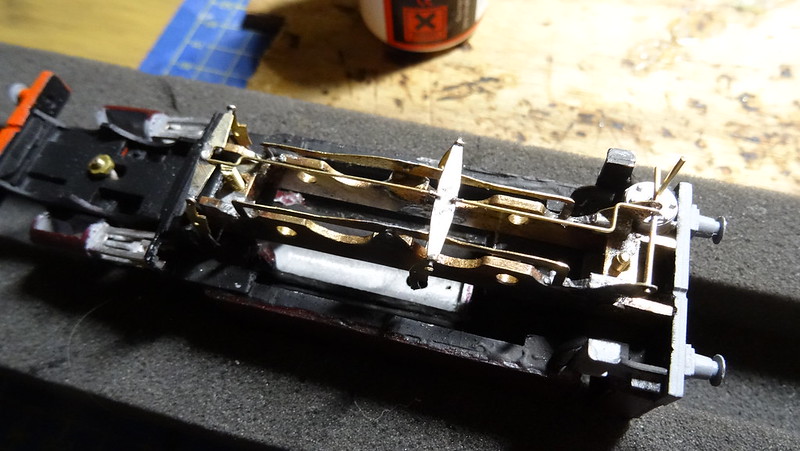 Next came the motor and gearbox, after some thought I went for High Level's Slimliner+ and 1024 motor which has a double ended shaft which is important for this model due to only having pickups on the main 4 driving wheels means it would need a Flywheel to help it a long on point frogs and dirt on the track. The gear set chosen for this kit was 40:1 The gearbox and motor come as a kit if you like and requires some assembly, but goes together quite well and runs nicely, shall look forward to seeing how it runs when it's all together. A flywheel has been ordered from Roxey mouldings and hopefully should arrive soon. 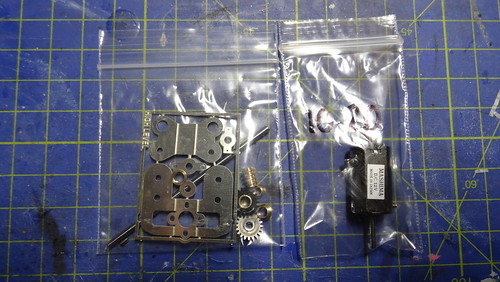 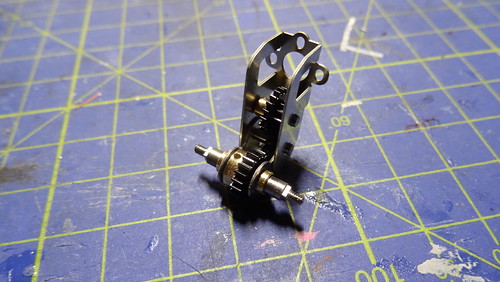 (HighLevel Slimliner+ gearbox with 1020 series Mashima motor) (HighLevel Slimliner+ gearbox with 1020 series Mashima motor)Carrying on with more chassis detail and prep for fitting motors, gearboxes and also the wiring, which is quite tricky at the rear due to limited space. The chassis had the spring support brackets and also various brake rigging and main support bracket at the rear. Also added was a support for the motor which was made from spare brass sheet, cut and soldered together, and soldered to the chassis.  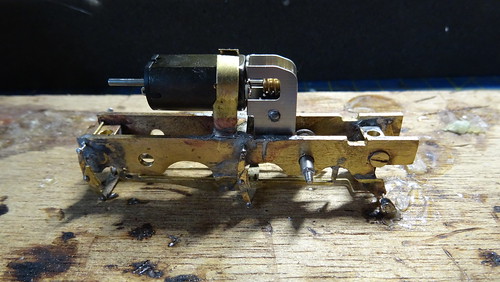 (New brass sections added, plus motor mount, small slots added at the rear for wheel pickups.) (New brass sections added, plus motor mount, small slots added at the rear for wheel pickups.) |
|
Deleted
Deleted Member
Posts: 0
|
Post by Deleted on Mar 22, 2016 19:34:22 GMT
Although the chassis pictured above has been built and run, and all appeared ok, a problem has developed meaning the chassis is twisted or a mounting point has moved so the chassis isn't square, I am currently looking at an alternative, but will take time, but I will post that at the end when I have all the bits. Anyway carrying on... Next was to clean/ degrease the chassis in readiness for pickup strips to be a fitted, then the chassis can be primed ready for paint, red for the middle of the frames and matt black for the outside. After the cleaning of the chassis I cut a strip copper clad board, measured out what I required, 2x 20mm for the front 2 wheels, and 2x 8mm for the rear wheels. These were then glued to the inside chassis with Araldite, when set these were covered ready for painting. 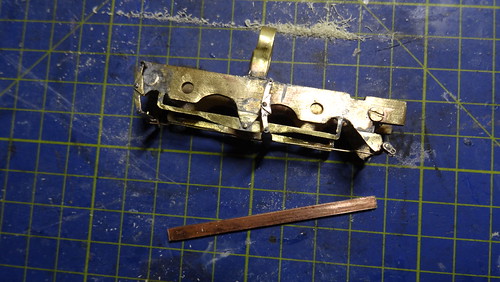 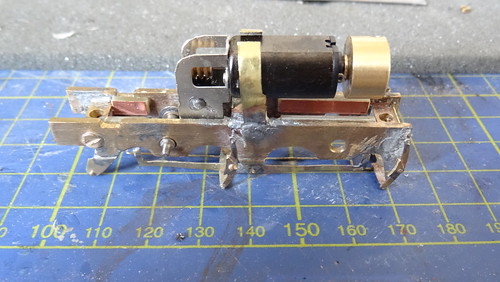 (Left: Pickup strip ready to be cut and fitted, Right: pickups fitted, plus motor / gearbox, plus the flywheel) (Left: Pickup strip ready to be cut and fitted, Right: pickups fitted, plus motor / gearbox, plus the flywheel)The chassis went for painting, meanwhile while this was drying the fun part began, lining, transfers arrived from Radley Models, sadly there is no certain transfer sheet for this model, Phil at Radley suggested the pannier lining sheet which I think also are the best suited, also ordered was a metropolitan insignia and numbers. These are just normal waterslide transfers so quite easy to deal with. 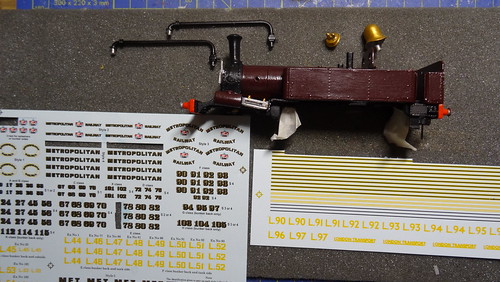 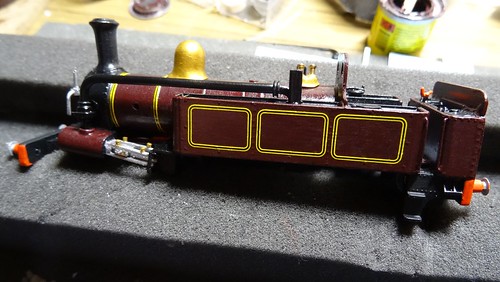 (Left: (Transfers from Radley, using metropolitan insignia and pannier lining. Right: Lining being applied) |
|
Deleted
Deleted Member
Posts: 0
|
Post by Deleted on Apr 16, 2016 23:40:40 GMT
After a day and a bit the lining was mostly complete just a few areas on the front and rear of the cab these were then sealed in with a light coat of varnish (Vallejo Satin Acrylic). Once dry small parts were then added (clack valves, pipe work, lamp irons, back head)
But for now back to the chassis, more parts arrived from Peters spares Phosphor Bronze strip 3/64"x7 1/4" (M2) was ordered for the back scratch pickups, these were bent at a 90 degree angle soldered to the inside copper clad board and then bent again down the outside of the chassis to pickup from the back of the wheel.
The chassis was then wired up but couldn't be test run yet as there was still a few things to do.
So next job was the wheels and it's crank pins, not using the original wheels with the crankpins already fitted using the new wheels required new crank pins, I use on most of my kits the Romford deluxe crank pins, which are screwed in to the wheel, with the pin itself being tapped for a small collared nut this means the holes in the rods must be enlarged to take the new pins.
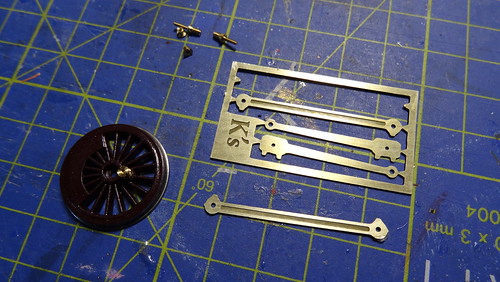 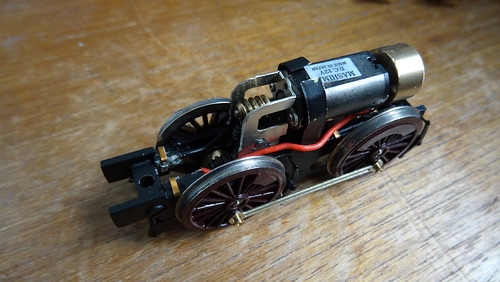
(Left: Romford deluxe crank pins, and rods. Right: The chassis mostly complete with trimmed flywheel + connection rods)
The chassis is test run to check for tight spots on the rods and crank pins there was a slight tight spot running in forward, so the rods need to be taken off and holes checked and opened up slightly to improve the running in forward.
While on the motion I found a problem with the next stage which is the connection rod between the wheel and cylinder slider, the problem became apparent when offering up the rod before fitting, the rod turned out to be 2mm to long which certain was a surprise. There isn't much material on the rod to drill another hole a bit further up but it's do-able if not it's quite easy to make a new rod from nickel silver sheet. The hole was moved back toward the wheel by 2mm, and a 0.7mm drill was used for the new hole, then de-burred to stop any catching or binding.
After the modification was done, the rest of the motion was re-assembled and surprisingly ran very well and smoothly, which was a bit of a relief.
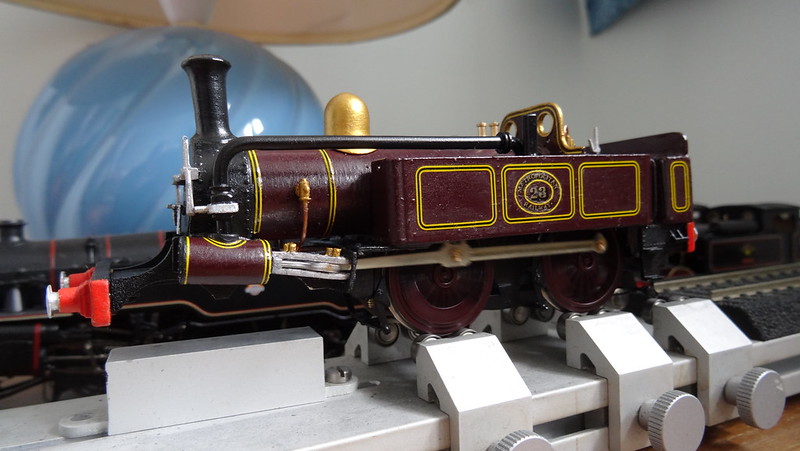
(On test on the rolling road, checking for tight spots)
|
|
Deleted
Deleted Member
Posts: 0
|
Post by Deleted on Apr 18, 2016 17:50:59 GMT
Final painting of small parts, like the various pipes and rods and also the front bogie assembly which is painted in Matt black, speaking of small parts I ordered a number of parts for the buffer beam which will be revealed soon, but I have sourced the vacuum pipes for the front and rear, I was going to fit some Romford braided pipes but no-one had any which was a surprise, so after a quick look I found some at Scale Link produced by W&T. These were bent in to shape using pliers and copying from images taken on my last visit to the London Transport Museum. Also added on the beams were the holders for the addition 2x chains either side of the main screw link couplings these additional chain holders were made from the good old split pins. A small hole drilled and the split pin cut down and glued in to position. 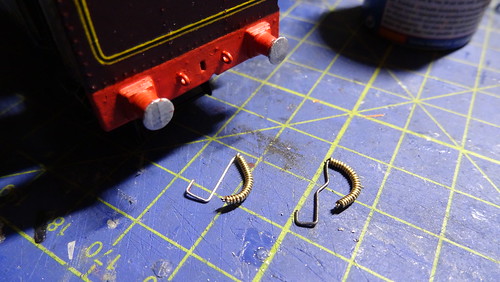 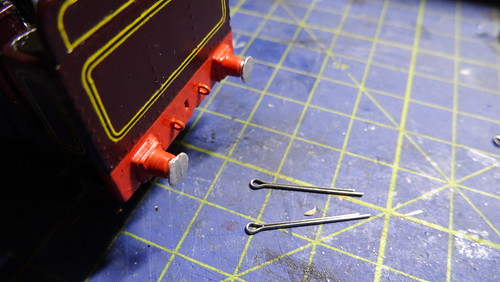 (Left: Vacuum pipes bent to shape produced by (W&T) Right: Additional chain holders made from Split pins) Another small part that needed finishing and fitting was the loco's back-head using my normal methods which you can now see on You Tube, the back-head casting is primed, sprayed with Matt black, and the various pipes, brass, water glasses and regulator handle are picked out by hand, using a mix of Humbrol paint and Vallejo. The small etched valve handles come from Mainly Trains (MT227). The back-head was test fitted to the model. 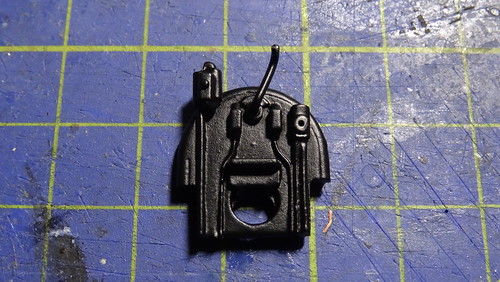 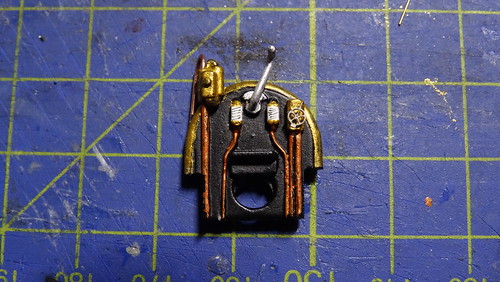 (Left: Painted in Matt black ready for detailing. Right: Detailed painted :Brass (70.801), Copper (70.999), Silver (70.997), White (34) 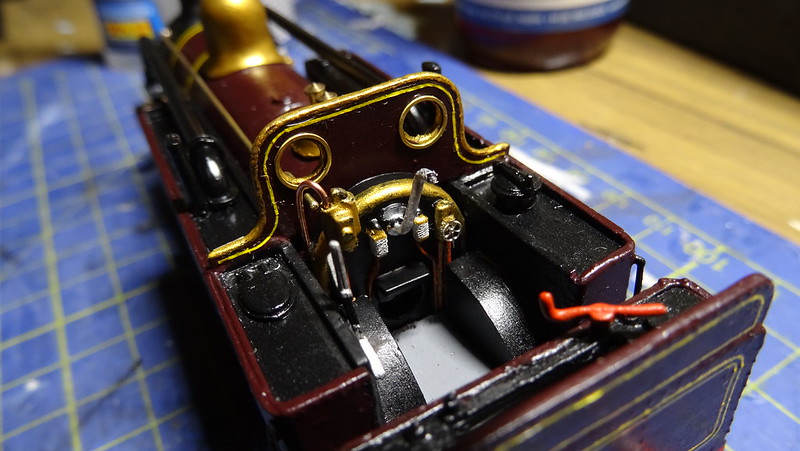 (Back-head test fitted to the model) |
|
metman
Global Moderator
5056 05/12/1961-23/04/2012 RIP
Posts: 7,421
|
Post by metman on Apr 18, 2016 19:12:09 GMT
This looks excellent. Looking forward to seeing this on your layout.
|
|
|
|
Post by John Tuthill on Apr 18, 2016 20:31:39 GMT
Final painting of small parts, like the various pipes and rods and also the front bogie assembly which is painted in Matt black, speaking of small parts I ordered a number of parts for the buffer beam which will be revealed soon, but I have sourced the vacuum pipes for the front and rear, I was going to fit some Romford braided pipes but no-one had any which was a surprise, so after a quick look I found some at Scale Link produced by W&T. These were bent in to shape using pliers and copying from images taken on my last visit to the London Transport Museum. Also added on the beams were the holders for the addition 2x chains either side of the main screw link couplings these additional chain holders were made from the good old split pins. A small hole drilled and the split pin cut down and glued in to position.   (Left: Vacuum pipes bent to shape produced by (W&T) Right: Additional chain holders made from Split pins) Another small part that needed finishing and fitting was the loco's back-head using my normal methods which you can now see on You Tube, the back-head casting is primed, sprayed with Matt black, and the various pipes, brass, water glasses and regulator handle are picked out by hand, using a mix of Humbrol paint and Vallejo. The small etched valve handles come from Mainly Trains (MT227). The back-head was test fitted to the model.   (Left: Painted in Matt black ready for detailing. Right: Detailed painted :Brass (70.801), Copper (70.999), Silver (70.997), White (34)  (Back-head test fitted to the model) Brilliant! |
|
Deleted
Deleted Member
Posts: 0
|
Post by Deleted on Apr 18, 2016 23:45:18 GMT
Many thanks for your kind words, It certainly got a bit more tricky a bit later on, as I found a chassis fault, so a replacement chassis has been put together.. which will feature later.
Hopefully it will look good on the layout and with the coaches, Won't be till the end of May till I get back to the layout
|
|
Deleted
Deleted Member
Posts: 0
|
Post by Deleted on Apr 24, 2016 21:44:46 GMT
With the front bogie complete and fitted with a coupling my attention turned to the rear of the model and fitting a coupling to it. On drawings and on photos I could see what I believe is a vacuum cylinder mounted at the rear of the locomotive, so I managed to scratch build this from plastic rod and bits of brass strip and 0.8mm brass rod. The rod will go up from the brass strips which go around the cylinder to 2x holes drilled in the chassis. The middle section was lowered / filed down by 1.5mm to fit the coupling and to be at the correct height. 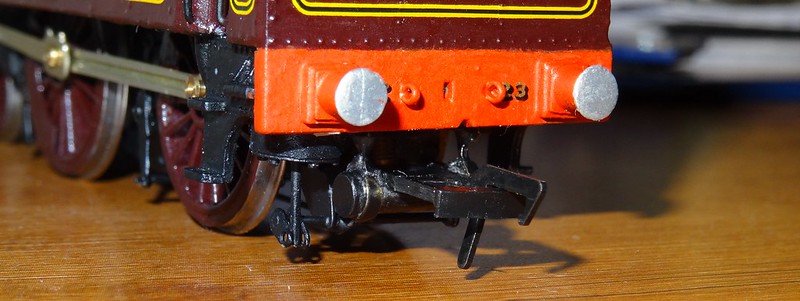 A couple of items missing from the rear are the guard irons, I have taken the decision not to put them on the front as there isn't enough room to put them in front of the bogie or even attached to the bogie. So I will be only putting them on the rear. The guard irons are fitted / mounted to the buffer beam, I have used some brass strip for these with the top section bent at 90 degree angle, 2x, 0.5mm holes were drilled to insert 2x brass rivets which were soldered in place, with the rivet still poking out the rear. 2X holes were drilled in the buffer beam for the mounting points for the guards, and the guards were then glued in place ready for painting. 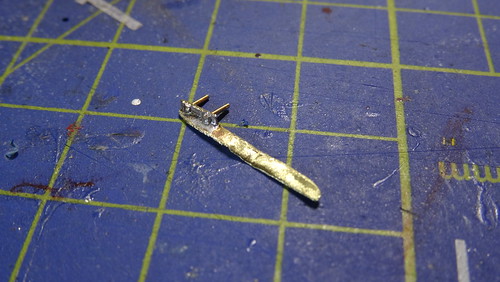 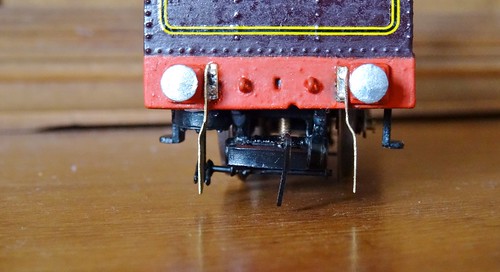 (Left: Buffer beam guard iron, Right: Guard irons fitted to the rear buffer beam, ready for painting) (Left: Buffer beam guard iron, Right: Guard irons fitted to the rear buffer beam, ready for painting)The buffer beam still requires some yellow + black lining similar to Maunsell coach lining around the outside of the beam, using fox transfers lining, again time consuming but will look good and will be worth it at the end. Other small items made before lining was the pipe work and whistle in front of the cab. Using some copper wire, a small handrail knob, and an old turned Tri-ang whistle to make up the assembly in front of the cab, 2x small holes were drilled in the V of the boiler casting and tanks to take the copper wire, the wire was soldered to the handrail knob, and old Tri-ang whistle was turned in a drill to try and get close to what is on the real thing, it was then soldered on to the top of the handrail knob, and then fitted. 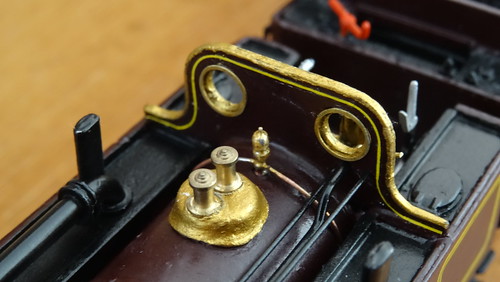 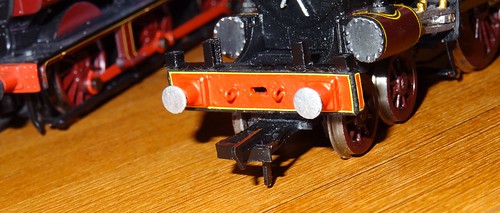 (Left: Whistle and pipe work fitted, Right: Lining added to buffer beams front and rear) (Left: Whistle and pipe work fitted, Right: Lining added to buffer beams front and rear)More items added to the buffer beams were the now painted W&T vacuum pipes, these fit very tightly over the beam and only require a tiny amount of glue to stay attached. Also added was some lamp irons, now this loco has some slightly different ones so I had to settle with what I had available to me or looked similar, I found some on a Mainly Trains (MT187) etch for lamp irons 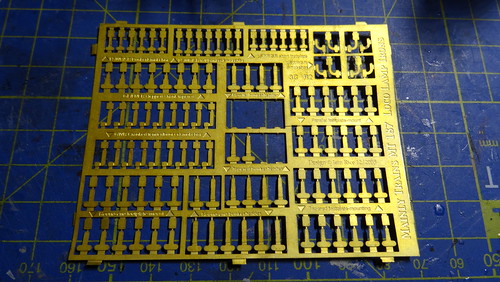 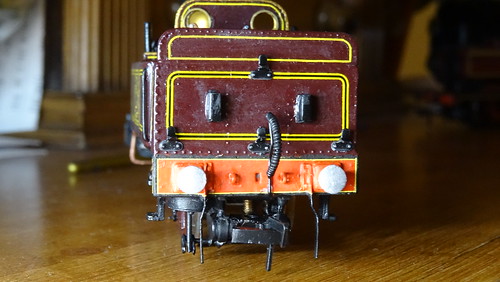 (Left :MT187 Lamp irons, GWR Parallel irons were used. Right: Glued in place on the rear, and one on top of the smoke-box) (Left :MT187 Lamp irons, GWR Parallel irons were used. Right: Glued in place on the rear, and one on top of the smoke-box) |
|
Deleted
Deleted Member
Posts: 0
|
Post by Deleted on May 7, 2016 22:30:17 GMT
Another small addition again all detail is the numbers mounted to the chimney, now they may not be 100% correct or accurate but they will do, using some etched numbers which I usually use for SECR locos purchased from Roxey mouldings some time ago, were added to the chimney with a small amount of super glue gel applied using a cocktail stick, and look the part. 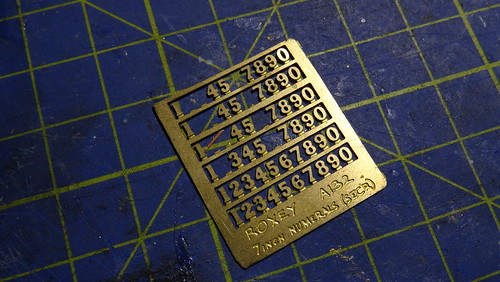 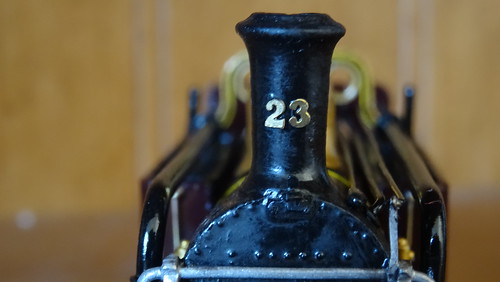 (Left: 7 inch SECR etched numbers from Roxey. Right: Numbers fitted to the Chimney) (Left: 7 inch SECR etched numbers from Roxey. Right: Numbers fitted to the Chimney)Next came a bit more pipe work, using the copper wire 0.6mm diameter, to make the pipe running from the underside of the tank bending round and then under the running plate / motion bracket. 4x holes were drilled 2x on the underside of the tank one on each side and 2x on the underside of the motion bracket and glued in place. 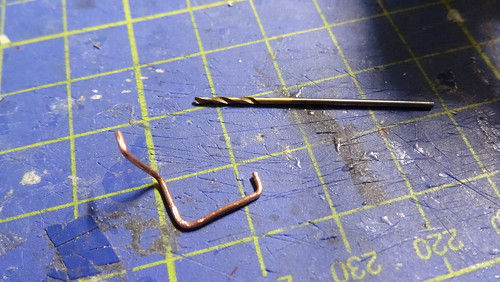 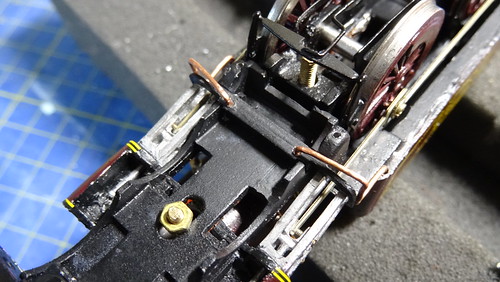 (Left: Copper wire bent to shape, 0.6mm drill bit. Right: Copper wire fitted to the model) (Left: Copper wire bent to shape, 0.6mm drill bit. Right: Copper wire fitted to the model)A few more items to go on, but that's after varnish, the model was spray with an Acrylic resin Satin varnish once fully dry the smoke-box was then brushed over with Matt Black (33) just to take the shine off the surface. The small items to be added to the buffer beam, screw link couplings and the 2 additional chains either side of the main coupling which attach to the cotter/split pins which were featured earlier on. The chains purchased from a well known auction site, 2mm fine chain blackened mainly used for jewellery like the copper wire. 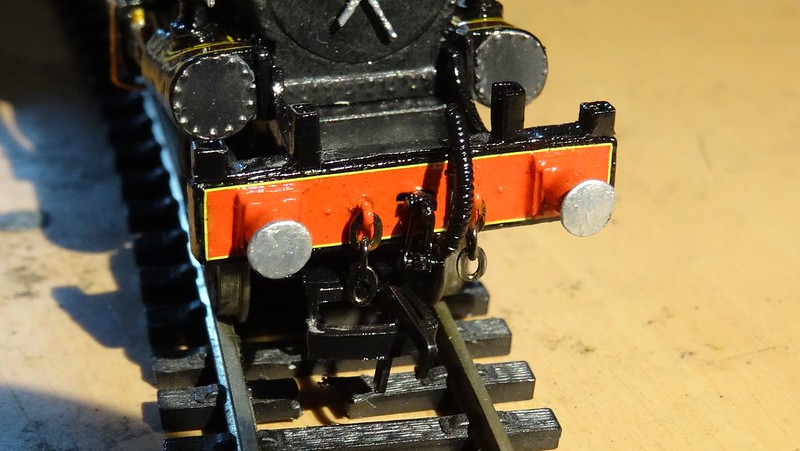 (Additional chains added either side of the screw link coupling) (Additional chains added either side of the screw link coupling) |
|
Deleted
Deleted Member
Posts: 0
|
Post by Deleted on May 20, 2016 17:45:05 GMT
- A new chassis - I took some time to review the chassis, although running, it still wasn’t running that well, the chassis was set up with a jig to ensure it was square, straight and level, and checked on a flat surface like mirror glass for example. Yet I still had some issue with the chassis being straight, either a mounting position was out, or an axle hole was out of position. No matter what I tried it still wasn’t right, despite improving it slightly the chassis was still rocking, with only 3 wheel flanges touching the surface. I took the decision to bin the chassis... fortunately thanks to a member on RMweb, pointed me in the direction of Alan Gibson workshop, who produce milled chassis frames, they do a Metropolitan A-Class but it’s not known if it will fit an old K’s kit, spacers, frames, and connecting rods were ordered late March. The frames and spacers arrived a week or so later, and after a few checks and measurements the Alan Gibson frames would fit with some adjustments and shortening as the frames spanned the full length of the loco. Some parts I made for the original chassis were transplanted on to the new chassis which went quite well. The new chassis is square level and runs beautifully, in addition to the new chassis I also purchased some new connection rods from Alan Gibson to replace the rather thick and had it etched rods from the K's Kit. There is a video on the building of the chassis which is available on my Workbench playlist on YouTube helping to pass on skills to new modellers: 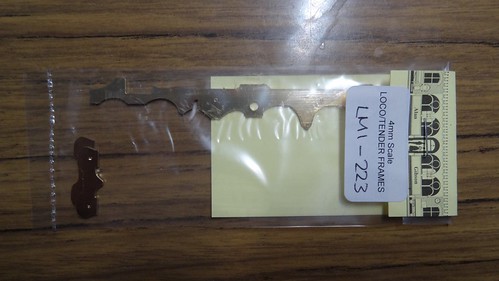 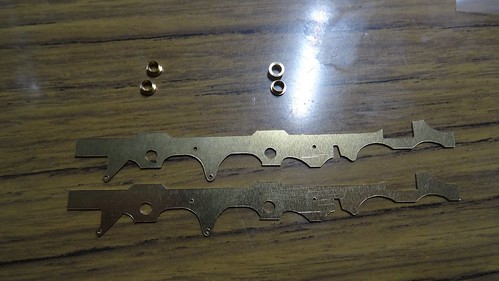 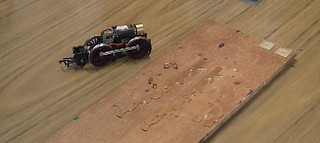 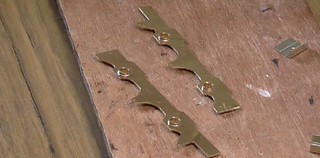 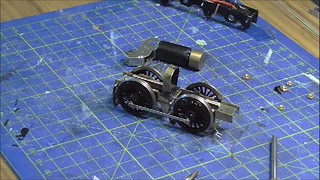 (Alan Gibson's chassis taking shape, to replace the K's original which had problems, possibly incorrect position of chassis screw fixings) (Alan Gibson's chassis taking shape, to replace the K's original which had problems, possibly incorrect position of chassis screw fixings)This is part is really just a bit of fun really, I wanted to make some destination boards which were fitted in to slots on the front buffer beam, and the rear of the bunker. I managed to get hold of a document which had the destinations written in the correct Font which correct backing colour, these were then put on to a photo editing software to adjust the size to fit the brass plates. These destinations were printed out on to transfer paper, and fitted to the brass. 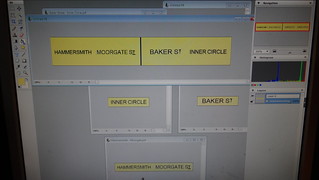 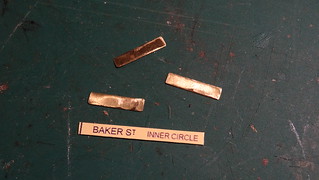 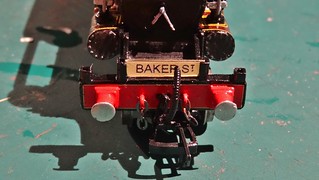 (Destination boards being produced for the A-Class held in brackets on the buffer beam and bunker) (Destination boards being produced for the A-Class held in brackets on the buffer beam and bunker)So with all the work on the chassis now complete and running nicely, and all the details done for this model, there is only one thing to do. Fit a crew add a bit of coal, and couple it up to some coaches. But before then I had an item arrive for it which I completely forgot about, ordered from Narrow Planet a pair of builders plates which are on either side of the bunker, just painted black which no highlights on the lettering. 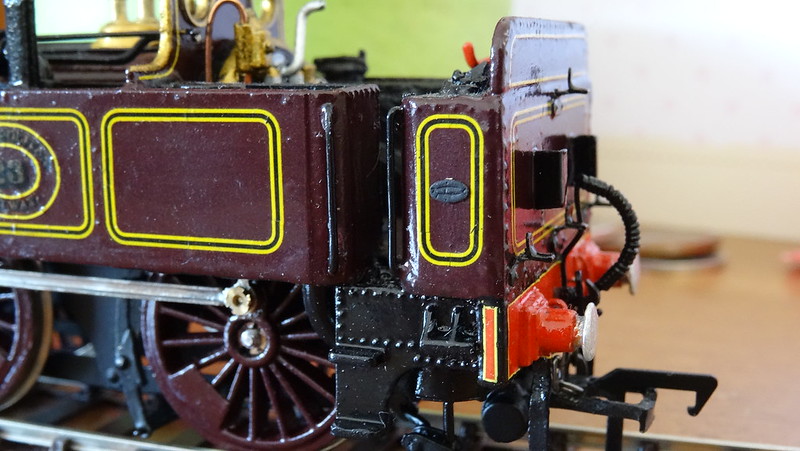 More Soon.
|
|
Deleted
Deleted Member
Posts: 0
|
Post by Deleted on May 31, 2016 11:25:56 GMT
|
|


